Blog

Coffee Loving Cardmakers – Cool Beans

Hello everyone! I’m up on the Coffee Loving Cardmakers blog today with this awesome and crazy cool beans birthday card. I was chatting with a crafty friend this weekend and she dared me to go wild and crazy with the Trinity Stamps coffee bean stencil. So I totally accepted and this is what I came up with.

To make this fun card, I started with the background by using Thermoweb transfer gel on the first layer of the Trinity Stamps coffee bean stencil. I let it dry overnight and came back with rainbow shattered glass deco foil. Then I lined up the second layer of the stencil and used black glitz glitter gel on the other half. I just love how this turned out!

Here’s a closer look at the top half of the colors. This is where I pulled the yellow from for one of my coffee cups from the Avery Elle cool beans stamp set.

And then here’s the bottom half where I pulled the blue from for my other coffee cup. I colored those, stamped my sentiments on the sleeves and the clear heat embossed over them. I used the coordinating dies to cut them out and moved on to assembly.

I started with a white cardbase, trimmed a black panel to 4 1/8×5 3/8 and glued it down. Then I trimmed the stenciled panel down to 4×5 1/4 and glued it down too. The coffee cups are popped up with foam squares.

It’s a crazy, fun card and I have plenty of crazy, fun friends who would get a kick out of this wild card.

I appreciate you sharing your time with me. Have a fabulous day!

Newton’s Nook June Release – Day 2

We’re back at it today with another fabulous reveal for you! Today we have…drum roll…GOATS! Seriously, these are adorable and the sentiments are so great! I had a blast creating with them just like I know you will!

Bleat

Again, I couldn’t stop and I created two cards to share with you today. The first one is really clean and simple so we’ll start there.

For this, I just trimmed down some white cardstock to 4×5.25, stamped my images and colored them with copic markers. The sentiment is a little sneak of what’s coming later in the week. I added black glaze pen to the eyes with white gel pen for highlights all over. Then I finished with a teeny bit of glossy accents on the bell and flower center. The panel is popped up with foam tape and the card is done. Adorable? I think so. ❤

This next card is a little more involved but it’s just soooo cute, it’s totally worth it and was so much fun to create!

Here I finally used the slimline frames and portholes dies. I cut the scalloped piece out of a melon cardstock and set it aside. Then I cut the portholes and a second panel out of white and inked them up with blue and green dye inks. I took the portholes and scored them about 1/4 inch in on different sides so each of my windows opens a different way. Then I placed them in my MISTI and stamped sentiments on them.

I took the images from Bleat, stamped them out and colored them with copics – multiples of some to fill in my scene. Then I used the coordinating dies to cut them all out. Next it’s time to assemble. Everything here is glued directly to the panels so nothing interferes with the portholes opening and closing. I used a strong tape on the porthole flaps and liquid glue on everything else. The porthole panel is popped up with foam tape on the scalloped panel and that is popped up on a white cardbase that measures 3.5×8.5.

And here is what you see when you open all those cool portholes up! Adorable goats ready to celebrate with the recipient! So much fun!!! I did a few finishing touches by added some glossy accents to things like the cupcakes and flower centers. I kept it simple so you could really focus on the fun portholes opening and closing.

Would you like to win the “Bleat” Stamp Set?This stamp set will be given away to ONE lucky winner!

Here’s how to win: Comment on the NND blog and Design Team blogs (see list below)! The winner will be chosen at random from the collective reveal posts. Make sure to check out each of their blogs and comment for your chance to win. You will not know which blog has been chosen so the more you comment on the better your chances are of winning! You have until Thursday, June 18th, at 9 p.m. EST to comment  — winners will be announced on the blog post on Friday, June 19th. 

Check out all the awesome Design Team Blogs below to enter:

Newton’s Nook Designs
Ellen Haxelmans
Larissa Heskett
Samantha Mann
Zsofia Molnar
Naki Rager
Maria Russell
Andrea Shell
Tina Smith
Tatiana Trafimovich
Amanda Wilcox

Newton’s Nook – June Release Day 1

I’m so excited that release week for Newton’s Nook is finally here! We all have some amazing inspiration to share with you this week created with another batch of incredible products from Newton’s Nook! Today we’re starting off with Farming Fun stamps and coordinating dies AND two versions of amazing slimline dies, Slimline Frames and Portholes and Slimline Frames and Windows. Check them out!

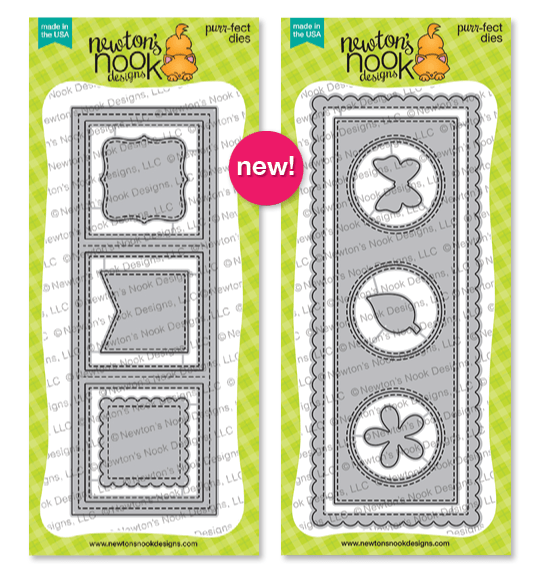
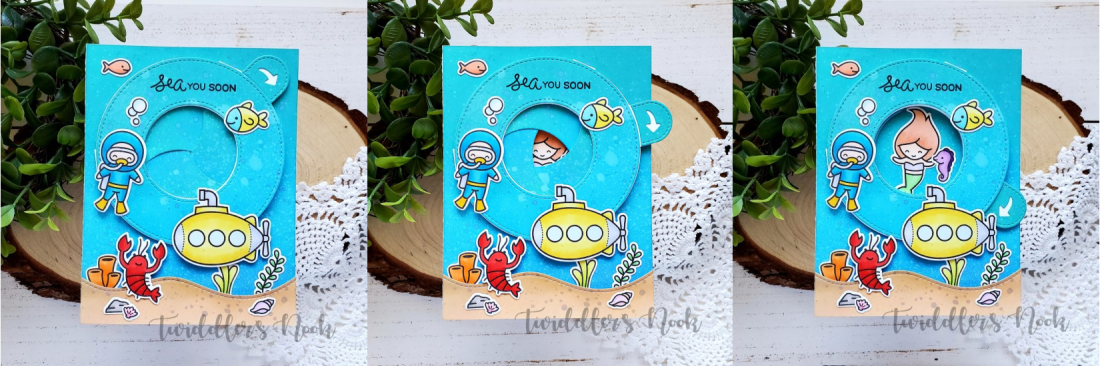
Slimline Frames and Windows along with Slimline Frames and Portholes

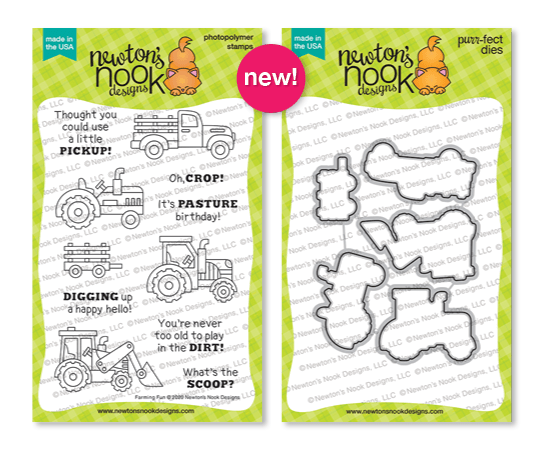
Farming Fun and Coordinating Dies

My cards today don’t feature the new slimline dies but I promise I have some fun ideas with those later on in the week. Today I have two cards featuring Farming Fun and some other awesome Newton’s Nook products. Here’s the first one.

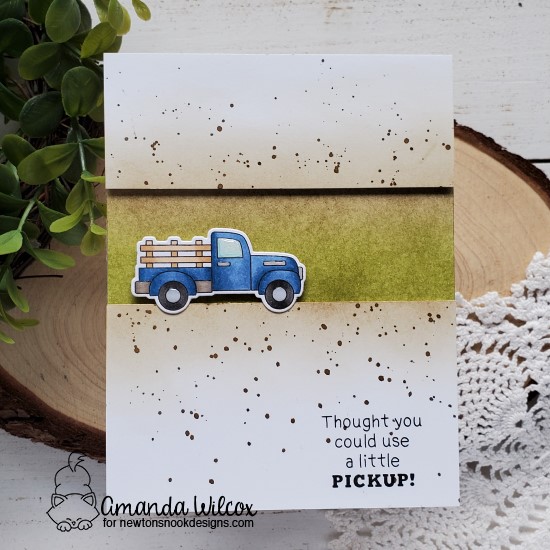
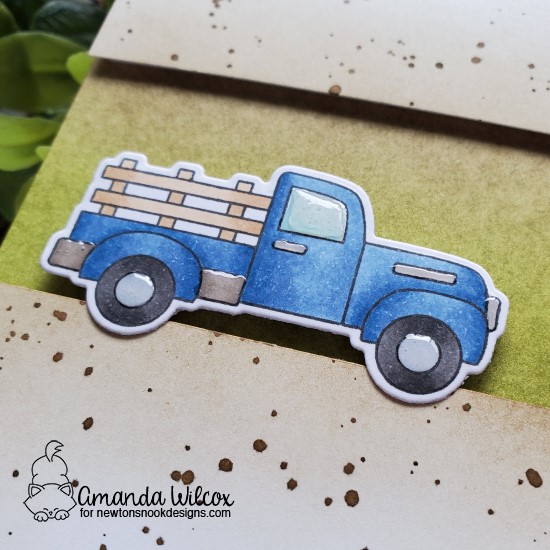
To create this card, I stamped, colored and die cut my truck. Then took a white cardbase and inked some dingy green and brown inks on it. I cut two strips of white cardstock – 4.25×1.5 and 4.25×2.5 and inked one edge brown. Then I splattered the panels with dark brown ink. I stamped my sentiment in the bottom right corner of the bigger one and attached the panels with foam tape. Then I attached the truck the same way and moved on to finishing touches.

I kept those simple with just some glossy accents on the window and “chrome” parts of my farm truck. I absolutely LOVE the puns in this stamp set. They are all so fun. Along with those awesome images.

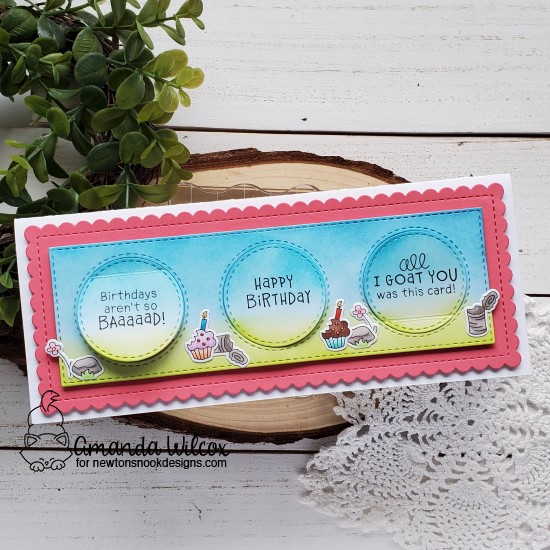
I was having so much fun with this set that I just kept going with a second card.

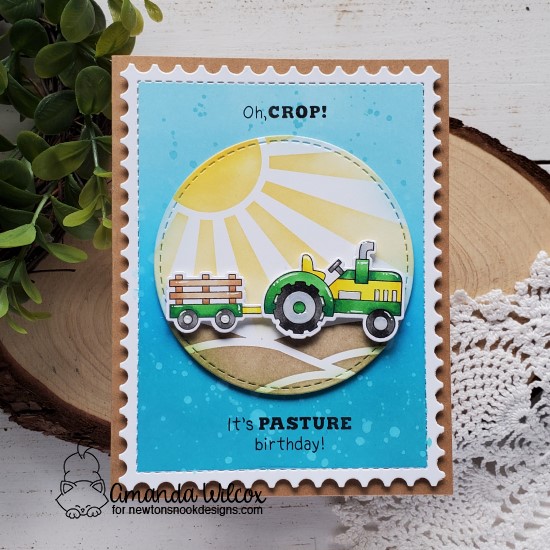
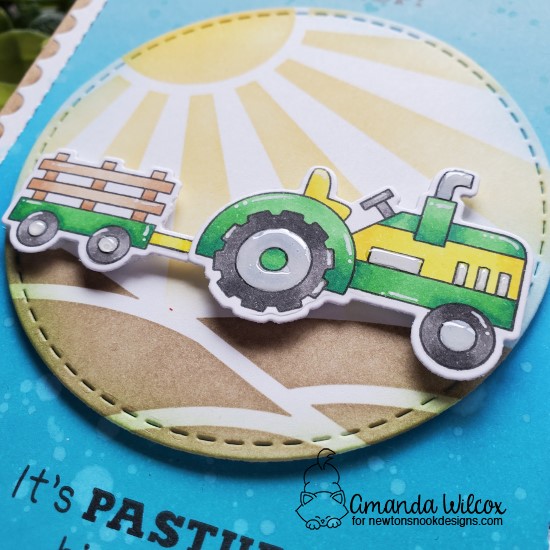
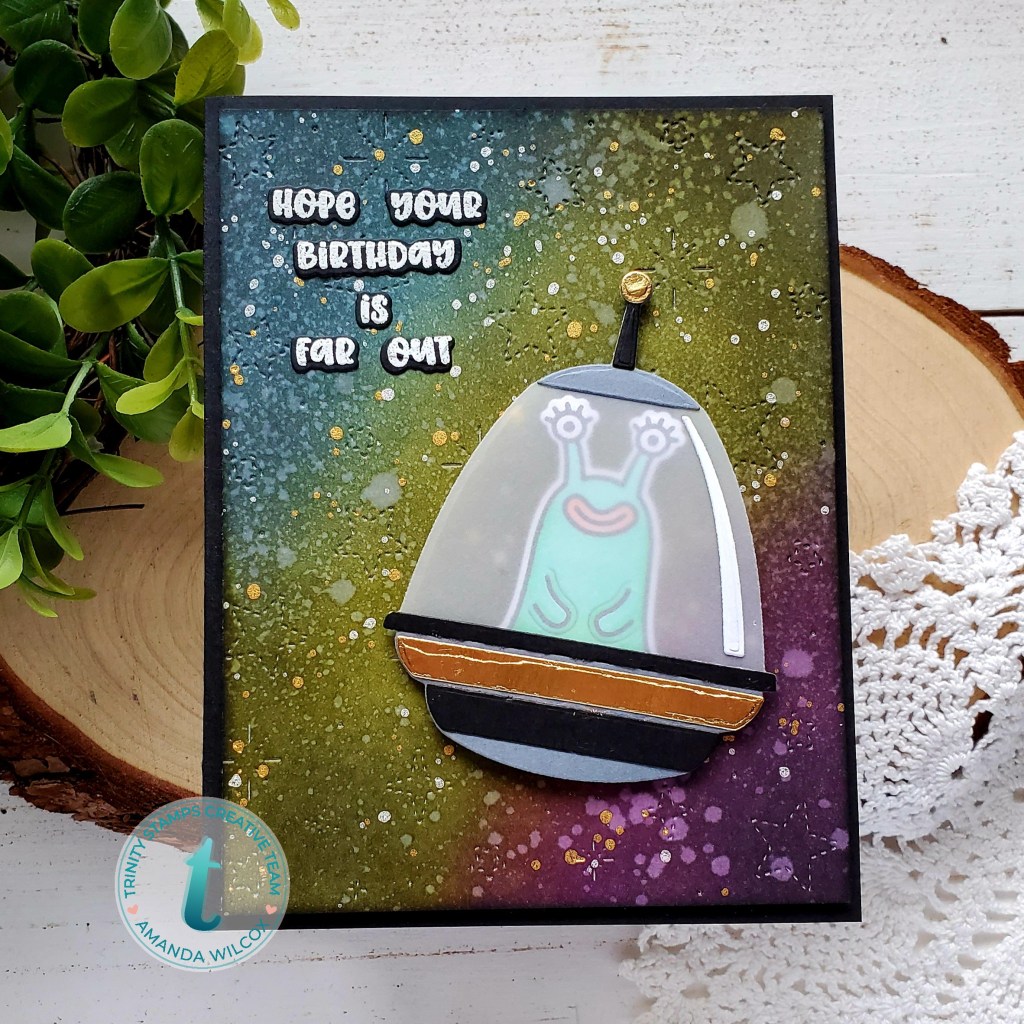
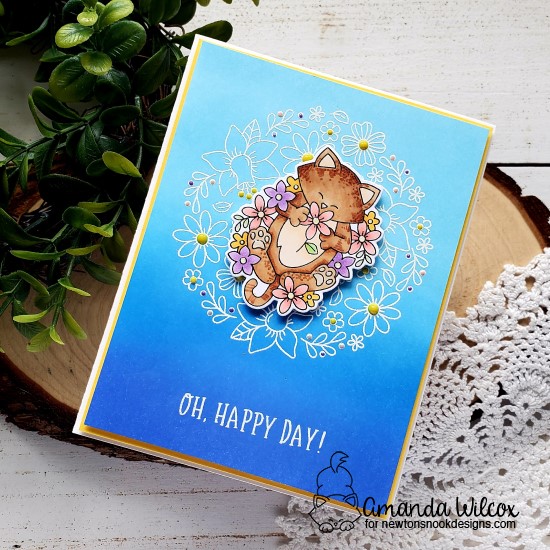
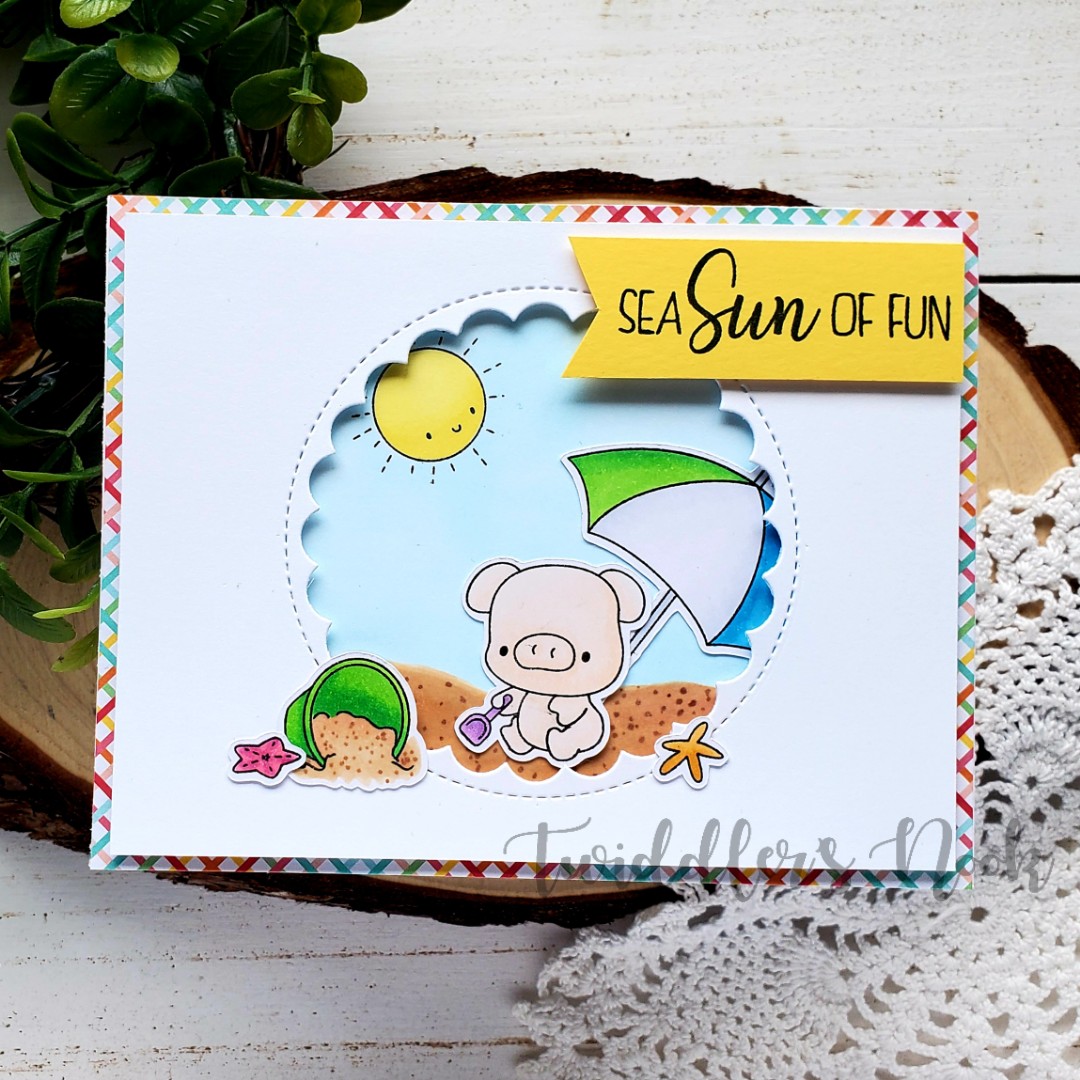
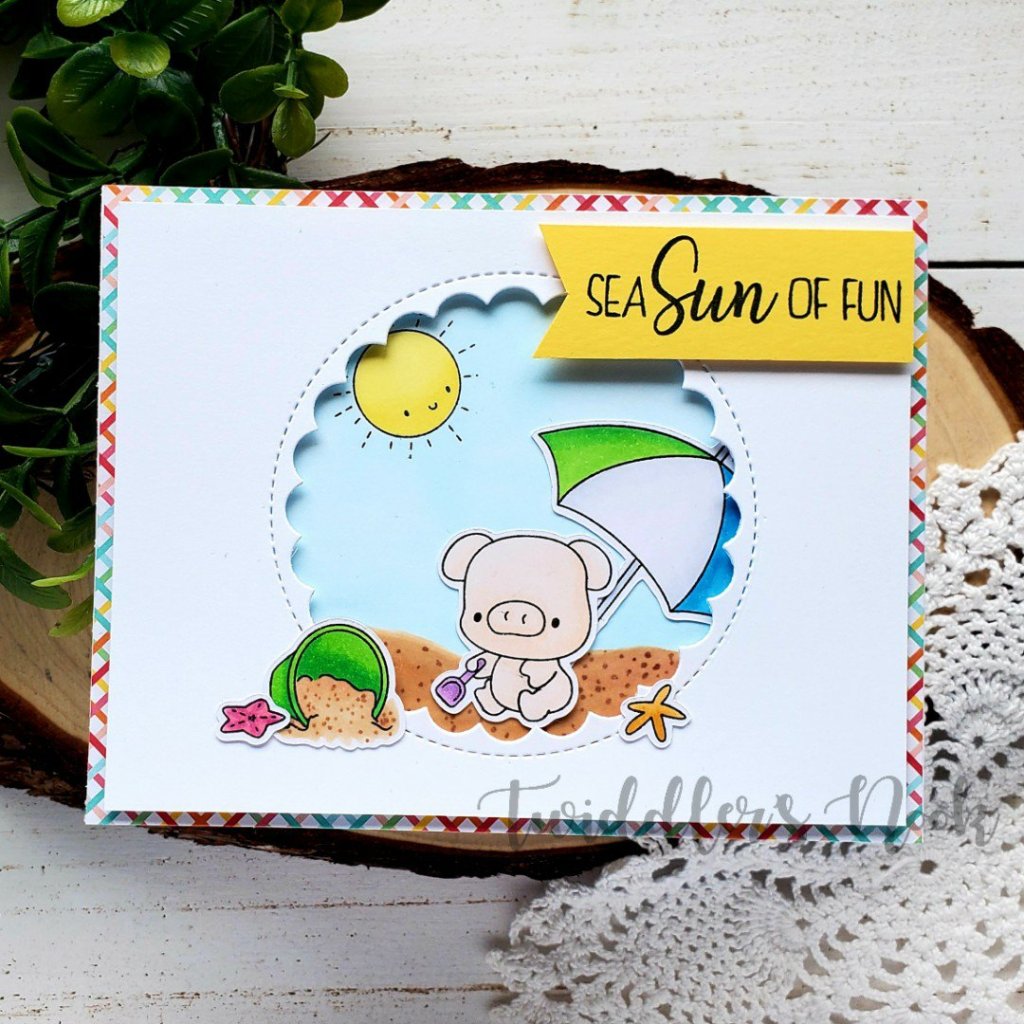
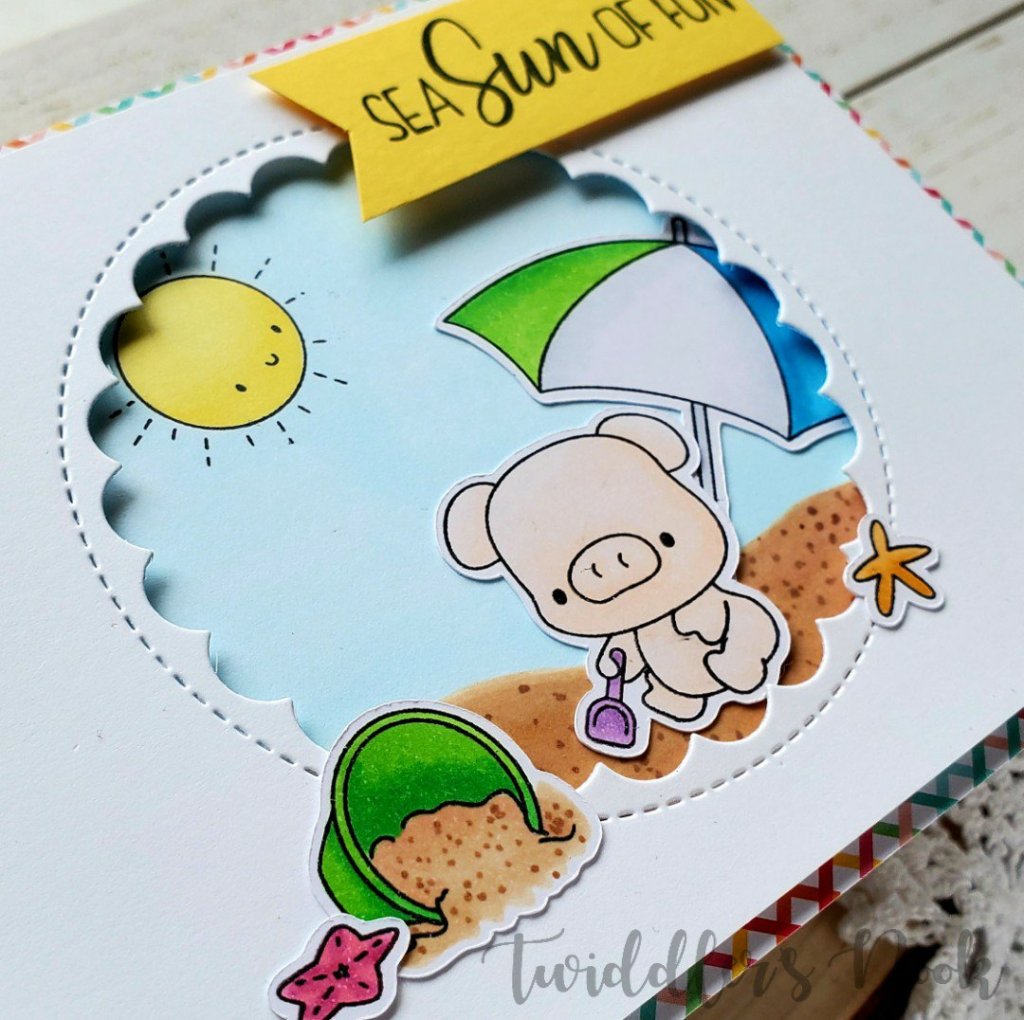
For this card, I chose one of the tractors and that cool trailer to color up and die cut. Then I die cut one of the Framework dies and a circle from Circle Frames. I taped of the framework cutout so I could ink only the center with my distress oxides – tumbled glass, mermaid lagoon and peacock feathers – and spritzed it with water. With the circle, I used the Sunscape stencil and some dye inks. I laid out my card to get an idea where I wanted to stamp my sentiments and then stamped them in black ink.

Moving on to assembly, I popped my inked panel up with foam tape on a kraft cardbase and then popped the circle up on that. The tractor and trailer are popped up with foam squares and then I added white gel pen accents. Last, I finished the card off with some glossy accents on those “chrome” pieces again.

This set is so much fun and makes it so easy to create boy cards of all kinds! It’s definitely going to be a staple in my crafting!

Would you like to win the “Farming Fun” Stamp Set? This stamp set will be given away to ONE lucky winner!

Here’s how to win: Comment on the NND blog and Design Team blogs (see list below)! The winner will be chosen at random from the collective reveal posts. Make sure to check out each of their blogs and comment for your chance to win. You will not know which blog has been chosen so the more you comment on the better your chances are of winning! You have until Thursday, June 18th, at 9 p.m. EST to comment  — winners will be announced on the blog post on Friday, June 19th. 

Check out all the awesome Design Team Blogs below to enter:

Newton’s Nook Designs
Ellen Haxelmans
Larissa Heskett
Samantha Mann
Zsofia Molnar
Naki Rager
Maria Russell
Andrea Shell
Tina Smith
Tatiana Trafimovich
Amanda Wilcox

Paperie Ink – Hello Sunshine Poolside

Happy Friday everyone! We made it through another week! Today I have a bright and happy card to share with you featuring a couple of newer release items from Paperie Ink and Spellbinders.

I fell in love with the entire last release Paperie Ink had and splurged on Mother’s Day to pre-order myself 2 of the new sets. This one – Hello Sunshine – had me immediately wanting a pool to put them in. Well, at almost the same time, Spellbinders had a new release and I picked up Pool with a View on my next ScrapbookPal order.

To create this card, I started with the background, inking picked raspberry and mermaid lagoon distress inks on a panel and spritzing it with water. Then I die cut the inner part of the pool and inked it with mermaid lagoon and spritzed it too. I die cut the outer part of the pool from gray cardstock and lightly inked the edge with black soot for a little dimension and moved on to my images.

I chose a couple of critters and flowers from Hello Sunshine and paired them with leaves from Toucan Party. I colored these with my copics and used my scan-n-cut to cut them all out. Then I started working on placement.

Once I had an idea, I used my MISTI to stamp the sentiment and started adhering images with liquid glue. I find this works best with panels that have been inked with distress or distress oxides.

Finally, I moved on to finishing touches which were pretty simple. I added white gel pen accents throughout the images, glossy accents to the noses and flower centers and Unicorn Stickles to other flower centers. I also used black glaze pen on the bunny’s eyes to help them shine a little.

This card has me dreaming for summer and a week by a pool with no adulting necessary! Maybe someday. Haha!

I appreciate you sharing your time with me. Have a fabulous day!

Trinity Stamps – Far Out Birthday

Welcome! Have you heard of the Crafty Troop Challenge? It’s a theme challenge held each month over on the Trinity Stamps blog. This month the theme is birthday! All you have to do to play is create a card using Trinity Stamps products (even just one) that fits the theme and upload it using the InLinkz widget at the bottom of THIS POST. You have a chance to win a Trinity Stamps gift certificate! Today I’m over on the Trinity Stamps blog with this far out birthday card inspiration featuring some fun products that I am using for the first time!

I had a general idea of what I wanted to create so I jumped right into my background. I blended peacock feathers, mustard seed and picked raspberry distress inks on a 4×5.25 panel and then went over the whole thing with black soot. I spritzed it with water and then splattered silver and gold watercolor for extra stars. After that dried I ran it through my die cut machine with the starry skies coverplate. This die only gives the stitching detail which is so much fun!

Next I pulled out my make-a-spaceship dies and had a blast cutting out and building my own spaceship! I used vellum for the largest spaceship die and then various colors for the rest. My favorite are the shiny gold accents. Because my spaceship has a see-through window, I decided to put one of the Monster Love monsters inside for fun! I popped this up on my starry sky with foam squares and moved on to a sentiment.

I chose a sentiment from Otter Space – heat embossed it and used the coordinating dies to cut it out. I love that about this set – the words have dies too! Then I used liquid glue to attach them to my sky too!

Finally I popped the whole panel up on a black card base with foam tape and my card is finished. I had so much fun creating this card with so many different techniques!

I appreciate you sharing your time with me. Have a fabulous day!

Coffee Loving Cardmakers – National Iced Tea Day

Hello everyone! Today is National Iced Tea Day and we’re celebrating with a fun inspiration hop and a giveaway with the Coffee Loving Cardmaker’s team today! Be sure to head over and check out the fun HERE! More details at the bottom too so keep scrolling!

Here’s the fun card that I made! I combined a few awesome Super Sponsors together to make this fun cup of iced tea. I took the cup from Paper Smooches Caffeinated and added the glasses from the set. Then I switched over to Trinity Stamps Coffee with Character for the ice cubes and lemon wedge. I stamped and colored everything and then used my scan-n-cut to cut it out.

Next, I took a white cardbase and a couple of Trinity Stamps stencils – foundations circles and catching some rays – with a variety of yellow inks and my blending buddy brushes! I used the medium yellow ink and stamped the lemon wedge from Coffee With Character across the card front from top left to bottom right. I chose a sentiment from Clearly Besotted Spilling Tea and stamped it in black on the bottom right corner and attached my images with foam squares.

Last, I added some fun finishing touches like glossy accents to the cup glasses and lemon wedge and Wink of Stella glitter brush pen to the ice cubes. I also decided on a scattering of Nuvo Crystal Drops in dandelion yellow mixed in with the lemon wedges in the background.

Such a happy, fun card and also a fun farewell to Paper Smooches who just announced the retirement of the shop. You might want to head over there and pick up your wishlist goodies while supplies last. She’s having a sale until everything is sold out.

And just a reminder to head over to the Coffee Loving Cardmakers blog to find the complete list of links to hop along. Comment for a chance to win a $15 gift card to your choice of one Spring | Summer Coffee Lovers Blog Hop Super Sponsor. The winner will be chosen from one of the comments on any one of the blogs so be sure to comment on each to increase your chances of winning!

I appreciate you sharing your time with me. Have a fabulous day!

Newton’s Nook – Oh, Happy Day!

Hello there! I’m up on the Newton’s Nook blog today with this really simple but pretty card featuring some new goodies from the May release.

To create this card, I inked up a panel with distress oxide – tumbled glass, salty ocean and blueprint sketch. Then I heat embossed the floral roundabout and a sentiment on the panel. After that cooled I trimmed the panel down to 4×5.25 and set it aside.

I knew I wanted to use this image from Newton’s Flower Garden so I inked it up and colored it with my copics. Then I used the coordinating dies to cut it out. Moving on to assembly I quickly decided that I didn’t like the boring white frame from the cardbase to the inked panel so I added another layer of yellow cardstock in between. This panel is cut down to 4 1/8 x 5 3/8.

For assembly, I added foam tape to the yellow and inked panels and adhered them to a white card base. Then Newton is popped up with foam squares in the center of the embossed image and I moved on to finishing touches.

For those I used Nuvo Crystal Drops in the flower centers and open dots in the floral roundabout design. Then I used clear Nuvo Crystal Drops on the colored image for that usual glossy sheen I like.

I think Newton looks so content laying in the flowers. So peaceful and happy. I love it! I hope you enjoyed today’s card.

I appreciate you sharing your time with me. Have a fabulous day!

Birch Press Design – Friend, You are Awesome

Hey everyone! I hope your week is off to a good start! I’m up on the Birch Press Design blog today with this awesome friendship card.

I love these colors together and really love how they pop off of the stark white background. If you’d like to see a step-by-step how I built this card, head over to the Birch Press Design blog and I’ll walk you through it all.

I appreciate you sharing your time with me. Have a fabulous day!

Lawn Fawn – Sea You Soon

Words can’t even begin to express how excited I am that #1 today’s card exists for me to share with you and #2 it was sooooo easy and incredibly fun to assemble!!!

Okay, now to make a little more sense…I recently bought the Lawn Fawn Magic Iris dies from ScrapbookPal. Since it came, I have been researching and watching all the videos from different crafters putting it together. It seemed doable but I was skeptical after another not-so-happy run in I had with a past interactive die of theirs. However, this is the real deal and they totally did an amazing job designing this so you can actually succeed!

To create this awesome underwater scene I started with lots of paper and my distress oxides. I inked up 2 quarter sheets with peacock feathers and mermaid lagoon, splattered them with water and then flicked blueprint sketch on them as well. Then I took the 3 sausage pieces for the iris and inked those up the same way. I took a scrap and inked it with tea dye and gathered twigs and flicked some gathered twigs on it for texture.

Then I moved on to lots of die cutting! To be specific, I cut out all the pieces needed for the magic iris mechanism. Be sure to check out the main Intro to Magic Iris video for assembly instructions. Then I used the stitched hillside borders to cut the brown inked panel for sand.

After everything was die cut, I set it all aside and stamped my images which were from Mermaid for You and You are Sublime. I colored them with my copics and used the coordinating dies to cut them all out.

I started by attaching my background panel to a card base and then the sandy ground to that with foam tape. Then I glued down my magic iris mechanism and started adding images.

I used liquid glue to adhere them all down because I find that works better on the distress oxide panels. Then I popped my whole card in my MISTI and stamped the sentiment at the top of the magic iris frame.

I’m so incredibly excited how this card turned out! I now have a whole list of ideas so I don’t forget them and can’t wait to make more and share them with everyone!!!

My daughter and I can’t stop playing with this one. Seriously, it’s so fun to watch that mermaid appear over and over again! Soooo much fun!

Do you enjoy making interactive cards? If you’re not a crafter, do you enjoy getting them? They are my favorite to create and most of all to give, especially to my non-crafty friends who think I’m some kind of witch when I make paper do fun things. hahaha!

I appreciate you sharing your time with me. Have a fabulous day!

Paperie Ink – SeaSUN of Fun

Oh my goodness, the art that Paperie Ink creates just seems to get cuter and cuter with each release! This last time I ordered two new sets. I had a moment to ink up the cute little piggies from Seasun of Fun this week and create a fun, sunshiny card to share with you!

I started this card with a general idea of what I wanted to create so I stamped my images and colored them with my copics. Then I used my scan-n-cut to cut them out. I trimmed down a white panel to 4×5.25 and used the next-to-largest outside in stitched scalloped circle from Lawn Fawn to cut a window. I also trimmed a second panel down smaller than that and stamped the sunshine where I wanted it to peek through the window. I used my copics to color a little sand and sky and started assembling my card.

I trimmed down some patterned paper and adhered it to a card base, then added my scene to that. I put foam tape on the back of the window panel and used it as a guide to line up my images and adhere them. Once those were in place I removed the release paper and put my window panel in place.

Finally I added the couple of images I had left to the front of the window. I just love the way this looks – like the scene is spilling outside of the opening.

Last, I stamped the sentiment on yellow cardstock and trimmed it in to a flag. This was popped up with foam squares and adhered to the upper right of the card.

I could seriously squeal over these piggies! They are just so cute! I can’t wait to ink up the rest of the set, along with the other one I picked up too!

I appreciate you sharing your time with me. Have a fabulous day!