Hey friends! Popping in real quick to share the winner from the National Coffee Day hop with the Coffee Loving Cardmakers.
Thank you to all who took the time to check out the shop, new and returning, and commenting with your favorites! The time you take out of your day to participate is appreciated and the comments really do help me know what people might like as far as themes and products in general.
Now…drum roll for our winner please…
Congratulations Debbie! Please email me to claim your prize.
Hello everyone! I’m here today with a little sneak peek of a set coming in the new release from Miss Ink Stamps on Saturday! It’s been a while and this release is definitely making up for it. It’s so full of amazing things!
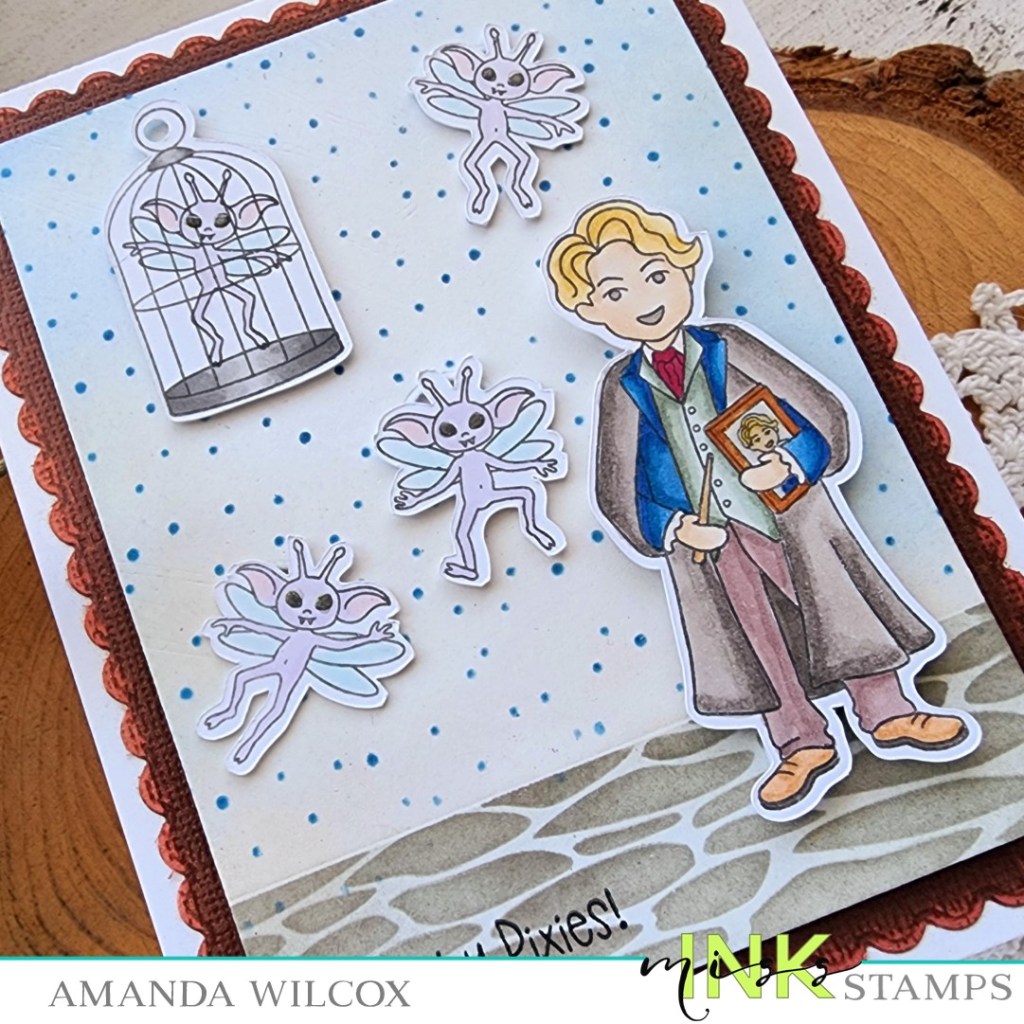
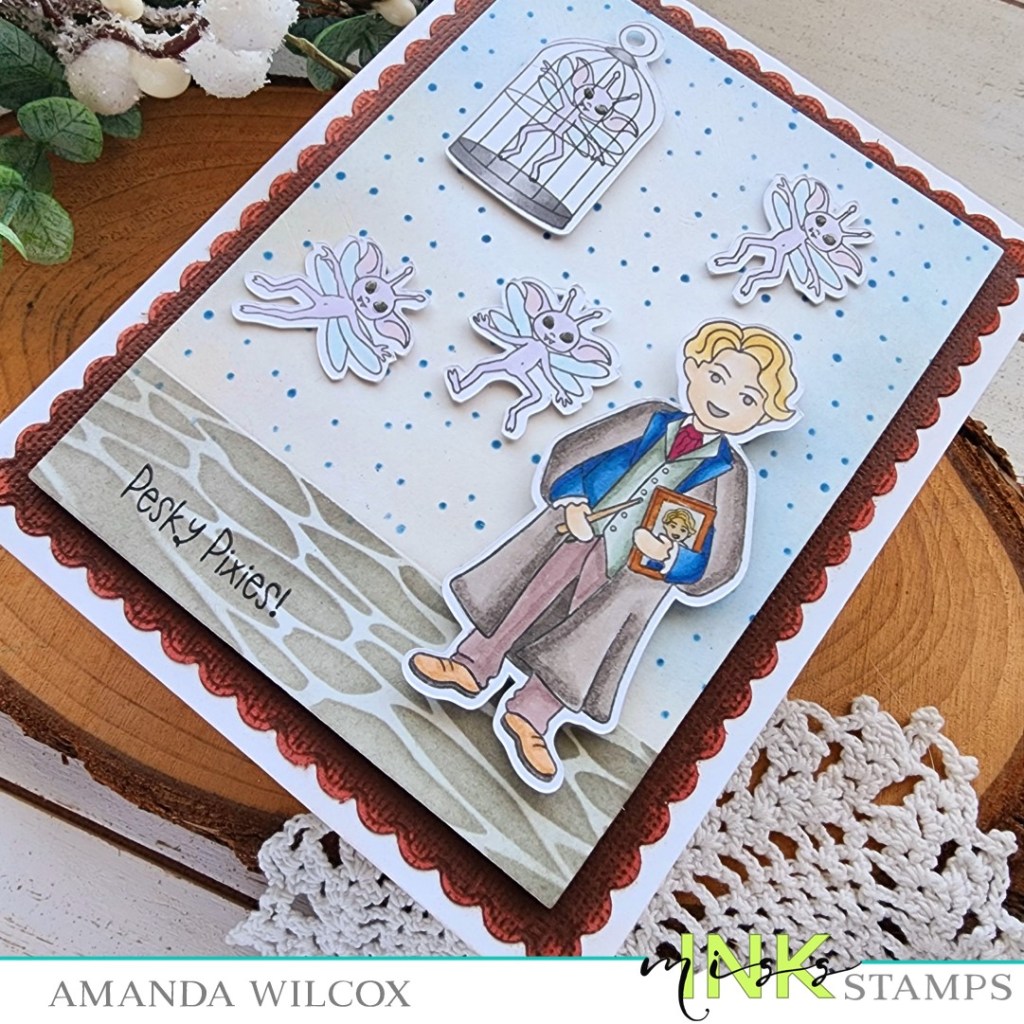
Today I have a card featuring the new set – Dark Arts! These are just a few of the images in this large set. I had a blast creating this card. When you jiggle it all the pixies, including the cage, float around.
I did this by simply adding circle foam squares to the back of the images, die cutting small holes (bigger than the foam circles) in the background panel, pushing the foam on the image through the hold and attaching a larger circle on the back. Then I lined the back of the panel with foam tape, keeping it away from the moving parts and adhered it to the card front.
Stay tuned on my Instagram later this afternoon for a little slo-mo video of it in action. It’s super fun!
Also, while you’re on Instagram, check out my post and hop around for a chance to win from the new Miss Ink Stamps release!
Hello everyone! Apologies that the blog has been sparse lately. I was really busy prepping for the Keeping it Crafty Retreat and then really needed some recovery time before I felt productive in the craft room again.
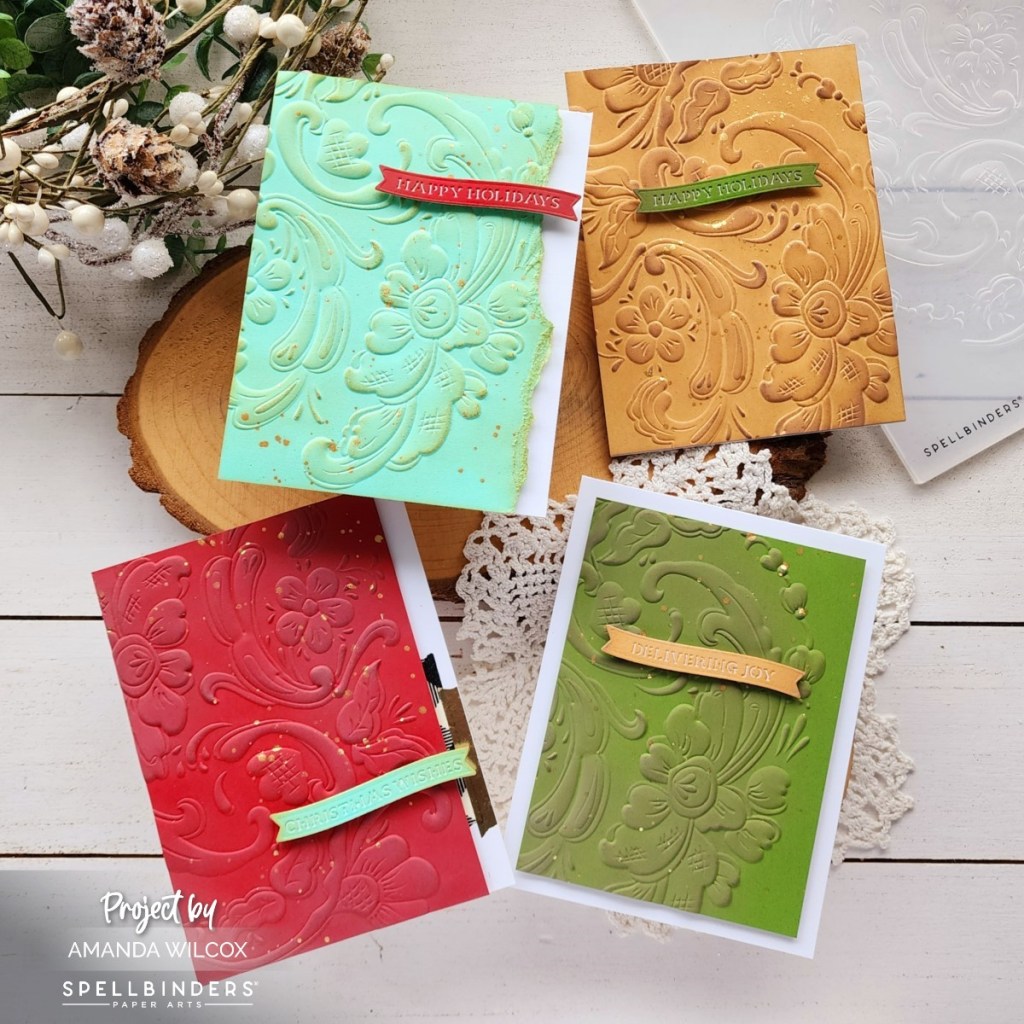
I’m back though and today I’m sharing a set of cards I created with very minimal products but if you use them differently, you don’t get bored with the design and can get different looks too!
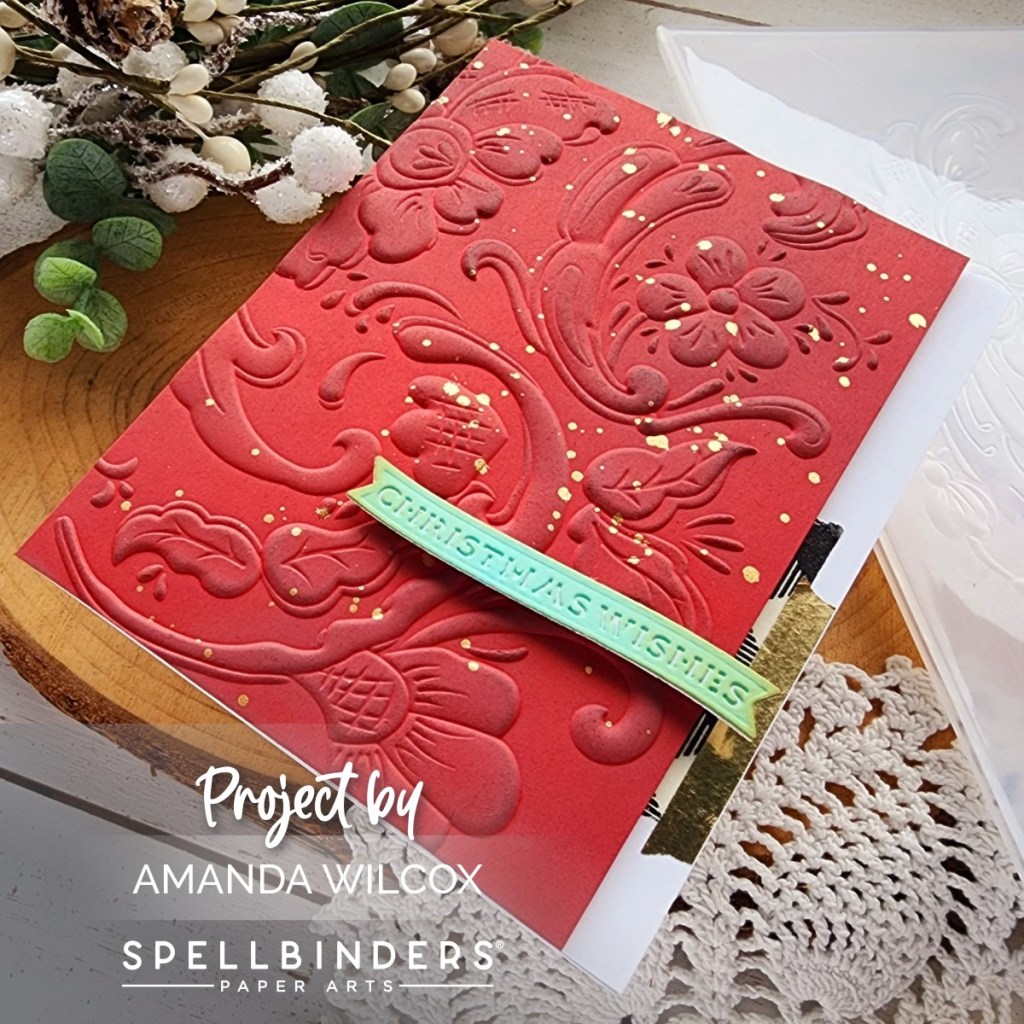
I’m highlighting the Spellbinders Norwegian Rosemaling 3D Embossing Folder and the banner dies from the Delivery Joy die set for all 4 cards I’m sharing today. I also used the same 4 colors of cardstock throughout, mixing and matching the combos.
I started with A2 pieces of each color cardstock and ran them through the embossing folder. This is a large embossing folder so I was able to move my cardstock around each time and emboss a different section of the print.
After each was embossed, I went over the panels with gathered twigs distress oxide ink and splattered them with gold watercolor. It gives the embossing depth and you know I like my sparkle.
This first card was just trimmed to 3.75×5.5 inches and popped up on a white card base with a teal sentiment banner. I slipped a couple of strips of washi tape on the edge for a little interest.
This panel was trimmed to 5×3.75 inches and also popped up on a white card base. This time I put the sentiment banner front and center.
This idea is like the red one but instead of neatly trimming the edge I tore it off and went over the tear with the distress oxide blending foam again. It’s popped up on a white card base and paired with the red sentiment banner hanging off the edge of the tear.
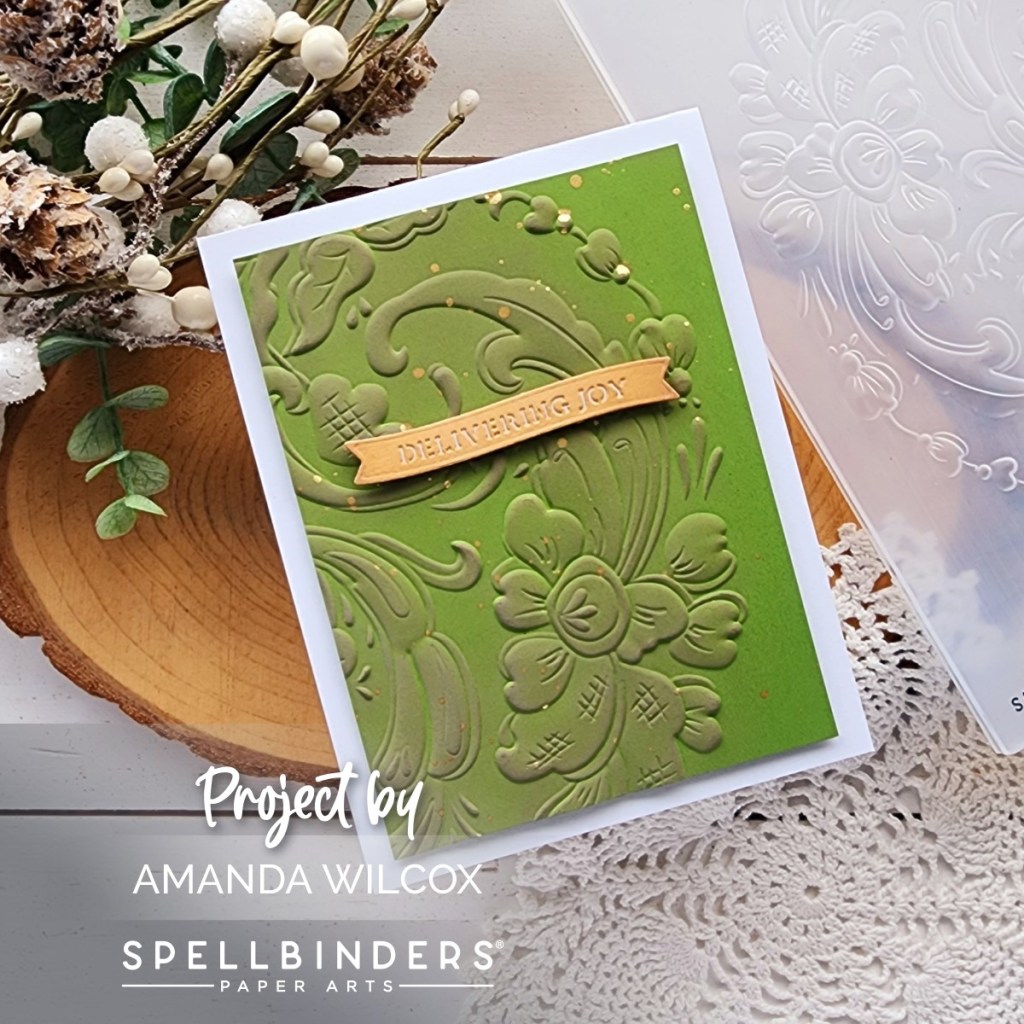
Last but not least, I went with a full card front glued directly to the base with the sentiment banner front and center like the green card.
Head on photos never show the shimmer of metallic watercolor so here’s a look at that too. It’s amazing how much something this simple adds in real life when someone is opening a card. It’s naturally moving in the light as they pull it out and it’s immediately noticeable.
I hope you’ll give this idea a try and have some holiday crafting fun!
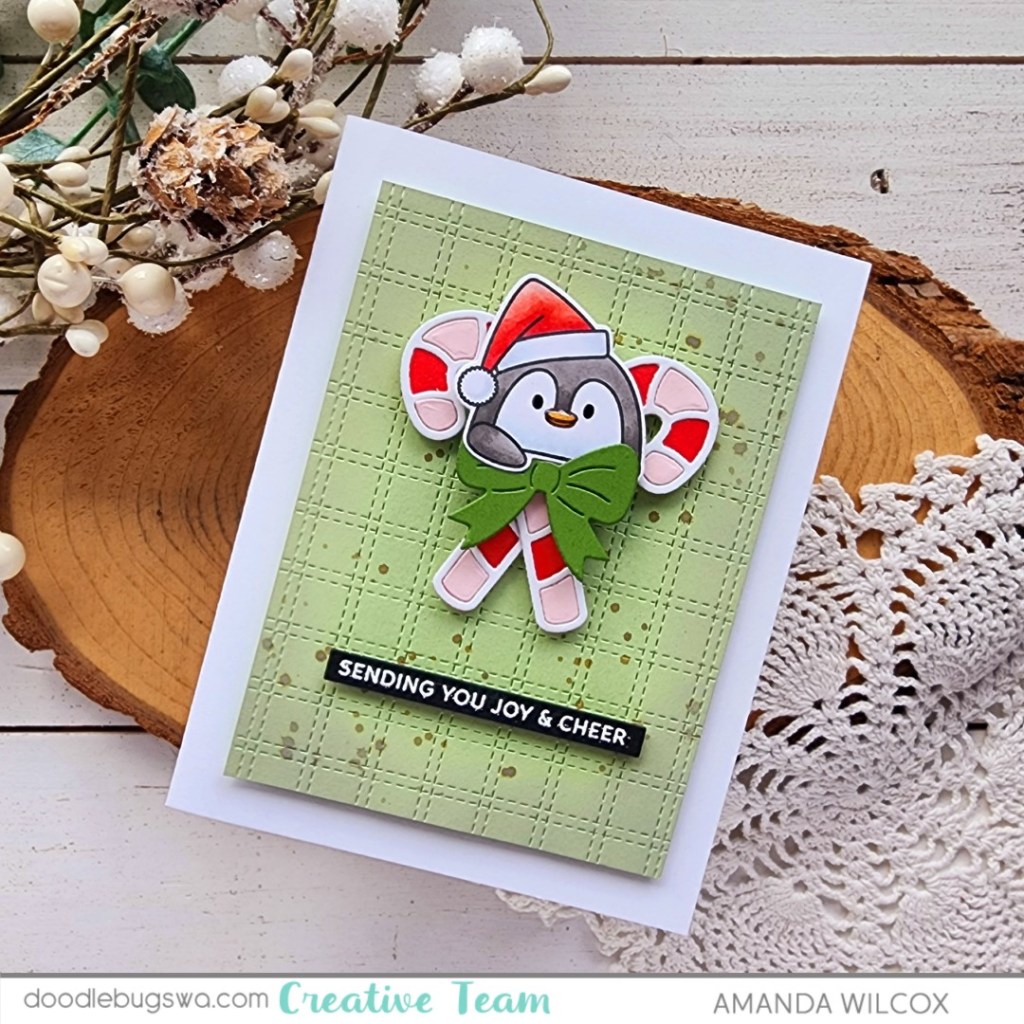
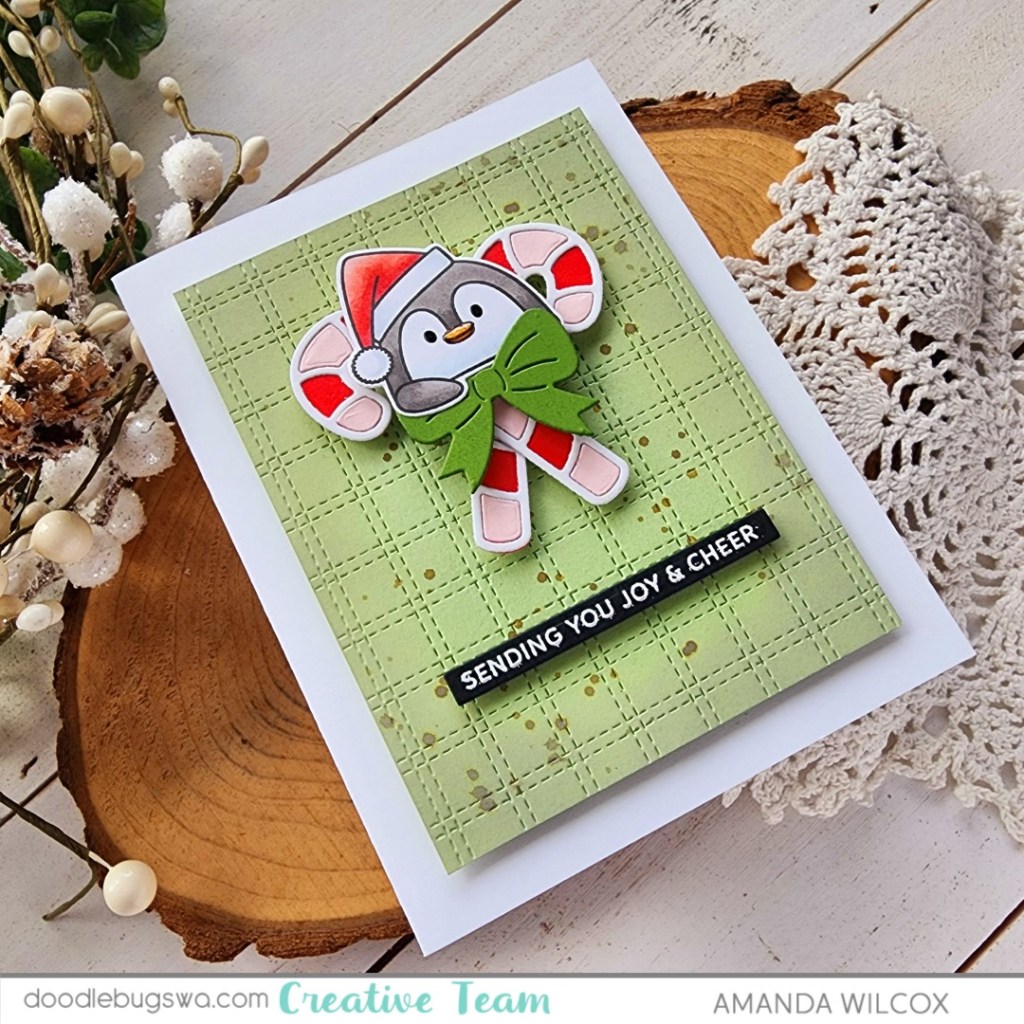
Hey friends! I’m over on the Doodlebugs blog for our weekly Mix it up Monday but today is seriously the ultimate mix and match with so many companies together and you’d never know. They just work so great!
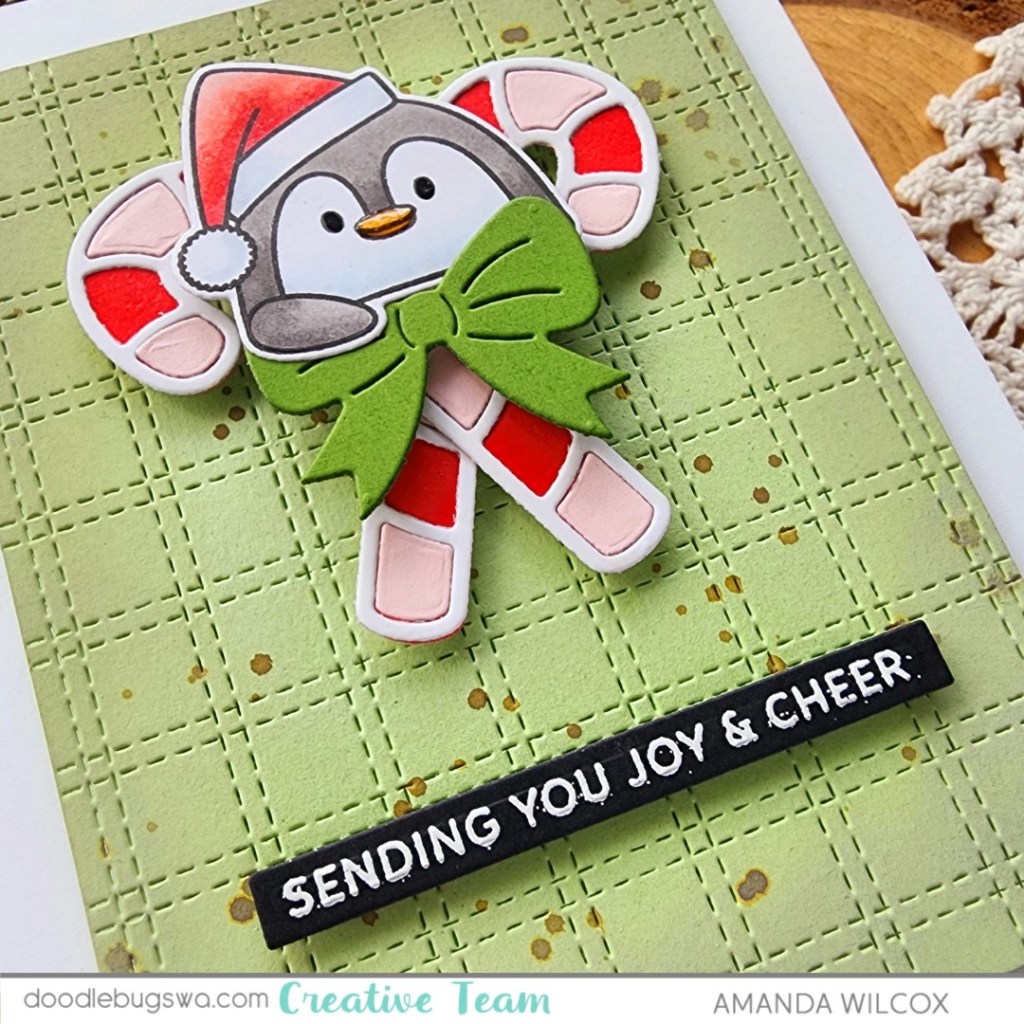
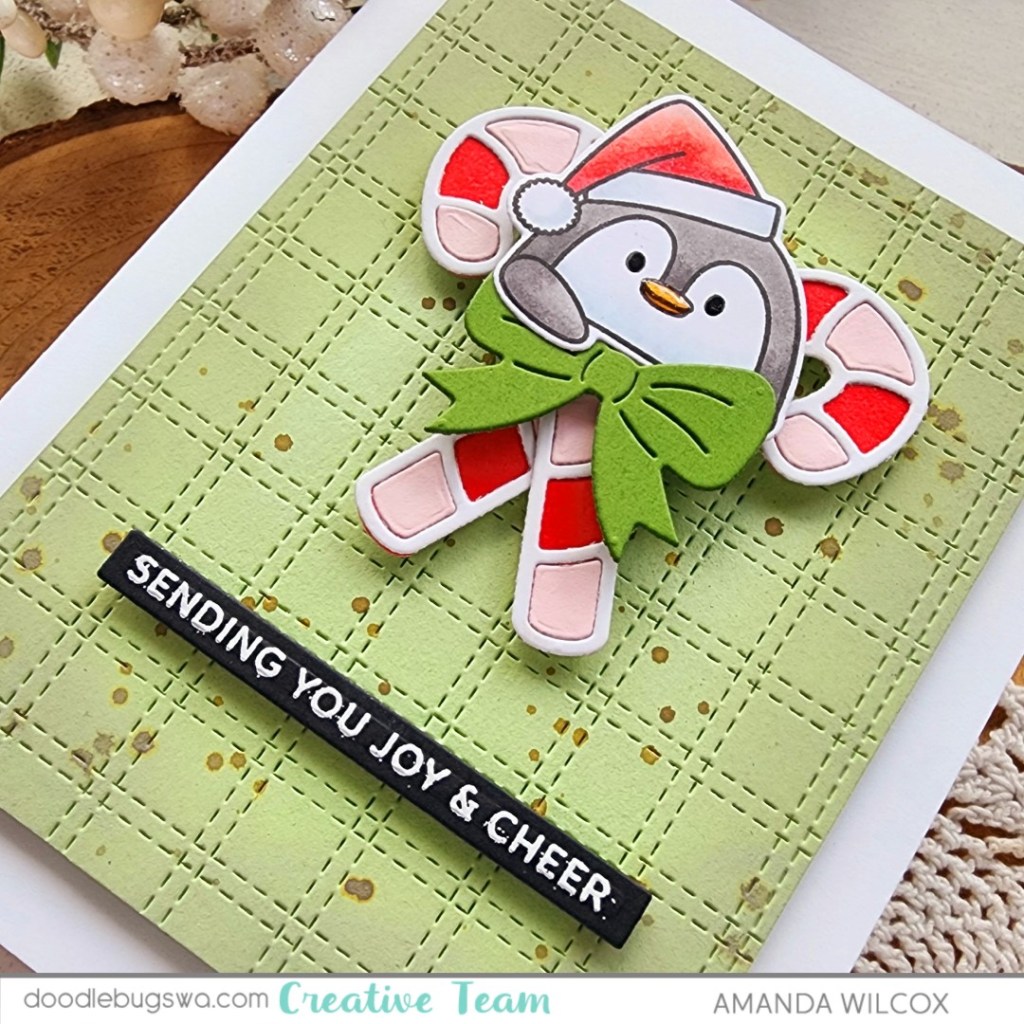
Isn’t this just the cutest!!! So easy too! Any order really, you just need that sweet Sunny Studios penguin colored and die cut. The awesome Lawn Fawn candy canes die cut and assembled. I started with red and white but didn’t love it until I added the pink. Be sure to play with this die set! I think I’ll try some mint green next.
Now, use liquid glue to adhere your candy canes crisscross and then add the penguin to the top.
Then stamp and heat emboss your sentiment of choice – the Pretty Pink Posh sentiment strips dies and coordinating stamp sets for the win as usual. I’m tell you, you’ll get your moneys worth from these. There is always something that works!
Now, add foam squares and strips behind your images and sentiment strip.
Now, we’re going to switch to Concord & 9th for an awesome background die. Trim your panel to 3.5×4.75 inches and cut it twice with the Double Stripe Card Front die – once landscape and then again portrait. Then you get this awesome plaid stitching.
I used green cardstock and then ink blended the edges with shabby shutters distress oxide for a little shadow and flicked forest moss ink across the panel for extra interest.
Finally, to assemble it all, I popped the background panel up with foam tape on a white card base and then adhered the images and sentiment strip on that. For finishing touches I added black glaze pen to the penguin’s eyes and glossy accents to his beak.
Can you believe it? We mixed 4 companies together today and they created the cutest holiday card!
Products used: Sunny Studios Roly Poly Penguins stamps and dies Lawn Fawn Cute Candy Canes dies Pretty Pink Posh Sentiment Strips dies Pretty Pink Posh Sentiment Strips | Christmas stamps Concord & 9th Double Stripe Card Front die Distress Oxide ink – shabby shutters and forest moss Foam squares and tape Liquid glue Reverse tweezers VersaMark ink Embossing powder – white Anti-static pouch Glossy accents Sakura black glaze pen
I appreciate you sharing your time with me. Have a fabulous day!
Hey friends! Happy National Coffee Day!!! Grab a cuppa if you haven’t already and hop along with us for inspiration and comment while you’re going for chances to win prizes at each stop!
You’ve reached Twiddler’s Nook which is a small Etsy shop who makes and sells craft tools to make your crafting easier, along with a variety of embellishments to add to all your different creations!
Today, I’m giving away a $20 gift code to the Twiddler’s Nook shop so you can curate your own prize!
Take a moment to check out our shop and comment here with your favorite product or something you’d like to see us create.
We’re the last stop but if you’re just getting started, head back to the Coffee Lovers blog to start at the beginning.
Happy Mix it up Monday everyone! Sometimes creating even a whole card front can feel overwhelming. Whether it’s too much coloring of images or too much space to fill. Today I have a fun design to share with you that shrinks your scene space but is really fun and has lots of interest too.
I started with a few images from Pretty Pink Posh Batty About You. I colored them with copic markers and used the coordinating dies to cut them out. Then I used a dab of liquid glue to adhere my bat to the tree branch.
Next, used some distress oxide inks to create a spooky sky on a piece of white cardstock. I started with crackling campfire, carved pumpkin and wild honey. After those were blended I went over the whole thing lightly with black soot, then went back over it all with the same colors to blend the black a little. I love the smoky look I ended up with. Next, I spritzed the panel with water and flicked black metallic watercolor on it too.
I trimmed a piece of black cardstock down to 4.25×3.5 inches and ran it through my die cut machine with the Spellbinders Tiny Dots embossing folder. This part of the design is easy to change up. Use a stencil or patterned paper, or maybe you like it simple and plain cardstock is your jam. Then just cut a 1/4″ strip of contrasting cardstock to adhere to the top. It’s like a bridge over the seam of your ink blending and the bottom panel. It polishes the design a lot.
Next, pop everything up on the ink blended panel with foam tape and squares. Placement of the sentiment can vary on this design too. I like the dab of orange at the bottom so that’s where my sentiment strip ended up this time. But it often ends up just below the seam strip or even up in the scene itself. Play around with it and see what you like.
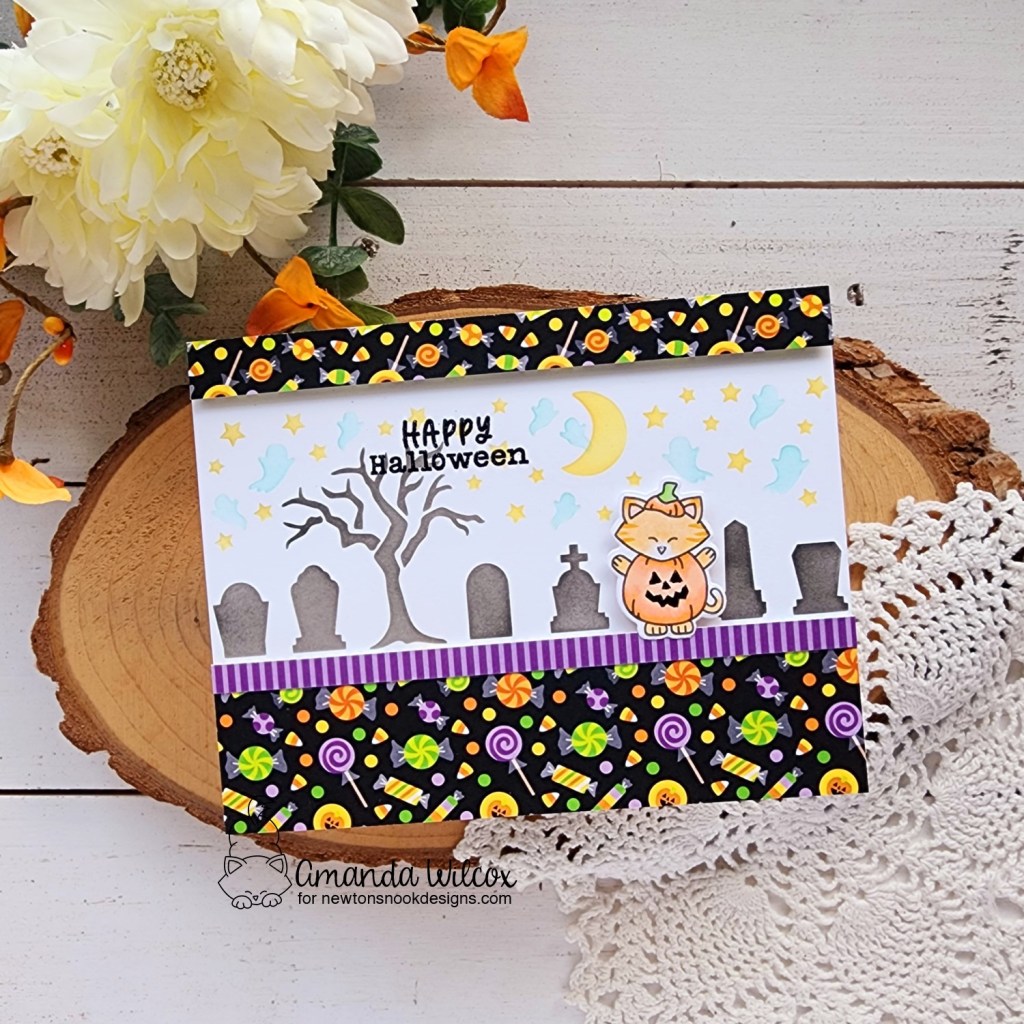
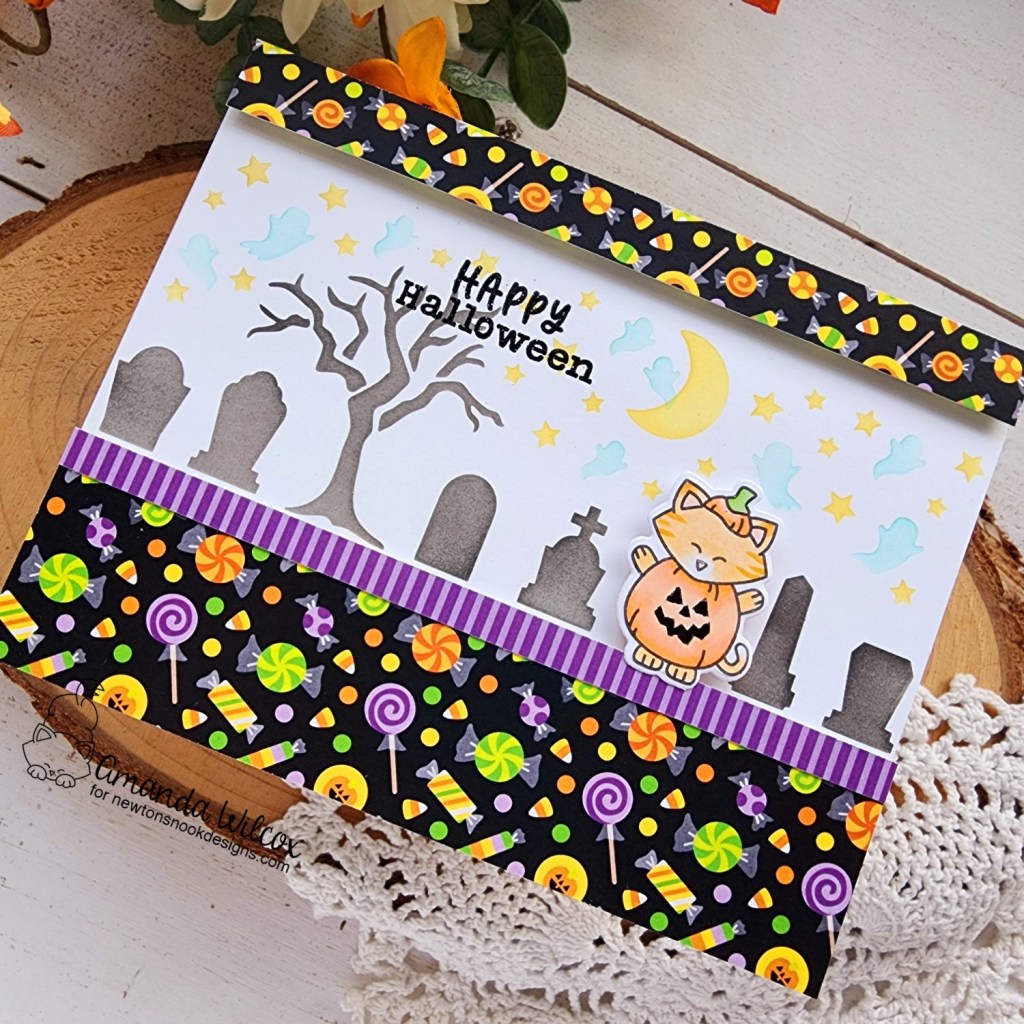
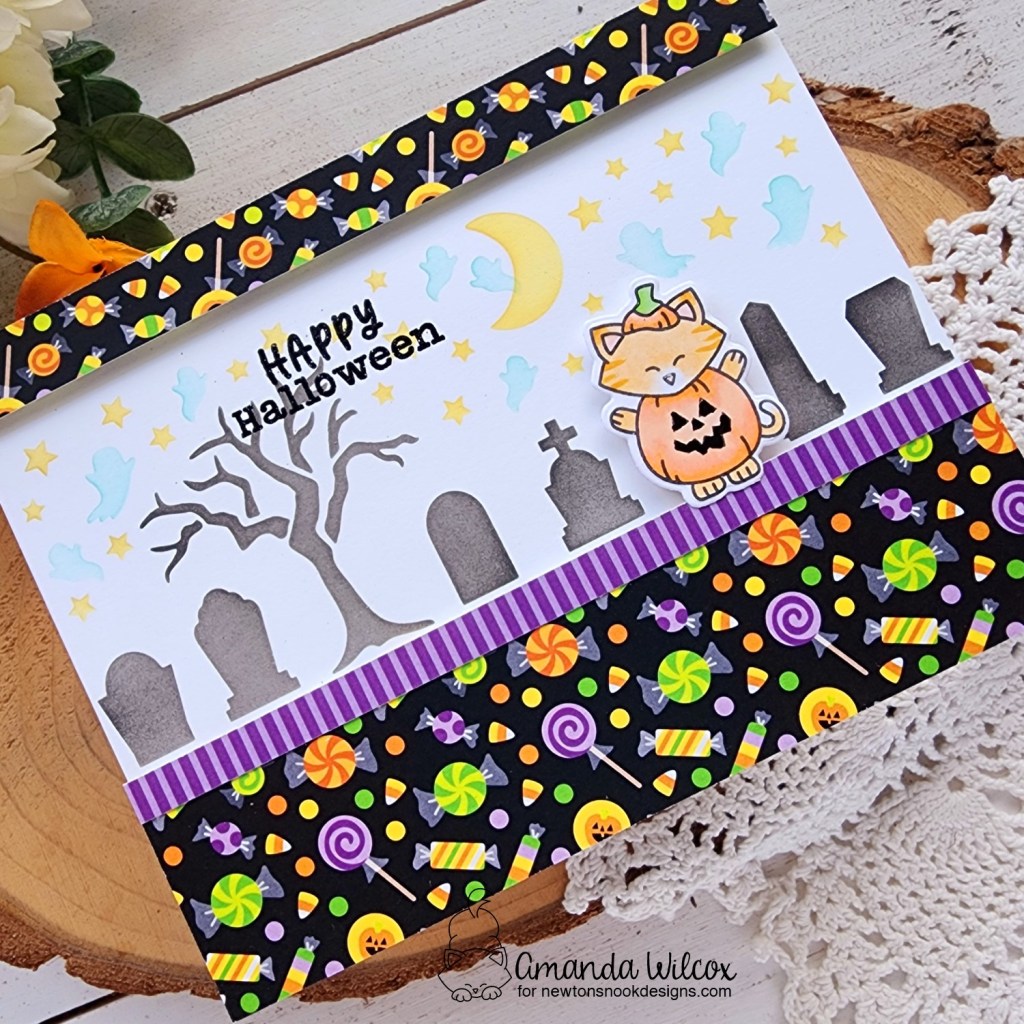
Hello again. I’m happy to be on the Newton’s Nook blog today sharing a fun card I created during my session with the September release goodies! This time I added one of the sweet Trick or Treat Newtons to a stencil and paper pad that was previously released. They go together so well!
First, I had this kitty left from last week’s release card. Isn’t he cute?!? And I loved how the size worked with the Spooky Line stencil so I had to try it out. I inked up the stencil on a piece of white cardstock.
Then I pulled out my Halloween themed paper pads and landed on this fun design from the Halloween Woofs paper pad. I cut strips to fill in the top and bottom gaps around the stenciled portion and popped them up with foam tape. I added a little border to the bottom section that acts like a ground for my Newton.
After gluing my panel to a card base, I added Newton with foam squares and stamped my sentiment in the sky of the scene.
For finishing touches I added glossy accents to Newton’s nose and the stem on the pumpkin costume. Then I came in with black glaze pen on the face of the pumpkin so it was shiny too.
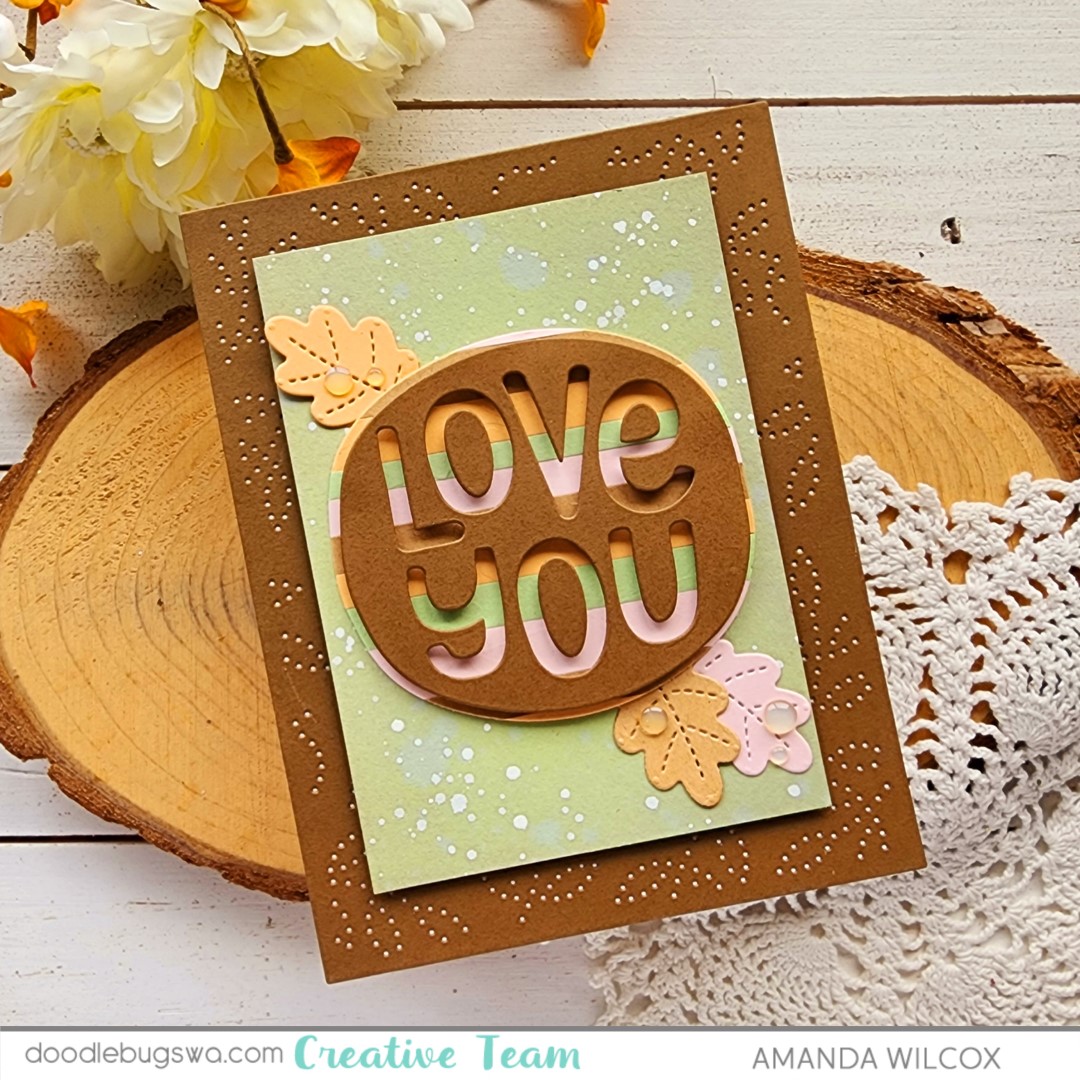
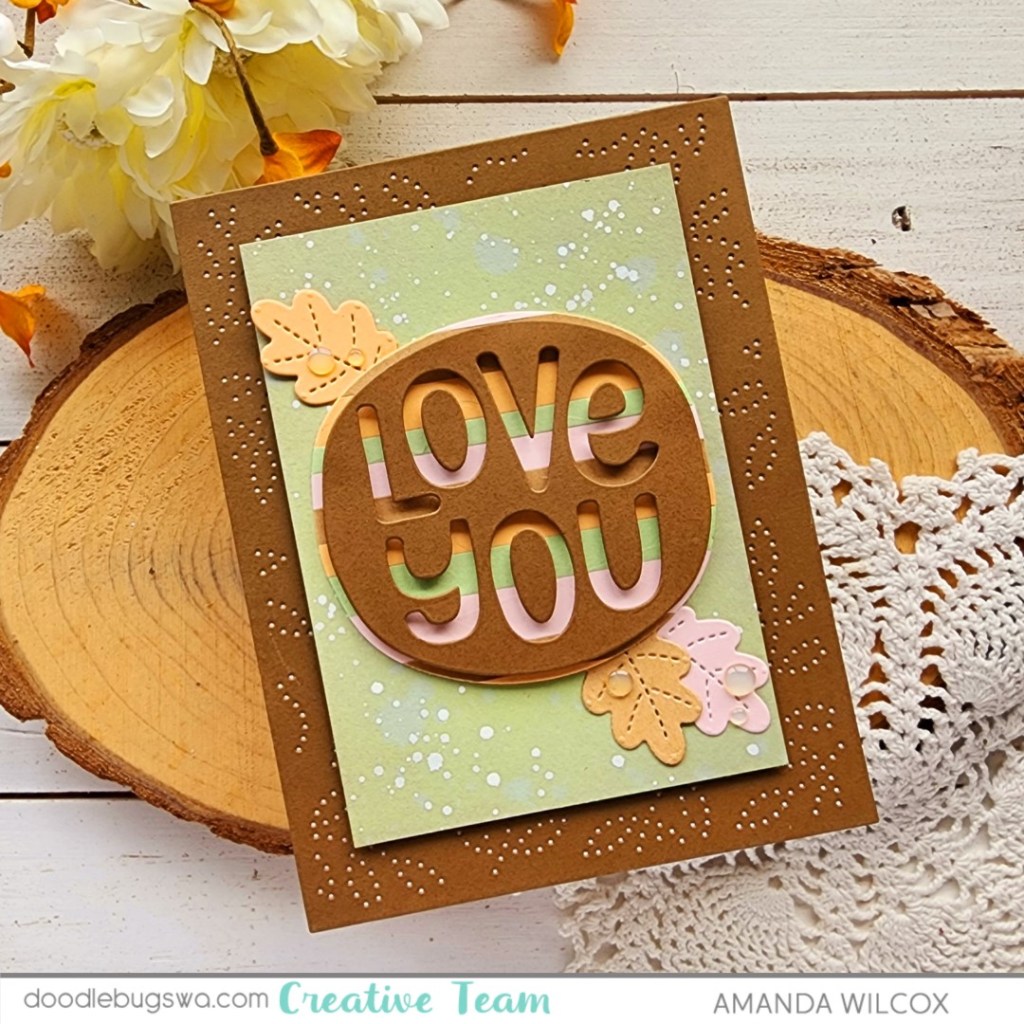
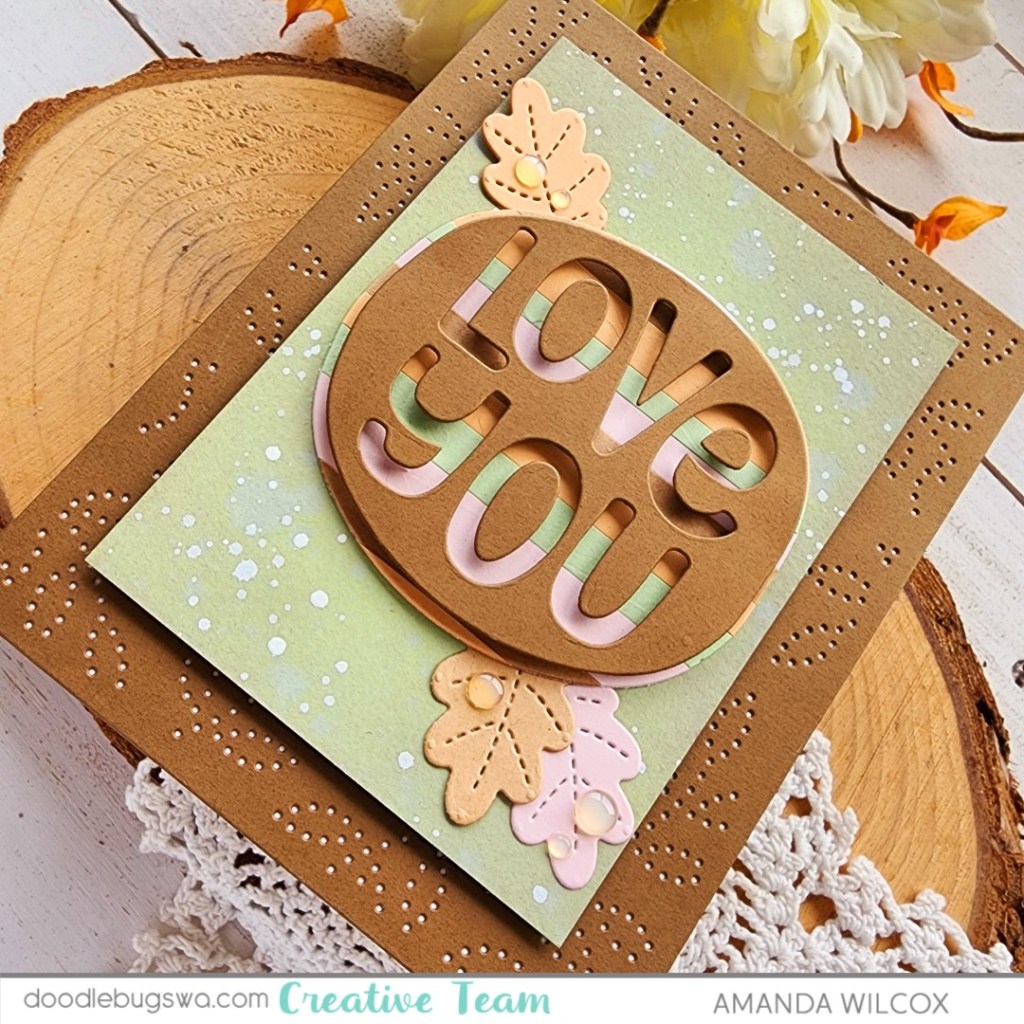
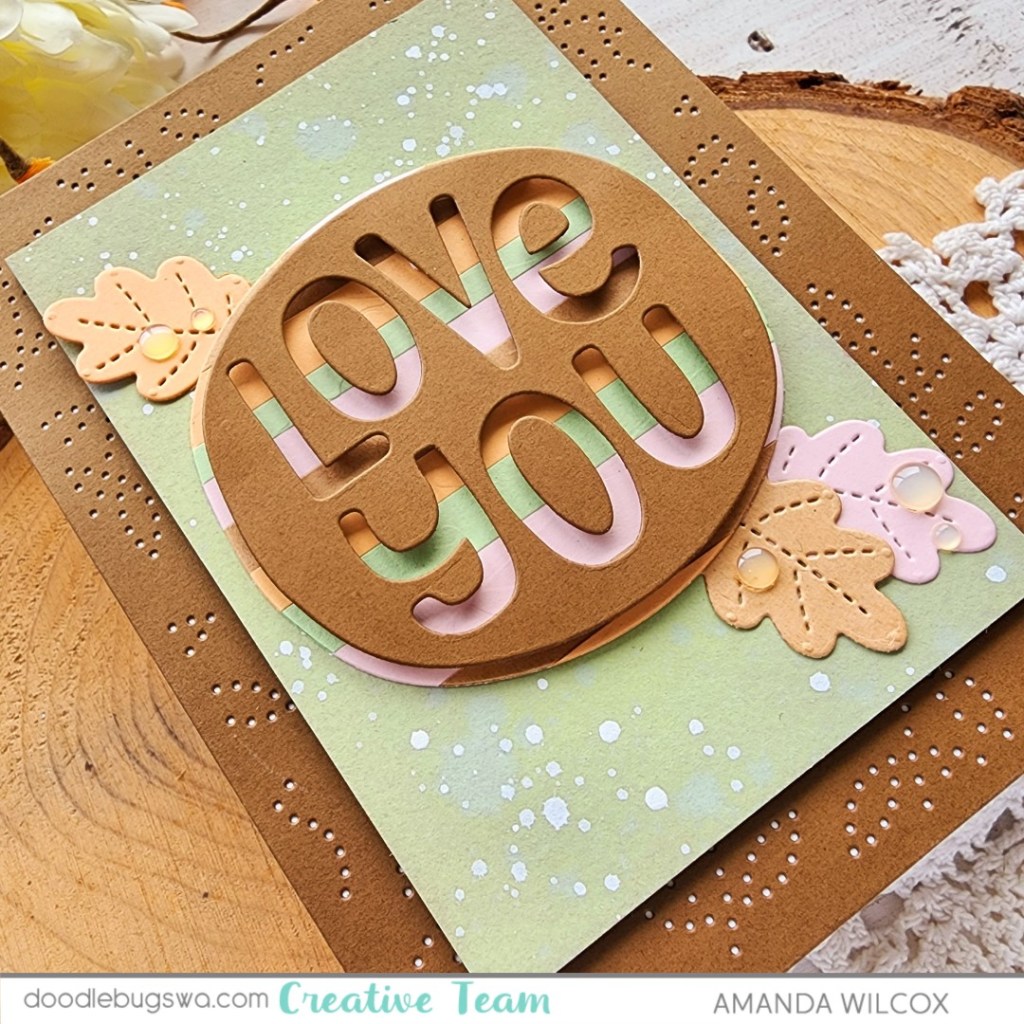
Welcome to another Mix it up Monday for the Doodlebugs blog! Today I’m playing with a few different die sets that were released during other times of the year but if you just change the color palette you use them with, it’s fun and easy to use them all year long.
I started with this great Love You die from the Concord & 9th Markered Messages die set. I cut some strips from my chosen color palette. I was thinking soft fall vibes. I glued those to a piece of cardstock and cut the “shadow” circle from that stripes. Then I chose a chocolate cardstock from my stash to cut the word portion out. I used foam squares to adhere the two together.
For my background, I wanted to tie the brown in more so I cut the Pretty Pink Posh Pierced Leafy Vines background die from it and glued that to a white card base. To separate the sentiment from the background panel, I used shabby shutters distress oxide ink on a piece of cardstock. I spritzed it with water and flicked white paint on the panel before popping it up with foam tape.
Last, I went digging for leaves that fit my vibe to adorn my sentiment panel. I found this one in the Pretty Pink Posh Winter Mug die set. I cut it from a few colors in the stripes and glued them in place with liquid glue. To finish off the design I found a few baubles that resembled water drops to glue to my leaves.
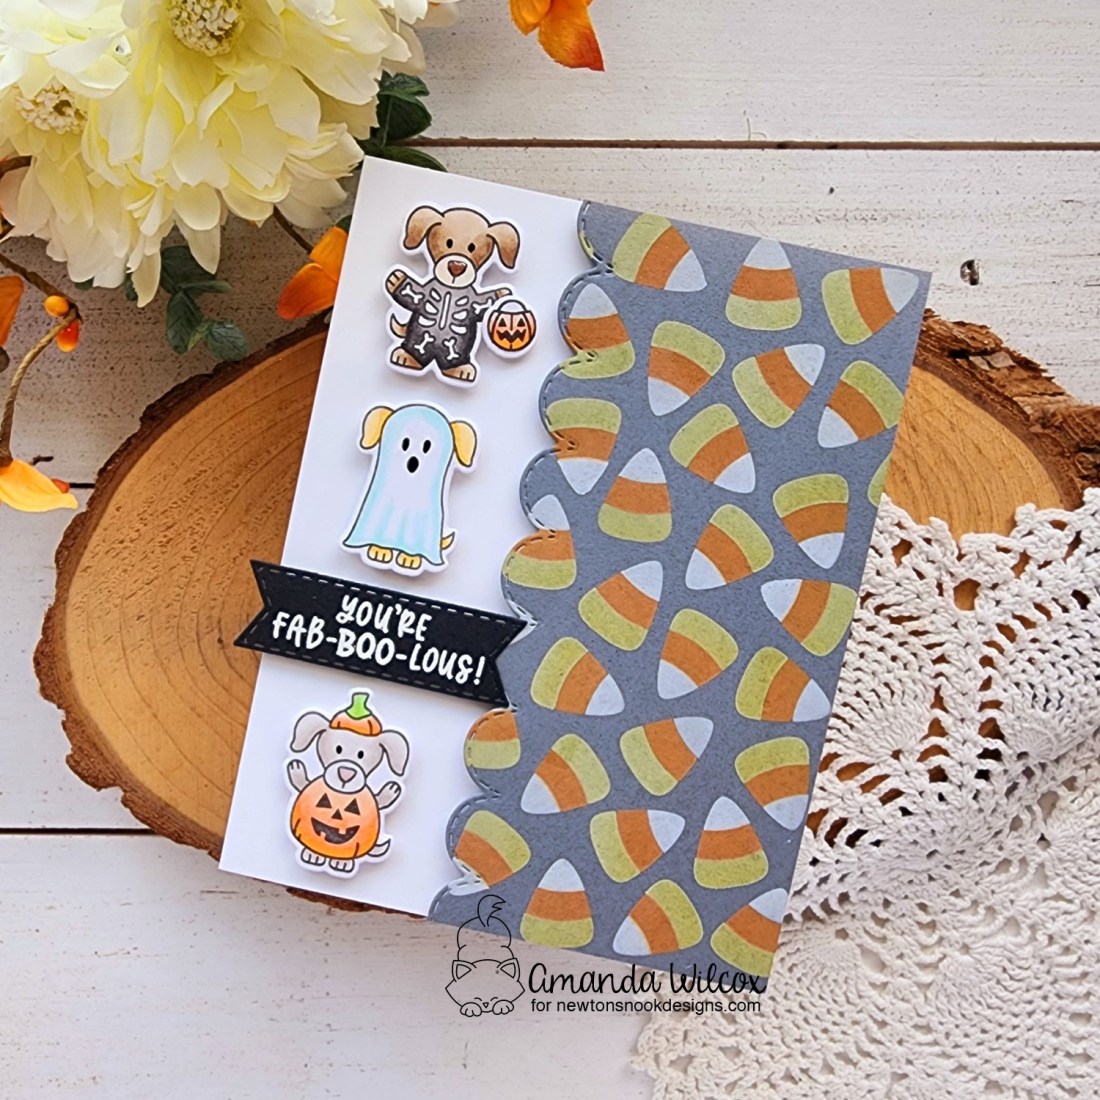
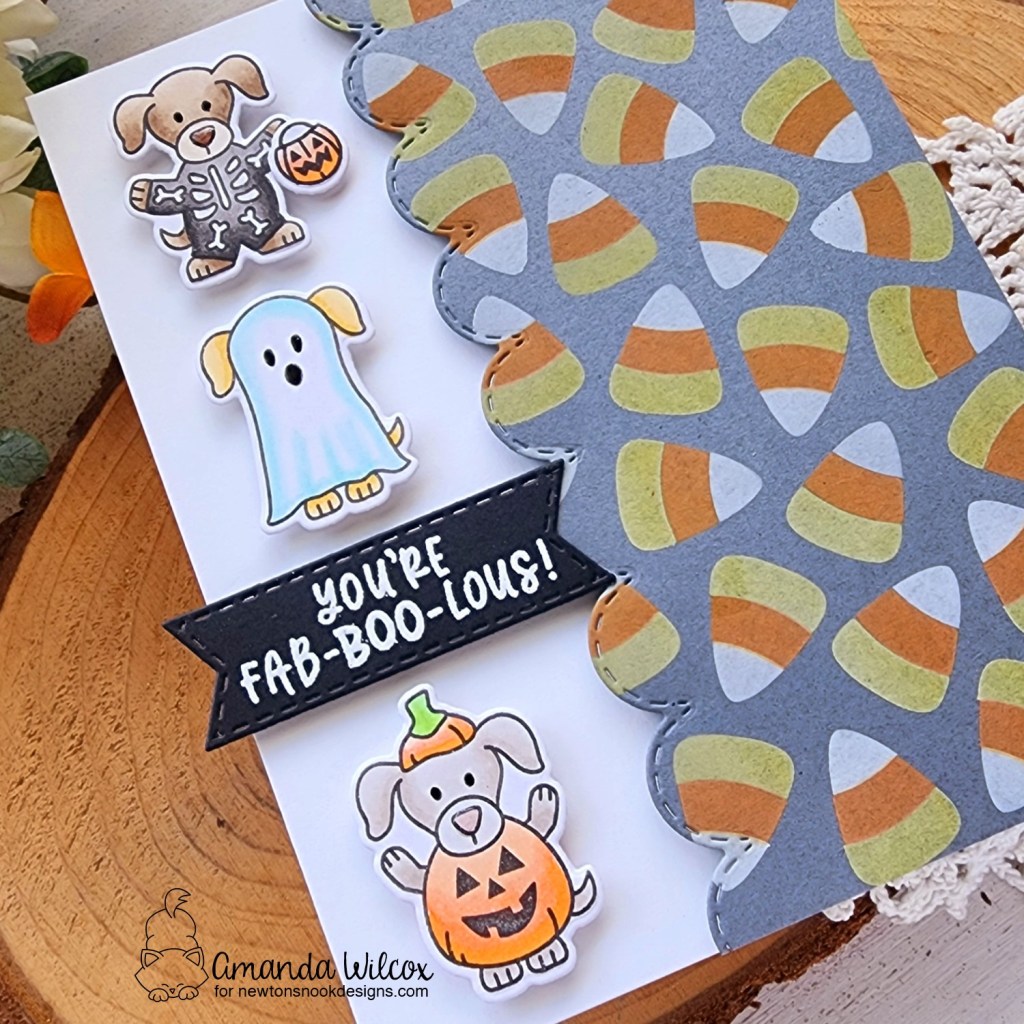
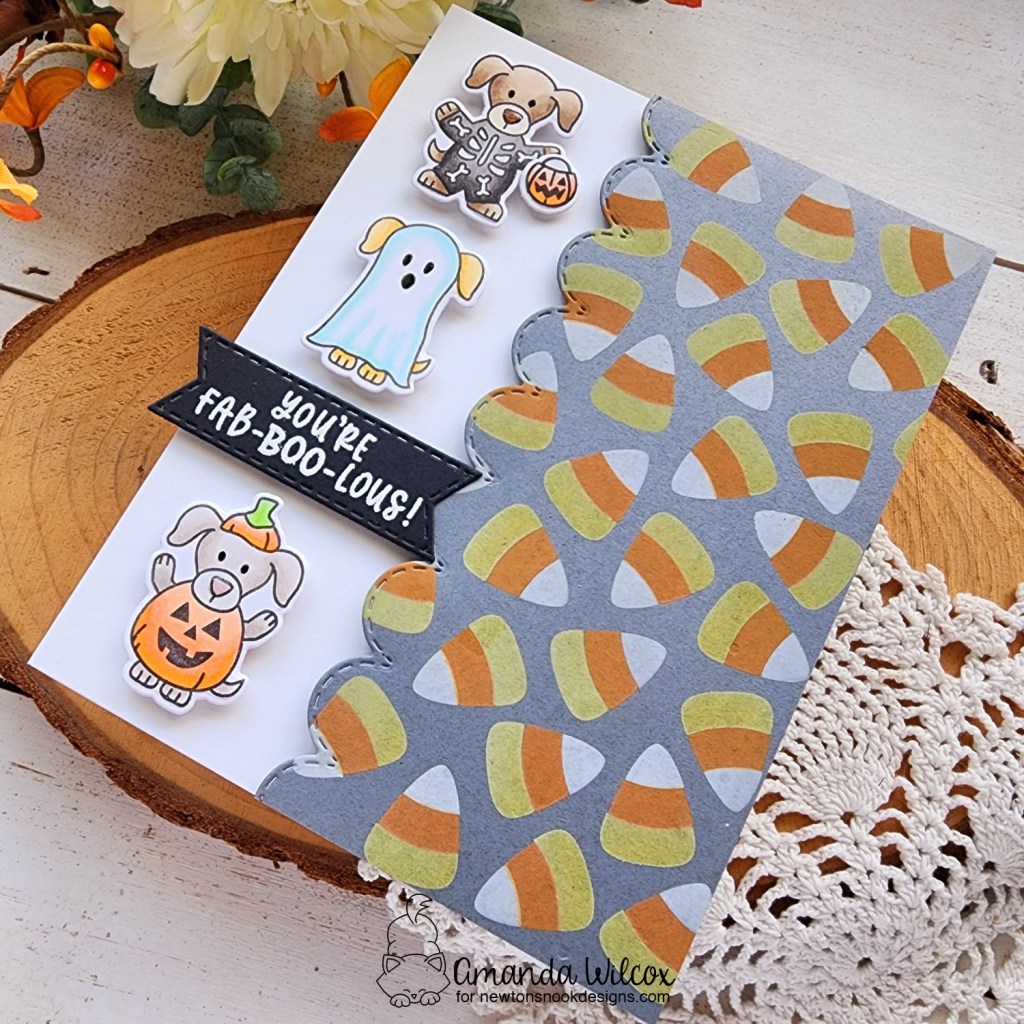
Hi friends! Thanks for stopping by again today. Things have been packed with the Newton’s Nook release and I’m not even done sharing creations from it! I’m back today with another card, this time featuring the Trick or Treat Puppy set that I’m equally as obsessed with!
This time I stamped a few of the images and colored them with copic markers, using the coordinating dies to cut them out. Aren’t they adorable!?!
I inked up the Candy Corn stencil on gray paper with distress oxide inks so they stayed nice and bright. Using the images as a guide on a card base, I used one of the Cloud Border dies to trim the edge off my stenciled panel. Then I popped it up with foam tape.
I die cut a banner using one of the Banner Trio dies, stamped and heat embossed my sentiment and then lined it back up in the banner die to cut the edge off to make it just the right size. After that I popped the puppies and sentiment banner up with foam squares.
For finishing touches I added black glaze pen to the eyes and glossy accents to puppy noses.
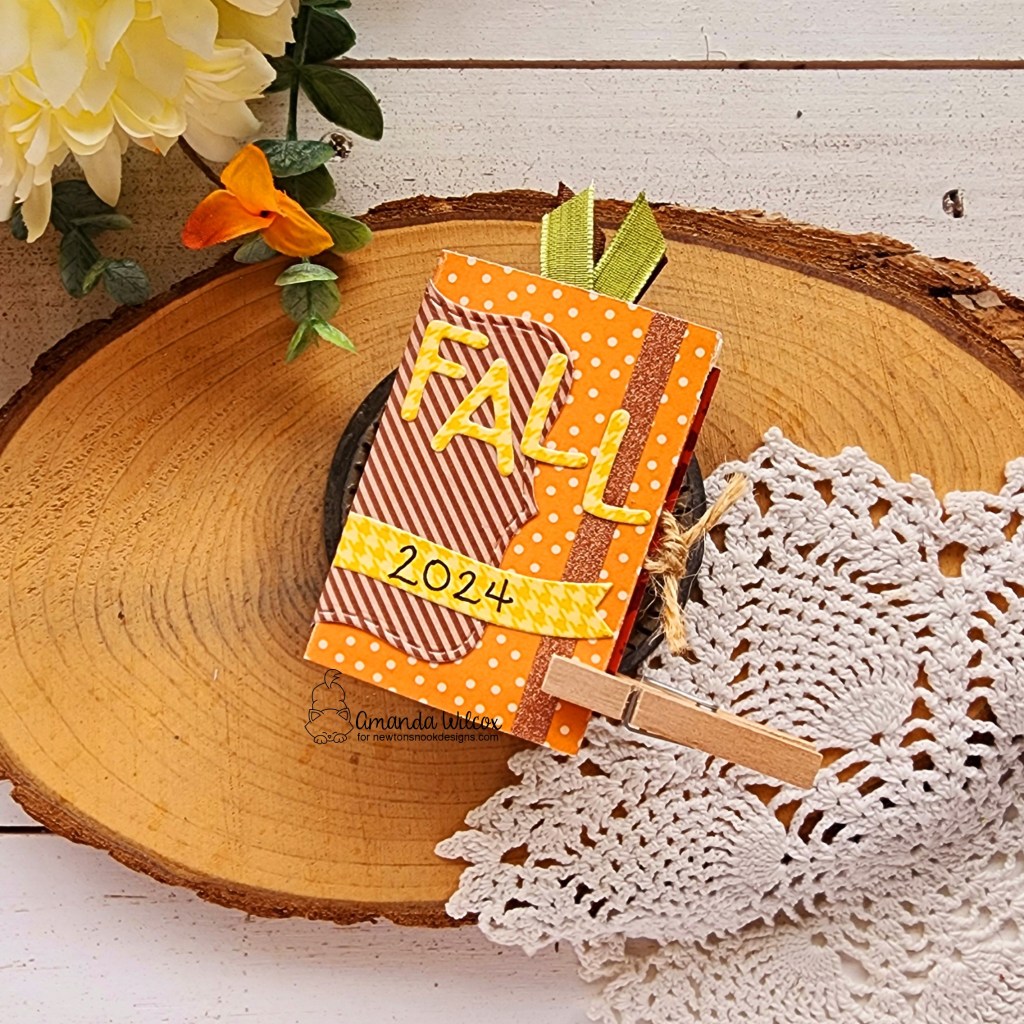
Happy Friday friends! We’re having an Instagram hop to celebrate the September Newton’s Nook Release today! I have a really fun, but sort of involved project to share with you for the release.
It looks simple on the front but this is a really fun mini book/album using the new Autumn Meows paper pad, along with some other fun products. It can stand up and be a decoration or tuck away to pull out when you want to look at it too.
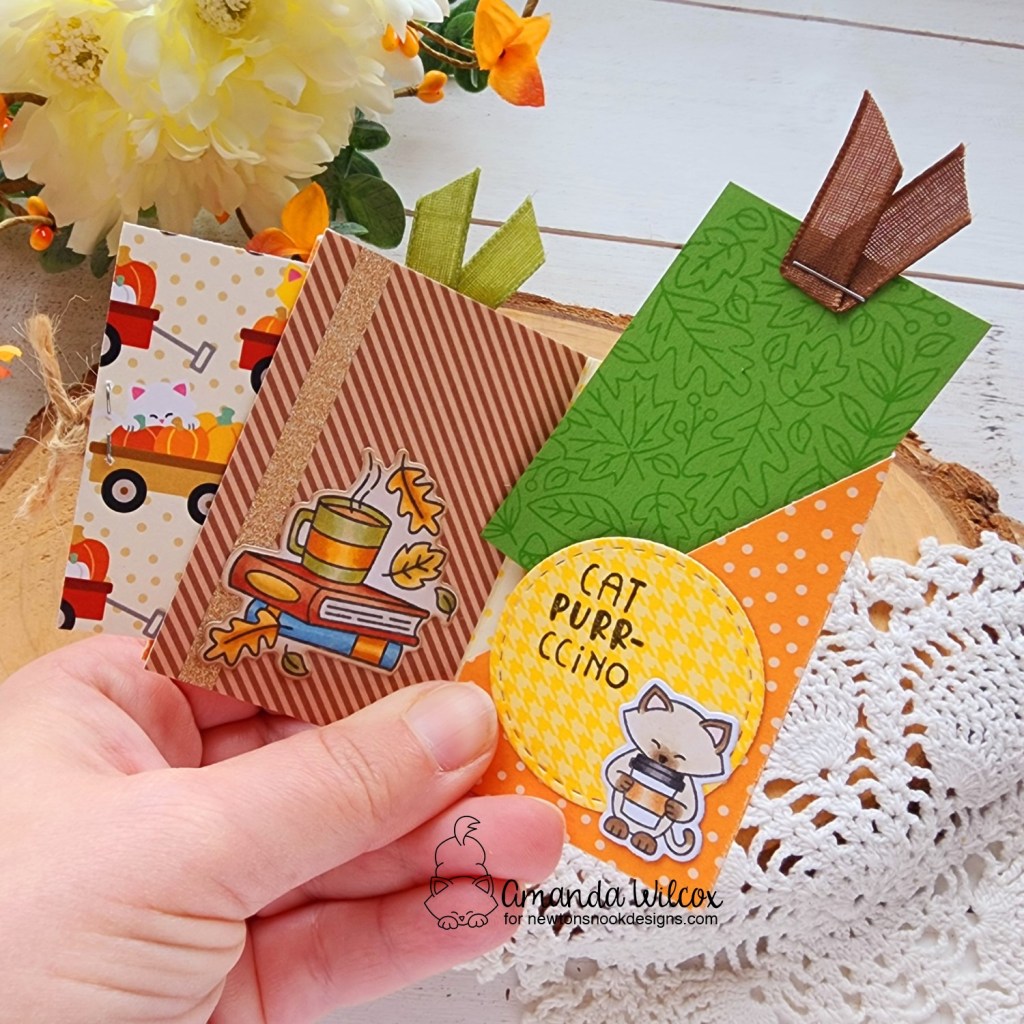
When you flip open the first page, you have a pocket on the left that I made a little pull out for. I plan to write something on the back and add a small photo to the front. Then in the center (on the right here) you have another pull out slot that I’m going to add small photos to both sides of.
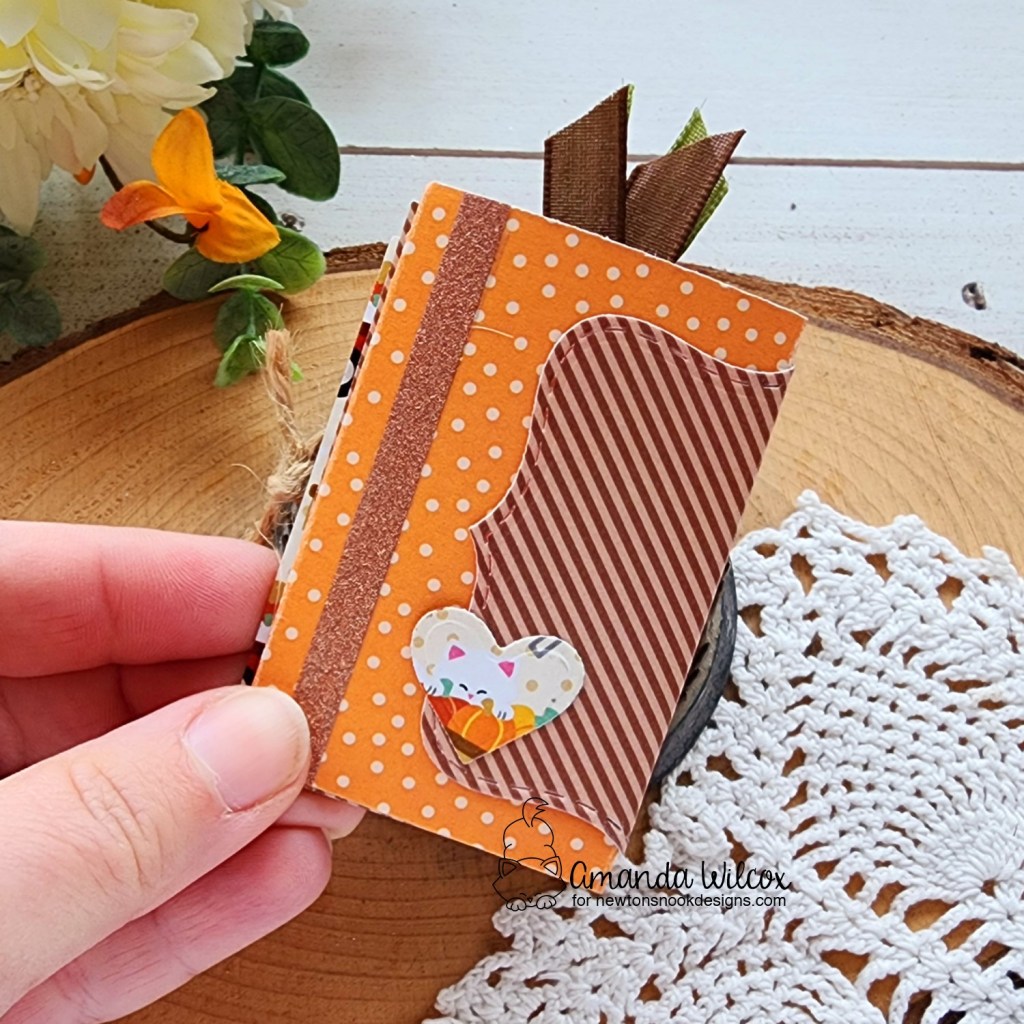
Here is a look at the back section. On the left you see the back of the leaf paper from the previous picture, along with another pocket on the right with a tag to pull out. I’ll probably do the same idea here with a photo on one side and write on the other.
And last, here’s the back of it. It’s such a sweet little book and was really a fun immersive crafting session to create it. I started with the basic shell and once I started cutting and adding little bits here and there, then I was totally invested in completing the whole thing. Next thing I knew, it was bedtime!
Remember to head to Instagram for the Newton’s Nook Release Hop for a chance to win a gift card to the shop!
I appreciate you sharing your time with me. Have a fabulous day!