Hey there! I’m super excited to share that today is release day for the Trinity Stamps Treetops and Trimmings Holiday Release! There are some really fun stamps, stencils and dies in this release. We’re having an Instagram Hop today where you can comment for a chance to win but the release is live now so don’t wait, head over and stock up on all the holiday goodness!

Today I’m sharing a card featuring the new Ribbon Wrapped Tree stencil. It’s a 2 part stencil which allows for multiple colors or other fun mediums like foiling, which is what I did today.
I inked up the first layer with some green dye ink and then spread Thermoweb transfer gel blanco through the second layer and set it aside to dry. Once it was dry and my laminator was heated up, I sent it through with some glittering green fancy foils from the Gina K line at Thermoweb.
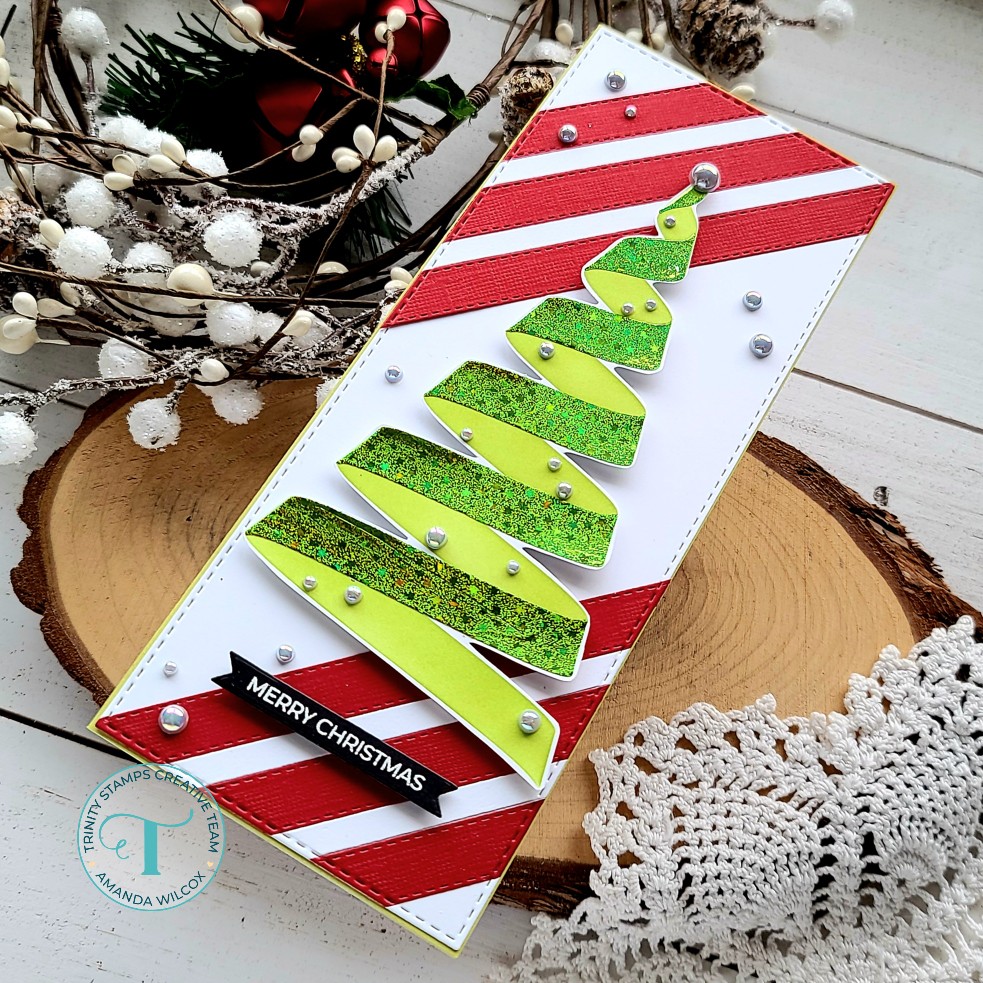
For my background, I used the slimline stitched strips dies to cut some red and white strips. I glued them to a white panel and die cut that with the largest slimline stitched panels and windows die. This die gives a small border so I inked up the edges of my white card base with twisted citron distress oxide ink to match the tree and adhered the striped panel down.

After foiling, I trimmed my tree out with scissors and added foam squares to the back. I popped it up in the center of my card and heat embossed a sentiment on black cardstock. I used a banner from the 4-Bar Card die set and popped it up as well.
For finishing touches I glued a scattering of glitzy gray baubles across the whole design.
So much bright and fun shine and shimmer on this card. I just love it! And have so many other ideas to try with this simple, but awesome stencil!
Products used today:
Ribbon Wrapped Tree stencil
Slimline Stitched Card Panel and Windows dies
Slimline Stitched Strips dies
A Sentiment for (almost) Everything stamps
4-Bar Card dies
Glitzy Gray Baubles
Thermoweb Transfer Gel Blanco
Thermoweb Fancy Foils – glittering green
Thermoweb Stencil Pal
Distress Oxide – twisted citron
Remember there is an Instagram Hop going on if you’d like to see more inspiration and comment for a chance to win. Or feel free to click HERE to head to the Trinity Stamps shop and check out the whole release there too!
I appreciate you sharing your time with me. Have a fabulous day!