Birch Press Design – Fall Thanks

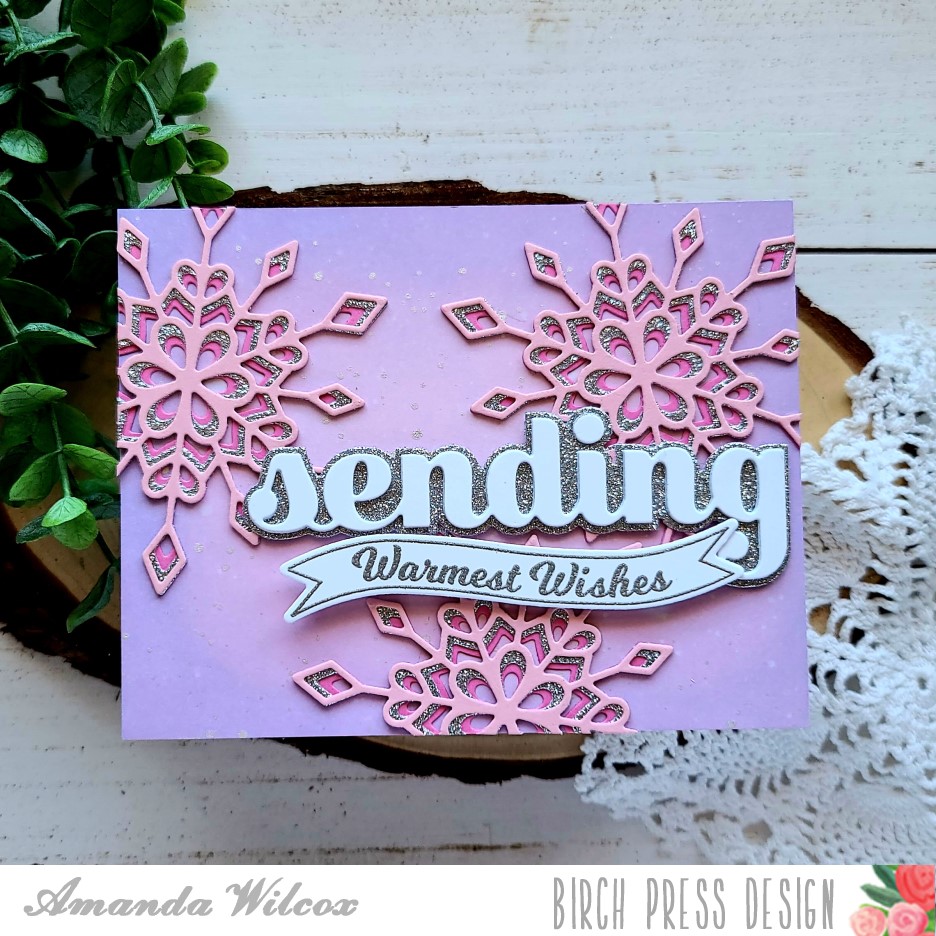
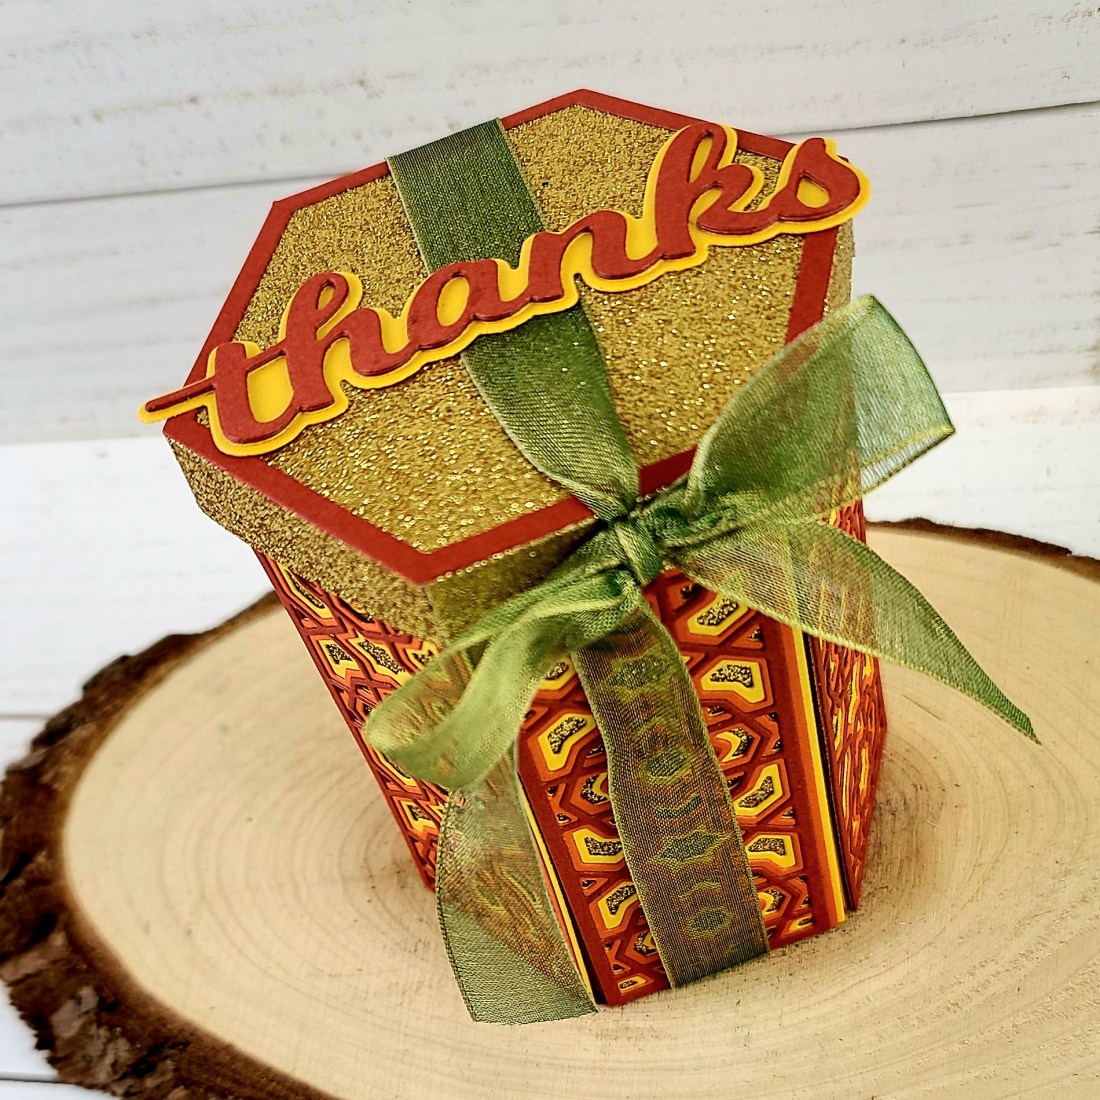
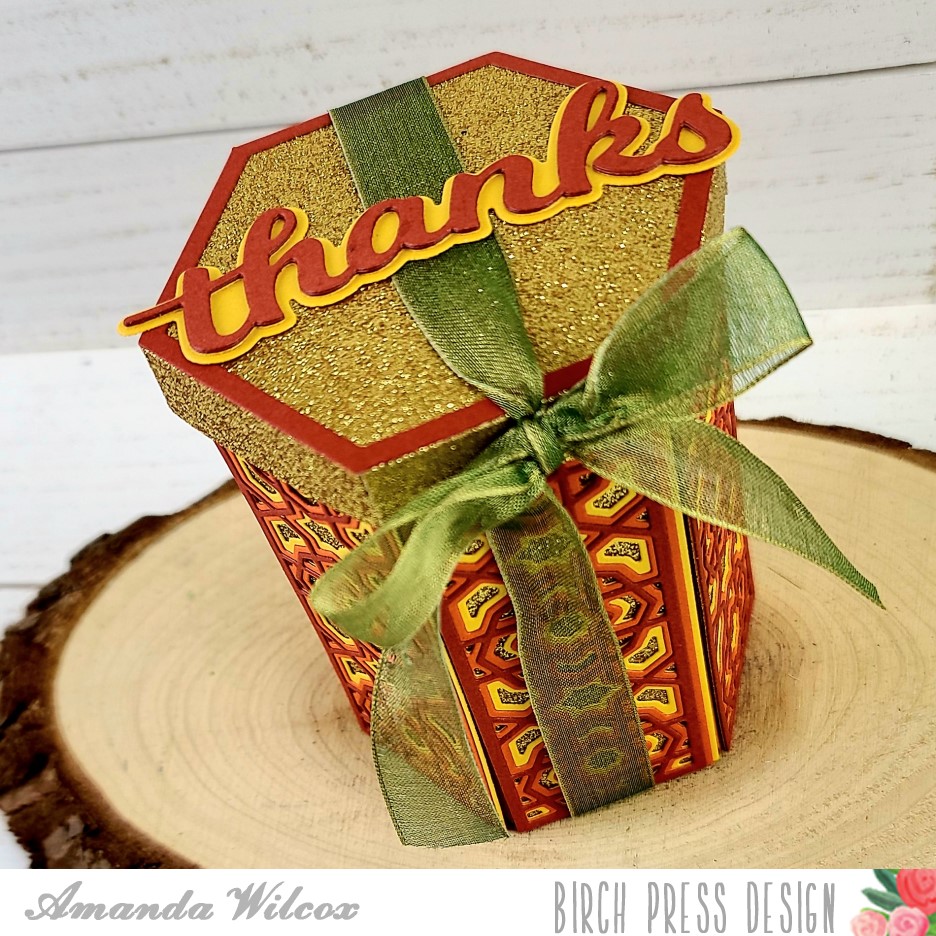
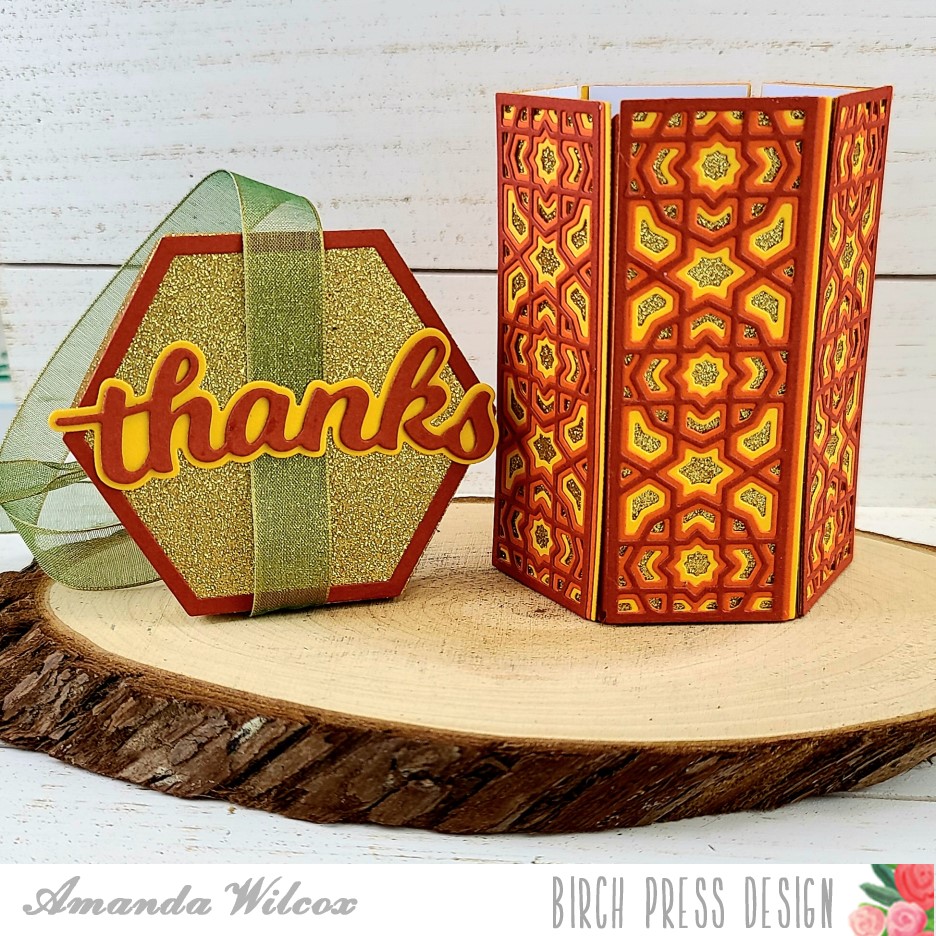
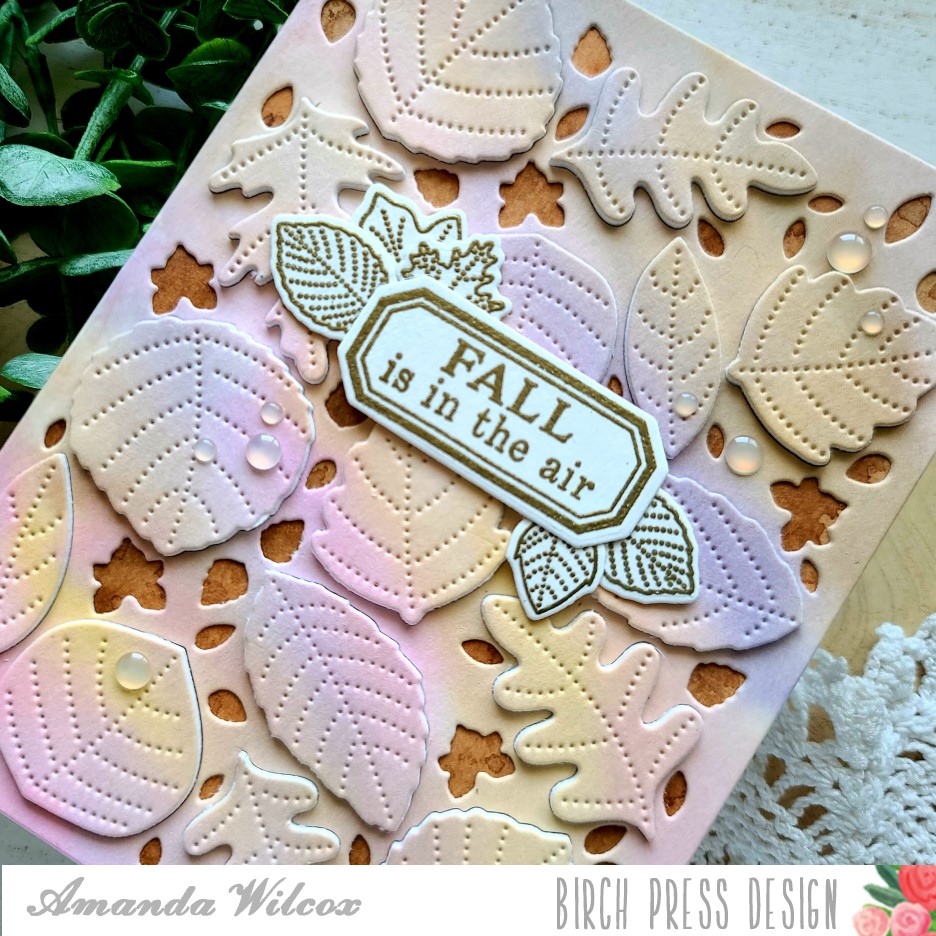
Happy Friday everyone! It’s been a long week and I’m so excited for the weekend. For today’s card, I’m sharing process photos on the Birch Press Design blog how to create this fall themed Thanks card. With Thanksgiving looking a lot different this year, I thought it would be nice to mail some thankful cards to friends and family to let them know I’m thinking of them.

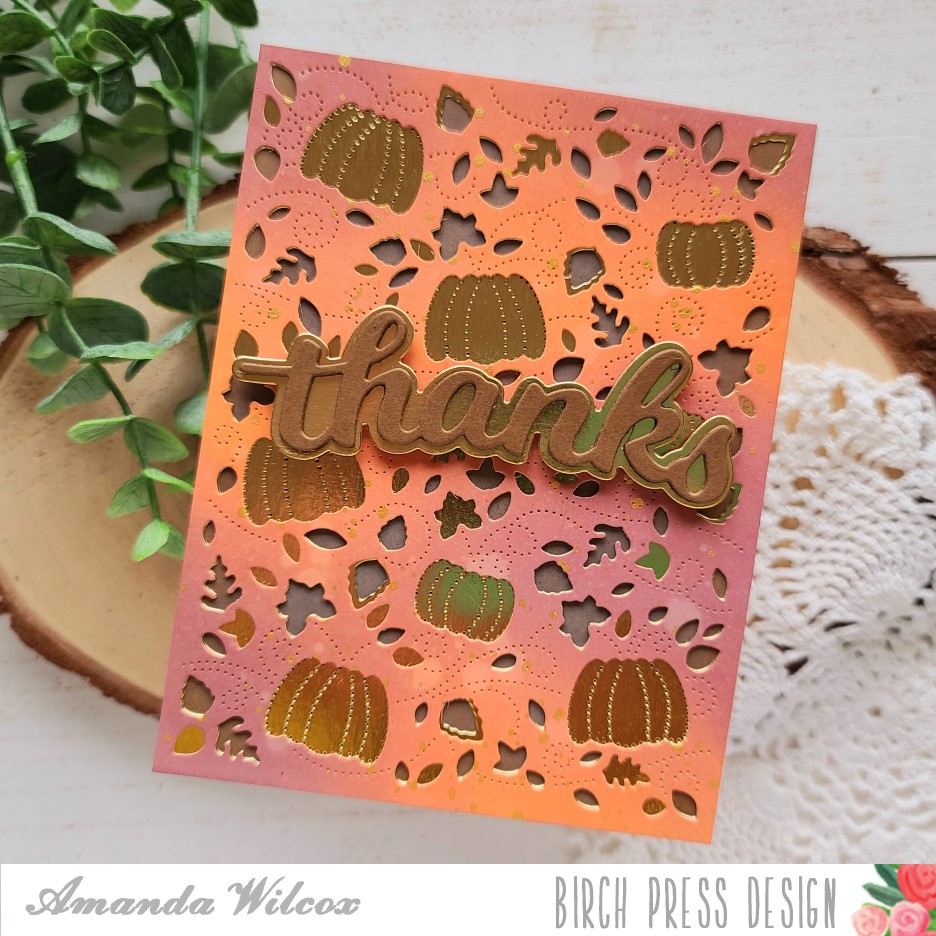
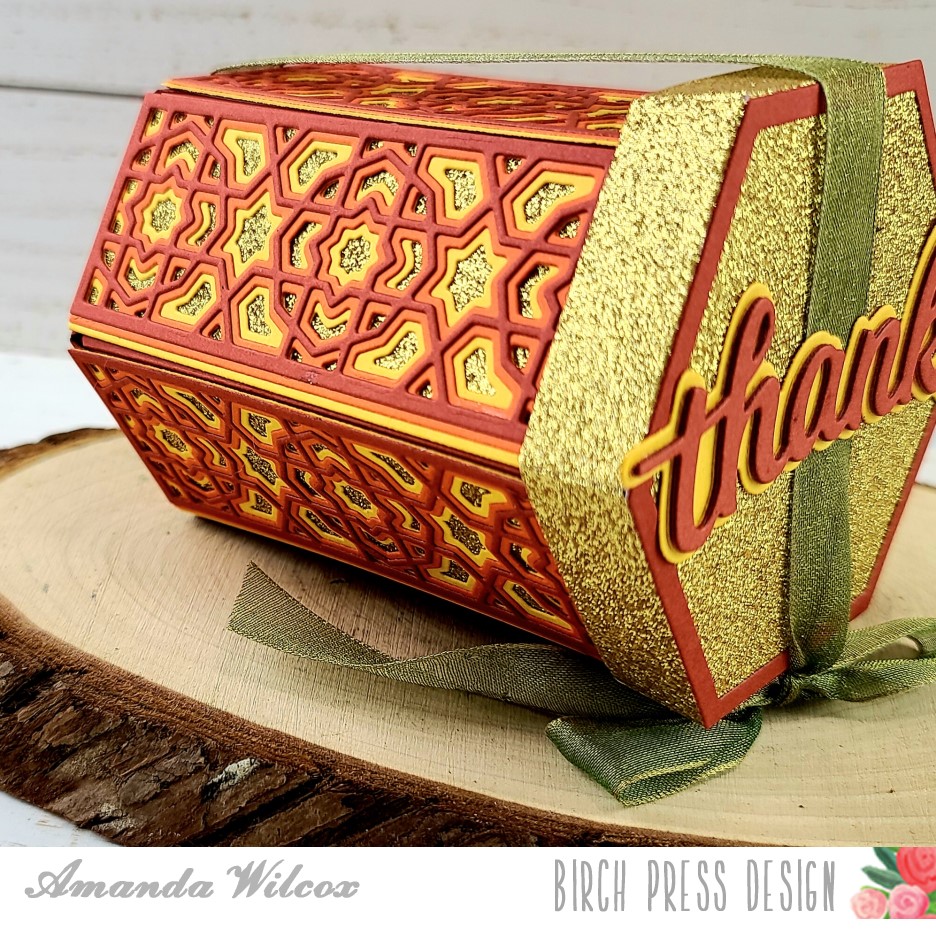
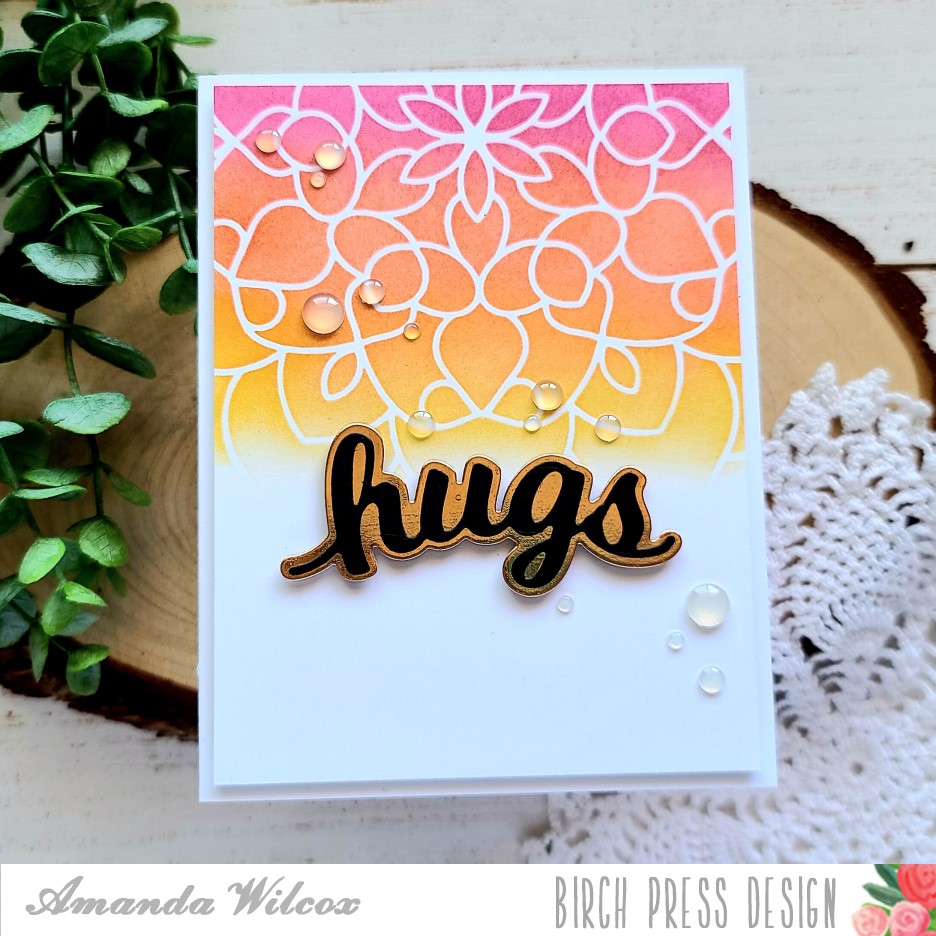
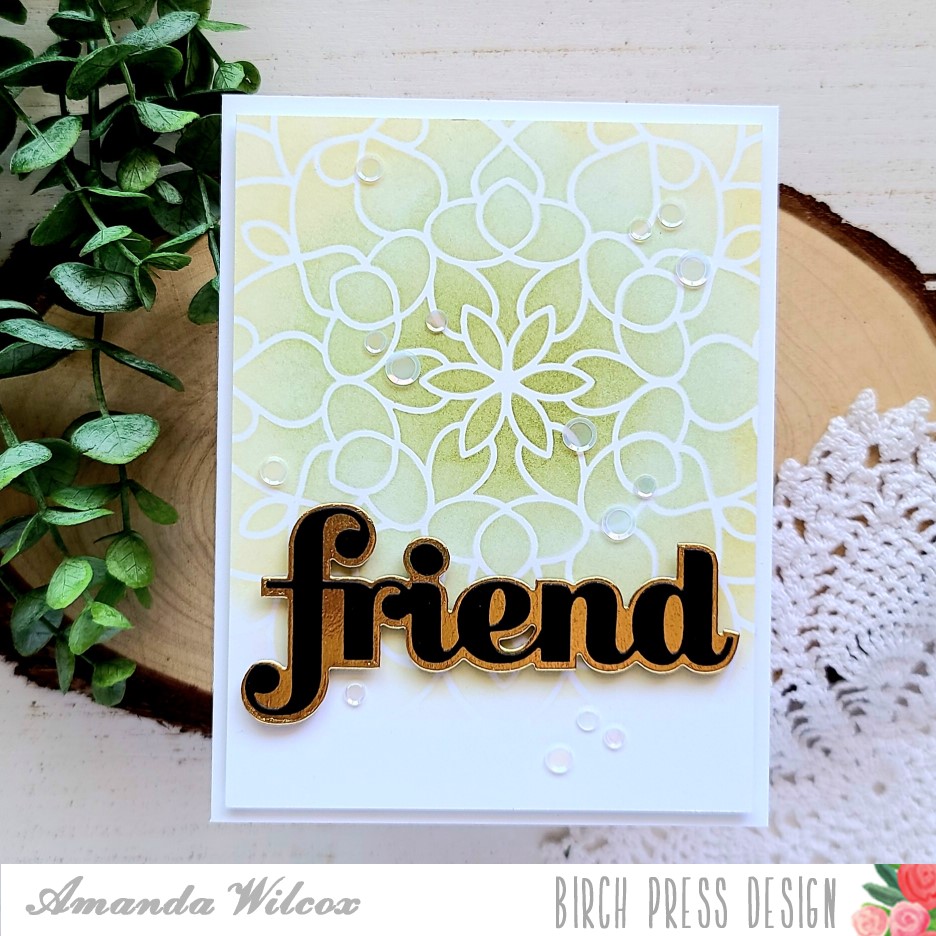
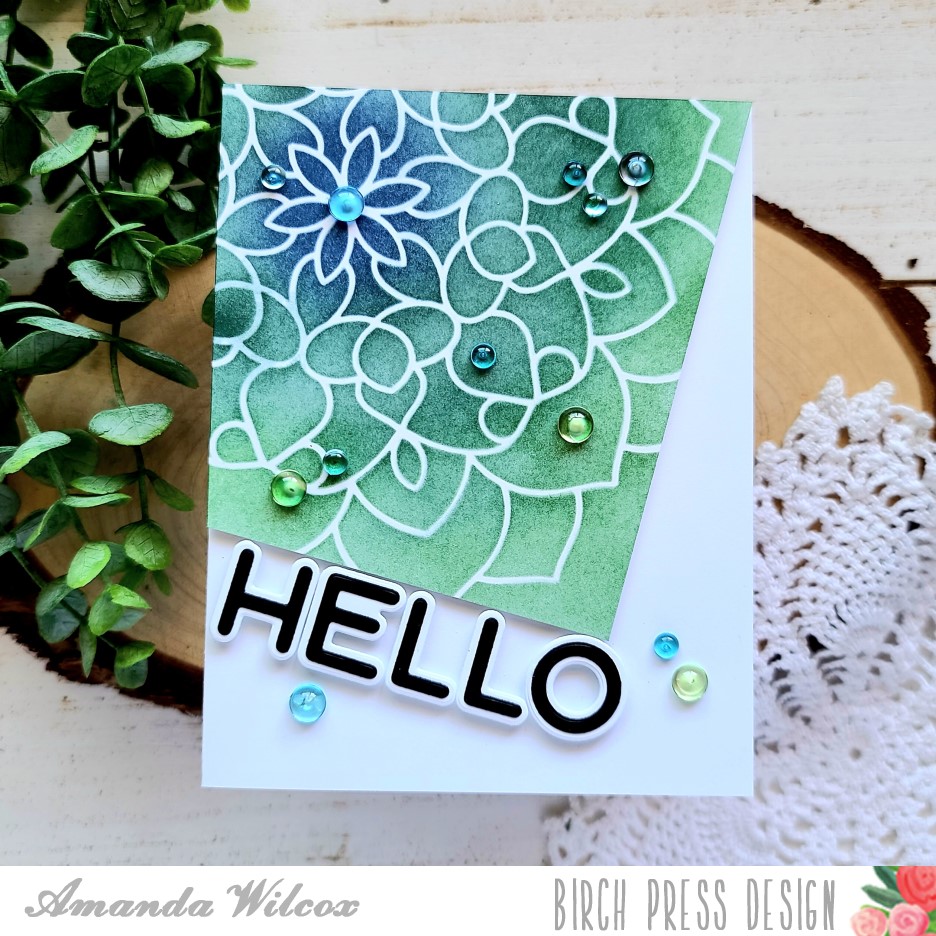
I paired some fun ink blending with distress oxides with mirrored cardstock on this layered die cut card. For a little extra interest I even added spritzed water to the distress oxides and flicked gold watercolor too. Seriously people, I love making a mess in the craft room!

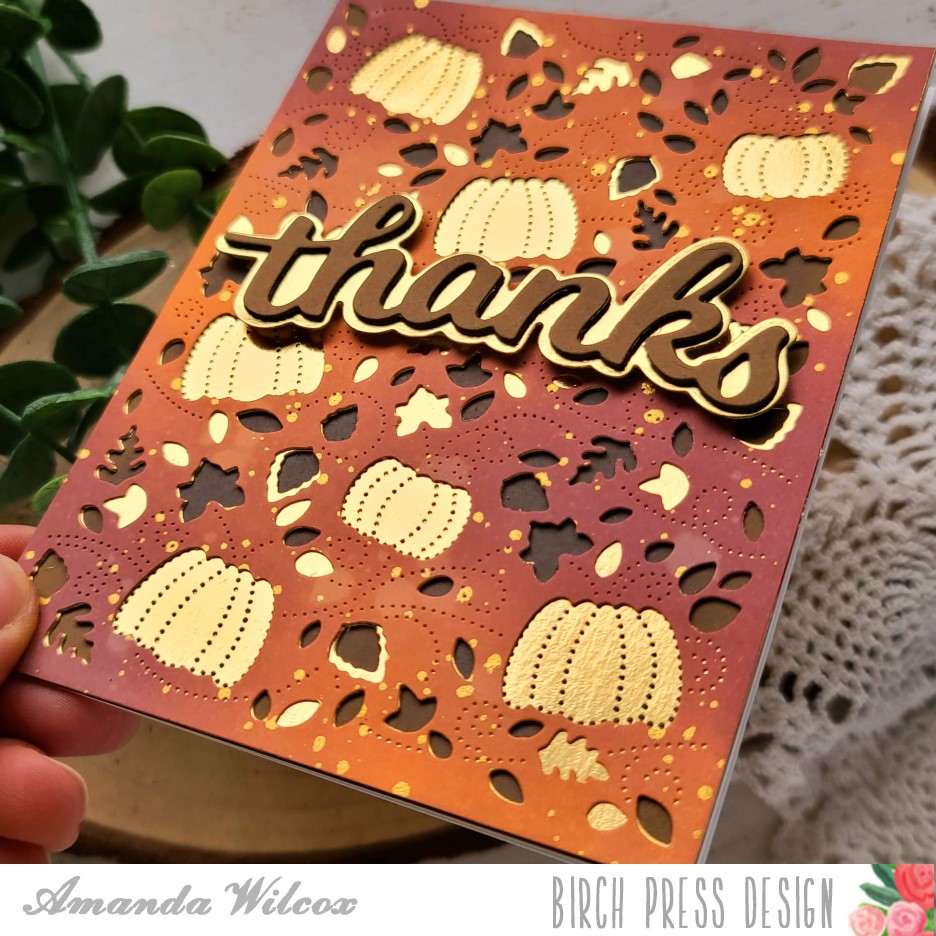
Here’s a different look at it tipped in the light. That mirrored cardstock is just fabulous and adds so much to the layers. Don’t you think?

How is Thanksgiving looking for you this year? I’m curious how many people are altering their celebrations and how creative are you getting. Please share in the comments.

I appreciate you sharing your time with me. Have a fabulous day!

Birch Press Design – 25 Days of Christmas Tags

I’m back today with my final contribution to the 25 Days of Christmas tags featuring a set of 3 using stamps and dies from Birch Press Design. I enjoyed mixing and matching different products for today’s project. I hope you like them too.

To make these tags, I die cut the Pinpoint Snowflake 3 times using the Memory Box delicate pastels glitter cardstock. I love this die because you can choose to cut the pinpoint detail or not. So then I cut 3 more snowflakes without the detail from white cardstock and glued them back-to-back so I had a nice clean place to write the recipient’s name.

Then I die cut the Frosty Flake – Layer A 3 times from white cardstock and only glued it to the glitter snowflake in the center so the points lifted a little on their own. I really like this little detail.

Finally I took the wavy labels stamps from Christmas Ornament and Labels set, stamped and heat embossed them silver and used the coordinating die to cut them all out. These are all popped up with foam squares.

To finish these beautiful tags off, I added some silver baubles to the snowflake and glued some silver cording between the layers of the pinpoint snowflake. I used my tweezers to clamp this down while each one dried to make sure it had a good bond.

Don’t forget to head to Tracey’s main post HERE and see how to participate in the event and be eligble to win one of the incredible prizes she has up for grabs!

I appreciate you sharing your time with me. Have a fabulous day!

Birch Press Design – Sending Warm Wishes

Happy Friday everyone!!! We’ve made it through another week and I’m so excited for this weekend! Before I switch back to Halloween festivities tomorrow, I have another wintery Christmas card for you today with a coordinating ornament. I’m also over on the Birch Press Design blog today with a full, photo step-by-step if you would like more detail how to create your own.

I had a lot of fun creating this card. I started with what ended up as my ornament just playing around, then switched out the middle layer for some silver cardstock and kept going. I blended spun sugar and shaded lilac distress oxides for my background and also added a splatter of water and pearl watercolor for some shimmer. I adhered my snowflakes, cut off the excess and adhered my panel to a card base.

I wanted to tie the silver in a little more so I used it on my sentiment too! The stamped, heat embossed banner comes from the Christmas Ornament and Labels set which I thought finished the card off perfectly.

I didn’t want my first snowflake to go to waste, so I cut another set and glued them back to back. I sandwiched some fishing line between one set of points and held it with tweezers while it dried. Then I added Trinity Stamps silver baubles to both sides so no matter which way it hangs on the tree, it’s beautiful! I feel like the silver baubles really tie it in to the card design and they’ll be a perfect gift! Time to make these in all the colors!!! A rainbow set of snowflakes just sounds wonderful to me!

I appreciate you sharing your time with me. Have a fabulous day!

Birch Press Designs – Christmas Shaker Cards

Hello and happy Friday everyone! I’m over on the Birch Press Design blog with a photo tutorial how to put together these awesome Christmas shaker cards. They were actually pretty quick and would be fun to make in larger batches to mail to friends and family this year.

I think these are so pretty and fun at the same time with the shaker mechanism adding a little whimsy to a more fancy stamp set.

I added a combination of snow queen embellishments and pixie dust micro beads in the Silvermist color – both of which are from my Etsy shop. The microbeads are so great in shaker cards, helping move things around more fluidly and they’re just cool looking on their own too.

Have you started making Christmas cards yet? With these 3 finished, I think my total is at about 12 and since it’s still October I’m feeling pretty good about that.

I appreciate you sharing your time with me. Have a fabulous day!

Birch Press Design – Thank You Box

Hey friends!! I’m over on the Birch Press Design blog today with a beautiful die cut box using a variety of products. I kept the colors bold for an autumn feel and I just love it. I can’t wait to fill it with goodies and share it with someone.

Here’s a top view of it so you can see the beautiful layered sides and the nice sentiment on the lid too. The ribbon is glued to the lid, under the sentiment so it stays with it but it’s not attached to the box so it’s easy to open.

I wanted to share a side view so you really get a look at those layers too. I just love these colors for fall. They’re too perfect. Warm and cozy!

If you’d like to see the step-by-step process how to create one of these, head over to the Birch Press Design blog and I’ll walk you through it.

I appreciate you sharing your time with me. Have a fabulous day!

Birch Press Design – Fall is in the Air

Hello again! I’m over on the Birch Press Design blog today with this soft, watercolor fall card featuring some goodies from the new mini release.

I had fun watercoloring with my Tombow markers and then die cutting one of the coverplates from the Autumn Breeze set. If you’d like to see how it all came together, head to the Birch Press blog for a photo tutorial.

The layers of this add so much interest and the different colors are just wonderful for a light fall feeling. I also love gold heat embossing for that fall feel! Don’t you?

I appreciate you sharing your time with me. Have a fabulous day!

Birch Press Design – Stenciling Quick and Easy Cards

Hello everyone! I hope you’re having a great week so far. Today I’m over on the Birch Press Design blog featuring this set of 4 stenciled cards. They are quick and easy to pull together if you need something in a jif or if you’d like to mass produce cards to have in your stash. They would make a great gift to give as well.

I used the same mandala stencil on each of these cards. I just changed up the ink colors and where I placed the stencil on my panel. I used blending brushes and dye inks for all the stenciling. Let’s take a closer look at each card.

For this first card, I used some blue and purple inks and started my inking from the center of the mandala out. I finished it off with some gem stones accenting the different points of the mandala to make it a focal point and added a die cut sentiment to the bottom.

For this next one, I wanted to use bright, fun colors for my inking and then made the sentiment flashy with a rose gold mirror cardstock for the shadow portion. I finished it off with some opal half-round embellishments scattered across the design this time.

For this design, I brought the stencil down much further and stuck with some natural green and muted yellow inks. I absolutely love how this turned out! I also brought a little shine to this sentiment with gold mirror cardstock and pearl confetti bits scattered all about. This one may be my favorite.

Something struck me when I moved on to this final card and I decided to try stenciling at an angle instead of centered. I think it turned out really cool and would definitely try this design again. I finished it off with a simple hello and some great clear blue and green bubbles from my stash.

I hope you enjoyed today’s cards. If you’d like to see the step-by-step, head over to the Birch Press Design blog where I lay it all out with a photo tutorial.

I appreciate you sharing your time with me. Have a fabulous day!

Birch Press Design – Trio of Ornament Tags

Happy weekend everyone! Today I’m over on the Birch Press Design blog with a step-by-step on how I created these awesome Christmas ornament tags. I know it’s crazy to think about Christmas already but it’s going to sneak up on us before you know it.

These new layered ornaments are just beautiful and so much fun to mix and match! I can’t wait to try these in lots of other color combinations too. Cool blues and teals would be beautiful! Don’t you think?

Here’s a look at each individual tag as well. This was the first one I create and I think it’s my favorite. I just love all that detail and how the baubles finish it off.

Then I tried this one, adding a word sentiment across the middle. I would love to get dies for the word joy or merry. I think they would be just beautiful on this style.

And this last one is just beautiful! I love the cut line detail and the star burst in the center. So pretty!

Do you work on Christmas early? I have friends who try to tackle a little each month all year long and others who won’t touch it until after Thanksgiving. I find myself somewhere in the middle…also lots of great intentions that don’t come to fruition. haha.

I appreciate you sharing your time with me. Have a fabulous day!

Birch Press Design – Slimline Card Set

Hello again! I’m over on the Birch Press Design blog today with this fantastic set of slimline cards featuring a few stencils, the Cora layering dies and the new Jumbo Lingo word dies! They are fantastic and I thought slimline cards were the perfect way to showcase them!

The whole set started with the thanks card and I just kept going with ideas, so I kept creating. They were so fun to put together. Here’s a close up of each one.

After this one, I thought I would make 3 of the same card, just different colors and switch out the sentiment but that last .2 seconds and I had other ideas I wanted to try.

I thought it was so fun to try this other stencil, inking it up lightly and moving it around the panel. I love how it turned out. And that happy sentiment is perfect for the brightness of this card.

And for this last card, I knew I wanted to try some masculine colors which turned out so cool! By the time I had created 2 landscape cards, I thought it would be fun to break the sentiment free of the shadow part and use it vertically. I love it!

For process photos and description, head over to the Birch Press Design blog!

I appreciate you sharing your time with me. Have a fabulous day!

Birch Press Design – Rainbow Happy

Hey there! I’m up on the Birch Press Design Blog today with a step-by-step on how to create this super fun rainbow happy card featuring some new products that just arrived in the shop.

As soon as I saw this die set, I knew I had to try it in a rainbow straight away! So I grabbed my cardstock and set to work! I’m thinking a set of these in color tones would be amazing too!

Those awesome confetti bits are from Trinity Stamps and you know I had to add some sparkle to it too…head to the blog to see how I put it all together.

I appreciate you sharing your time with me. Have a fabulous day!