Doodlebugs – Mix It Up Monday Birthday Fun

Hi friends! Today I’m mixing things up on the Doodlebugs blog birthday style. My daughter turned 17 a couple weeks ago and this was the birthday card I created for her. The fun part is, you can create this same card for any year because of the awesome Mama Elephant Birthday Candles stamp set!

I chose images from Mama Elephant Birthday Candles and Delivery By Truck to stamp and color with my copic markers. Then I used the coordinating dies from both sets to cut them out.

Next, I cut a white panel with the largest Pretty Pink Posh Eyelet Rectangle die and inked it up from the center fading out with Lawn Fawn celery stick ink and a blending brush. Then, I taped the Pretty Pink Posh Starburst stencil to the panel and went over it with the same ink. I didn’t want my card front white but I also didn’t want it dark to distract from the images either. So I took a Lawn Fawn kiddie pool ink pad and drug it across all four edges to give it a light teal color.

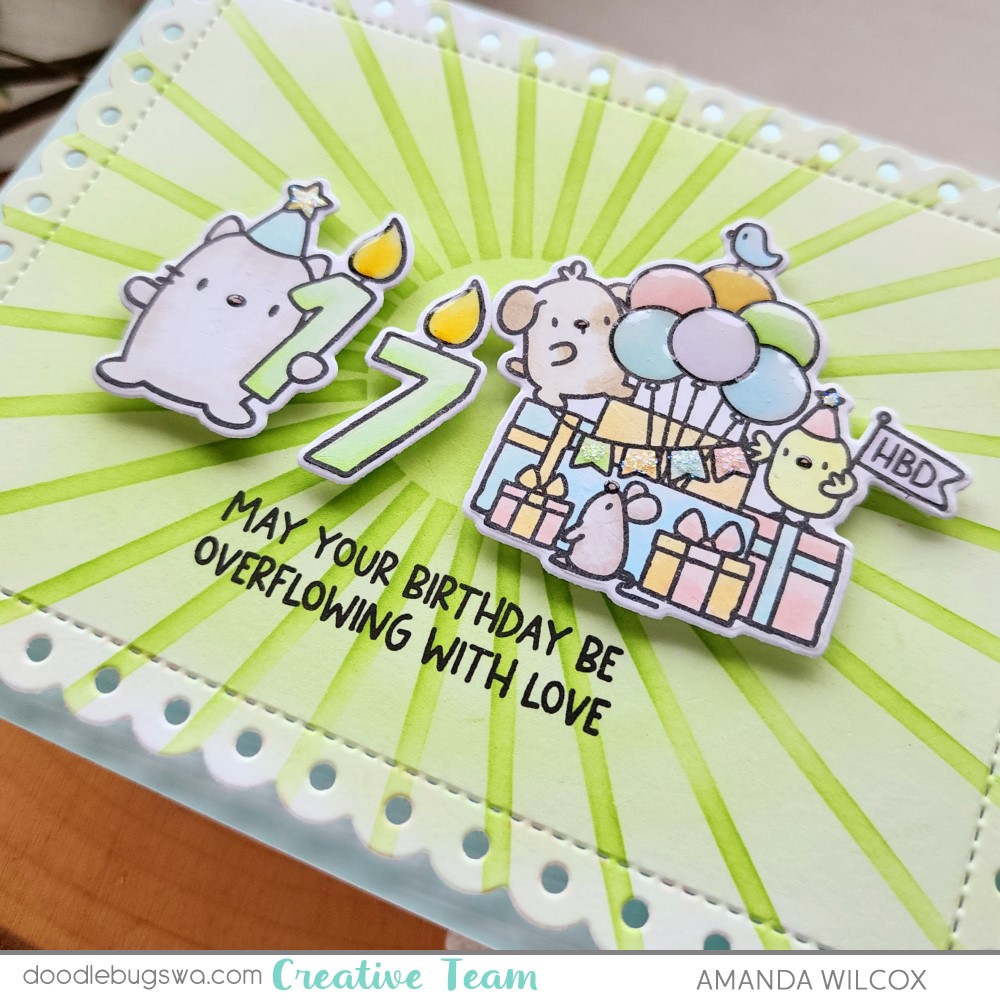
I stamped a sentiment on the lower center of the eyelet panel from Mama Elephant Deliver Lots of Cheer before adding foam tape and popping it up on my card base. Then I added the images with foam squares. For finishing touches I added glossy accents to all the noses and balloons. Then I added stardust Stickles to the banner and stars on the hats.

Most of the time I don’t know who is getting my card or when so I leave the inside blank but this time it was very specific so I pulled the cute sloth from Mama Elephant Birthday Candles and stamped him in pizza dough ink, along with a second sentiment from Mama Elephant Mixed Wishes Greetings.

Product used today:
Mama Elephant Birthday Candles stamps and dies
Mama Elephant Delivery By Truck stamps and dies
Mama Elephant Mixed Wishes Greetings stamps
Mama Elephant Deliver Lots of Cheer stamps
Pretty Pink Posh Eyelet Rectangle dies
Pretty Pink Posh Starburst stencil
Blending brushes
Lawn Fawn Ink – pizza dough, kiddie pool and celery stick
Foam squares and tape
Glossy accents
Stickles – stardust

I appreciate you sharing your time with me. Have a fabulous day!

Doodlebugs – Hanging Ornaments Card Duo

Happy Monday friends! To mix things up today for the Doodlebugs blog I’m playing with the new Spellbinders ornament dies – there are a few fun sets depending on your style – and Pretty Pink Posh stencils and dies for the background. And of course I got carried away and made too many ornaments for one card so we’ve got two, just for fun!

Like I eluded to above, I started these cards by just pulling out the Spellbinders Festive Ornaments dies and started cutting pieces. I wanted to make a million of them all because they’re so cute but I focused on my top favorites and cut the pieces for those. I just used cardstock in my stash and actually didn’t have a plan for pairing them up at all.

But once they were all glued together, I immediately put these three together and loved the combo! So I pulled out the new Pretty Pink Posh Winter Words stencil and inked green on green cardstock for a subtle background. Then I stamped a sentiment from Spellbinders Santa’s Sippin’ Sayings and heat embossed it white.

After popping the ornaments up with foam tape I threaded fishing line through them for the look of them hanging but nothing too bold to take away attention from the cute ornaments themselves. I secured the fishing line with washi tape on the back of the panel and then glued it to a card base.

But I still had this adorable light ornament left over and this sentiment in the same stamp set was just calling it’s name. So instead of making more for another card in the same design I thought I would let it shine all on its own. I did use the same stencil on this background panel before die cutting it with the largest Pretty Pink Posh Eyelet Rectangle die although my dark red ink isn’t quite dark enough for this paper.

I heat embossed my sentiment on the bottom of the panel and popped the ornament up the same as the others. Then I threaded fishing line all the same again and popped the eyelet panel up on a white card base.

Aren’t these so fun!?! I can’t wait to make more, including the other sets with the critters and characters in them. These would make great tags and ornaments for your tree too! Lots of ideas!!!

Products used:
Spellbinders Santa’s Sippin’ Sayings stamps
Spellbinders Festive Ornaments dies
Pretty Pink Posh Eyelet Rectangles dies
Pretty Pink Posh Winter Words stencil
Blending brushes
Lawn Fawn Ink – cilantro and chili pepper
Foam tape
Liquid glue
VersaMark
Embossing powder – white
Powder tool
Reverse tweezers

I appreciate you sharing your time with me. Have a fabulous day!

Doodlebugs – Holly Jolly Die Cutting Christmas

Hello everyone! I had a die cutting party for one in my craft room and it was a blast! I played with the new Pretty Pink Posh Build a Stocking die set and it was so fun! I even went a completely different color way than I’m used to for added fun. I hope you enjoy it!

This card actually started with me embossing a piece of white cardstock with the new Spellbinders Sparkling Snow 3D embossing folder. I had to test it out as soon as it came because it looks so pretty on the package. It’s even better in real life. After I embossed the panel I took my pink and purple blending brushes and just went over random snowflakes without adding and ink to them. It gave a sweet, soft glow on the paper and I loved it.

So naturally, I went digging in my paper stash and found pink and purple cardstock that coordinated and started die cutting parts of the stockings. I used liquid glue to adhere them together and played with arrangement on my card for a while before I liked it.

I carefully added liquid glue where the stockings overlapped and placed an acrylic block on them to dry so I didn’t lose my positioning. (That’s how long it took me to get it right.) While that was drying, I die cut sentiment strips and stamped the sweetest sentiment ever on the top layer. I was mindful to use gray ink because the card is so soft, I didn’t want a bold black sentiment stealing all the attention.

With the stockings dry, I added foam squares to everything and popped them in place on the embossed panel. Finally, I added the panel to a card base and my card is all finished.

I love thinking about different ways projects could be fun after I make them and this one screams a “build a stocking” party for kids. Die cut a bunch of pieces and let them loose to build stockings and create cards with them. I think it would be so much fun for everyone! Shoot, might be a fun way to convert a non-paper crafter to the dark side too. Lol.

Products used today:
Pretty Pink Posh Build a Stocking dies
Pretty Pink Posh Sentiment Strip dies
Pretty Pink Posh Sentiment Strips | Christmas stamps
Spellbinders Sparkling Snow 3D embossing folder
Liquid glue
Foam squares

I appreciate you sharing your time with me. Have a fabulous day!

Doodlebugs – Gift Card Holders for the Holidays

Hey there everyone! We’re gearing up for gift giving with this week’s Mix it up Monday. As our family has gotten older we give more gift cards for the holidays than we used to. It’s fun to make them a little extra by putting them in something fun and cute instead of those sleeves they all come with.

Today I’ve got a pair of adorable gift card holders using the awesome Pretty Pink Posh Gift Card Bag dies and some Mama Elephant images and sentiment banners. I can’t wait to see these hanging on our Christmas tree!

I cut two sets of gift card bags – one from white cardstock and the other from teal. Then I ink blended both using the Pretty Pink Posh Trellis stencil and Lawn Fawn dye inks – deep sea and peacock. I used a tear tape to adhere the front and back of the bags together. Now let’s decorate them!

I started with this wintery version using the sweet bunny and mug from Mama Elephant Holiday Huggers. I chose to color the peppermint stick like a cinnamon stick and his hat blue to keep with the winter/hot cocoa vibe instead of Christmas.

I popped him up with a Mama Elephant Banner Greeting using foam squares and strips. Then I used black glaze pen on the bunny’s eyes and glossy accents on his nose and hat.

But I couldn’t make only generic ones. These reindeer from Mama Elephant Holly’s Reindeer are irresistible and I was so excited to color this cutie and his gifts. I followed the same design and popped him up with another banner sentiment but this time I went with silver instead of gold.

On this one I used the black glaze pen on the reindeer’s eyes and nose, then glossy accents on the package bows. I also created little inserts that are perfect to tape gift cards to and write a message on as well.

I know some people have strong feelings about gift cards versus gifts for the holidays, what side are you on?

Products used:
Mama Elephant Holly’s Reindeer stamps and dies
Mama Elephant Holiday Huggers stamps and dies
Mama Elephant Banner Greetings dies
Pretty Pink Posh Gift Card Bag dies
Pretty Pink Posh Trellis stencil
Lawn Fawn ink – deep sea and peacock
Sakura black glaze pen
Tear tape
Foam squares
Glossy accents

I appreciate you sharing your time with me. Have a fabulous day!

Doodlebugs – Different Ways to Glam Up Your Card

Hey friends! I’m over on the Doodlebugs blog today mixing things up with glitter for all things holiday sparkly! Sparkle and shine are some of my favorite things to add to a card so today I’m sharing a few different ways to achieve that.

I’m in love with these sweet new Mama Elephant critters from the new Holiday Huggers set and just had to use them as soon as possible. So I went digging to see what I could have them hang on to and when I found this Spellbinders sentiment I knew I didn’t need to look any further. So I stamped all three critters and colored them with copic markers. Then I used the coordinating dies to cut them out.

Next, I cut the sentiment shadow from black cardstock. Then I cut a piece of Spellbinders die cutting foam and also cut a piece of double-sided adhesive sheet to match. I removed the liner and attached the foam to the adhesive sheet. Now my foam is essentially a giant sticker. Then I die cut the sentiment. The die cutting foam tends to stay in your die which is fabulous for this because I removed the release paper and lined the die up with my shadow adhering the sentiment down and pulling my die off. It worked perfectly!

Sparkly sentiment? Yes, please! It grabs your attention and the foam gives instant dimension too!

Next, I inked up the Pretty Pink Posh Holly stencil with Lawn Fawn inks – cilantro and noble fir – before spreading Thermoweb Glitz Gel through the berry layer.

Sparkly stenciling in your background? Fabulous way to add some glam and take things to the next level.

I added my critters to the sentiment and used liquid glue to adhere them to the stenciled panel once the glitz was dry. Then I decided to trim the edges off the stenciled panel – just 1/8 inch off each side. Then I added strips of black cardstock to my card front and finally glued my panel on top of that. I liked how this sets off the shadow on the sentiment.

Then, for finishing touches we add some shine. Black glaze pen to the critter eyes and glossy accents to their noses and the white parts of their hats.

Shine to go with sparkle is fabulous! It’s not as bold as glitter but the shine definitely adds a big piece and catches your eye when you’re looking at the card.

Products used today:
Mama Elephant Holiday Huggers stamps and dies
Pretty Pink Posh Holly stencil
Spellbinders Merry Christmas dies
Spellbinders die cutting foam – silver
Liquid glue
Glossy accents
Sakura black glaze pen
Lawn Fawn ink – noble fir and cilantro
Blending brush
Stencil pal
Glitz gel – red

I appreciate you sharing your time with me. Have a fabulous day!

Pretty Pink Posh – Fall Jar with Metallix Stenciled Background

Hi friends! I’m sharing a card I created with the September Pretty Pink Posh release. I paired the super fun Fall Jar stamps and dies with the Deco Leaves stencil.

I can tell the seasons are changing when I’m reaching for all of those rich, deep colors in my inks and copic markers. It’s almost subconscious because I love fall so much!

Today, I started my card with the messy background so it had time to dry while I was working on the other elements. First I inked up a 4×5.25 inch white piece of cardstock with distress oxide inks in aged mahogany and crackling campfire. I splattered the panel with water and blotted it dry before attaching the Deco Leaves stencil over the top and spreading Thermoweb Aged Copper Metallix through it.

I removed the stencil, set the panel aside and cleaned everything before switching gears to stamping and coloring.

I stamped out all of those sweet images from the Fall Jar stamp set and colored everything with copic markers before using the coordinating dies to cut it all out. Then I used liquid glue to adhere all of the parts and pieces together except the mouse. He needed to stand out in a foam square.

When my stenciled background was dry, I used liquid glue to adhere it to a white card base. Then I used the main die in the Spring Circles die set to cut a green label. I added the jar to that with foam strips and did the same to add the label to my background panel.

To finish things off, I tied jute twine around the top of the card and tied it in a bow. Then I added Touch of Gloss to the berries, small leaves and spots on the mushroom.

Products used today:
Fall Jar stamps and dies
Deco Leaves stencil
Spring Circles dies
Thermoweb Metallix Gel – aged copper
Foam tape
Distress Oxide Ink – aged mahogany, crackling campfire
Liquid glue
Touch of Gloss

I appreciate you sharing your time with me. Have a fabulous day!

Doodlebugs – Cozy It Up Monday

Hey friends! I’m switching things up for today because we’re getting cozy on the Doodlebugs blog while mixing things up. Mixing Mama Elephant cuties with Pretty Pink Posh sentiment stamps and dies for an awesome combo!

I started by stamping and coloring my images from Mama Elephant’s Keep Cozy set. Then I used the coordinating dies to cut them out and a little liquid glue to adhere the groupings together.

Next, I pulled some cardstock scraps from my stash and cut a bunch of sentiment strips using the Pretty Pink Posh Sentiment Strip die set. This die set is genius and a must have staple in your craft room. After cutting them all I arranged them on a piece of white cardstock. I used liquid glue to adhere them so I let the glue dry for a minute before trimming the panel down to 4×5.25 inches.

Then I added foam tape to my critters and popped them up like they were sitting on one of the strips. Next, I placed the panel in my MISTI and stamped a sentiment from Pretty Pink Posh Sentiment Strips | Fall stamp set with brown ink to keep the look subtle.

After that, I added foam tape to the back of the panel and popped it on a white card base. For finishing touches I added mossy green confetti across the design, black glaze pen the the critter eyes and glossy accents to their noses.

Doesn’t this make you want to curl up with a cuppa and a good book and forget your responsibilities? Me too!

Products used today:
Mama Elephant Keep Cozy stamps and dies
Pretty Pink Posh Sentiment Strips dies
Pretty Pink Posh Sentiment Strips | Fall stamps
Pretty Pink Posh confetti – mossy green
Glossy accents
Sakura black glaze pen
Foam tape and squares
Liquid glue

I appreciate you sharing your time with me. Have a fabulous day!

Doodlebugs – Brewing Up Some Fun with Die Cut Inlay

Hello again. I’m on the Doodlebugs blog today mixing it up with Mama Elephant Little Agenda cuties and the Pretty Pink Posh Haunted House die. They’re perfect for each other! Let’s get started!

To start things off today, I pulled out the Pretty Pink Posh Haunted House die and my Mama Elephant Little Agenda Mummy and Witch stamps. I placed the stamps all over the house to see which ones and how many I wanted to use. Then I stamped and colored everything with copic markers, using the coordinating dies to cut them out.

Between the house and the background panel, I did two sets of ink blending full panels. For the house, I used hickory smoke, gathered twigs and black soot distress oxide inks. I was super messy and intentionally didn’t blend the panel well. For my background panel, I inked top to bottom with twisted citron, mowed lawn and rustic wilderness. Then I went around the edges with black soot. Still using distress oxides; it’s was I typically reach for. I spritzed the green panel with water and blotted it dry.

Next, I die cut the haunted house from the gray inked panel and glued the frame down with liquid glue. Then I cut the house again from black cardstock, carefully leaving as many of the little pieces in the die as possible so that I could inlay most of them onto my panel. This did take a while, not going to sugar coat it, but it was therapeutic and totally worth the work.

I slid some images behind the window frames, trimmed out the center frame so my mummy would should through, and popped some of the images up with foam squares. I used a black pen to add web from the window frame to my spiders hanging down too.

Last, I cut a sentiment strip using the new die set from Pretty Pink Posh and stamped a sentiment on it using the coordinating Halloween stamp set. The sentiment strip was cut from green cardstock so to mute it down I inked the edges with black soot distress oxide ink left in my blending foam. I popped it up with foam strips and added some glossy accents to the candle flame.

Products used:
Mama Elephant Little Mummy Agenda
Mama Elephant Little Witch Agenda
Pretty Pink Posh Haunted House die
Pretty Pink Posh Sentiment Strips dies
Pretty Pink Posh Sentiment Strips: Halloween stamps
Liquid glue
Distress Oxide Ink – hickory smoke. gathered twigs, black soot, twisted citron, mowed lawn, rustic wilderness
Foam squares
Glossy accents

I appreciate you sharing your time with me. Have a fabulous day!

Doodlebugs – Thank You Box Card

Hey friends! Mix it up Monday brings us thinking outside the box a bit…a box card that is. I love making box cards and don’t do them near often enough. I recently picked up the Pretty Pink Posh Box Card die set and it’s total perfection. Probably the easiest and most complete I’ve used yet. No need for extra “insert” dies and I love the scallop pieces to decorate every part of your box card.

I started by choosing a few of the adorable Mama Elephant Little Agenda Hamsters to stamp out. I colored them with copic markers and used the coordinating dies to cut them out.

Sticking with my love of teal, I found some cardstock in my stash and started die cutting the pieces to my box card next. I chose white for all the decorative pieces so I could ink blend on them. Today I chose peacock feathers and cracked pistachio distress oxide ink for those.

For my sentiment I stamped the large sentiment from Mama Elephant Thank You (Love You) in Lawn Fawn dye inks – rainforest, peacock and mermaid for the ombre effect and used the coordinating die to cut it out. I also stamped a small sub-sentiment from the same set and used a Pretty Pink Posh Sentiment Strip to cut it out.

I used liquid glue and reverse tweezers to assemble my box card and then tear tape to add my images to the different levels of the card. I also cut a second large scalloped piece from white cardstock to glue on the back so I had a big clean area to write my message on.

Products used:
Mama Elephant Little Agenda Hamsters stamps and dies
Mama Elephant Thank You (Love You) stamps and dies
Pretty Pink Posh Sentiment Strip dies
Pretty Pink Posh Box Card dies
Distress Oxide Ink – peacock feathers and cracked pistachio
Lawn Fawn Ink – rainforest, peacock, mermaid
Liquid glue
Tear tape

I appreciate you sharing your time with me. Have a fabulous day!

Pretty Pink Posh – September Release Instagram Hop

Hey friends! Just popping in today to let you know that I’m participating in the Pretty Pink Posh Instagram Hop today! I have this gorgeous stenciled card to share and you have chances to win one of three $30 gift cards to the PPP shop if you head over, comment and hop along too!

This was a simple card to create but I’m still in awe of how pretty it turned out and how easy the new Layered Woodland stencils are to use! I used all Lawn Fawn dye inks with blending brushes, then die cut my panel with the largest Stitched Torn Rectangle die.

I cut the new Thankful Script word from white cardstock 4 times and glued them together, then cut the shadow once from white cardstock but I inked it with chipped sapphire distress oxide ink before adhering the word to it. I also inked my card base with the same to tie them in together.

I popped the stenciled panel up with foam tape on my card base and use liquid glue to adhere my sentiment. Then I pulled some images from the new Fall Jar stamp set to color and add to the design.

For finishing touches I added black glaze pen to the mouse’s nose, then Touch of Gloss to the center of the bow and parts of the moth (or butterfly, whichever you prefer).

I had so much fun pulling this card together, especially adding that mouse to the top of my sentiment. Just makes me smile every time I look at him.

Products used:
Fall Jar stamps and dies
Layered Woodland stencils
Stitched Torn Rectangles dies
Thankful Script dies
Distress Oxide Ink – chipped sapphire
Lawn Fawn dye inks
Blending brushes
Foam tape and squares
Liquid glue

Remember to head to Instagram to comment and hop for a chance to win a $30 gift card to the PPP shop!

I appreciate you sharing your time with me. Have a fabulous day!