Miss Ink Stamps – If Things Made Sense

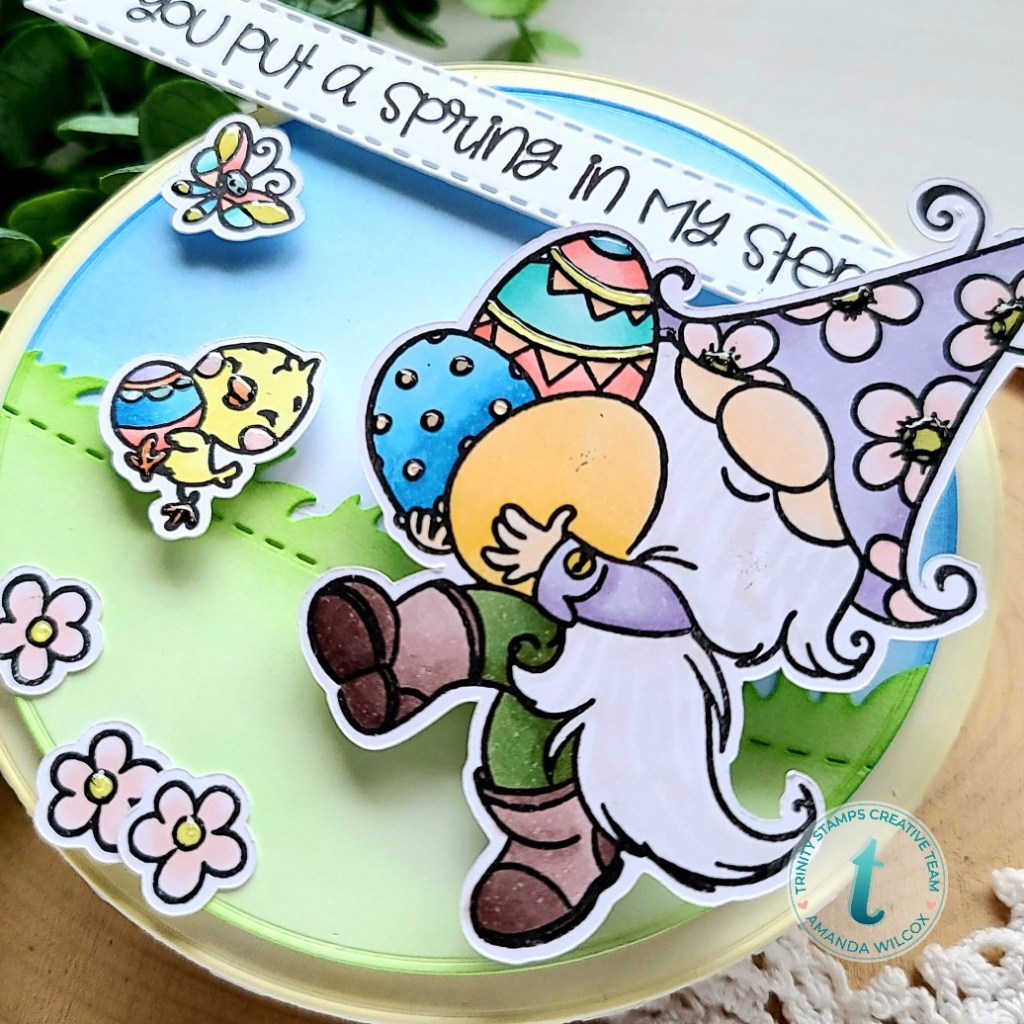
Hey everyone! I’m over on the Miss Ink Stamps blog today with another addition to the Alice card collection. This time we’re falling down the rabbit hole…where nothing makes sense anymore, and we’re late.

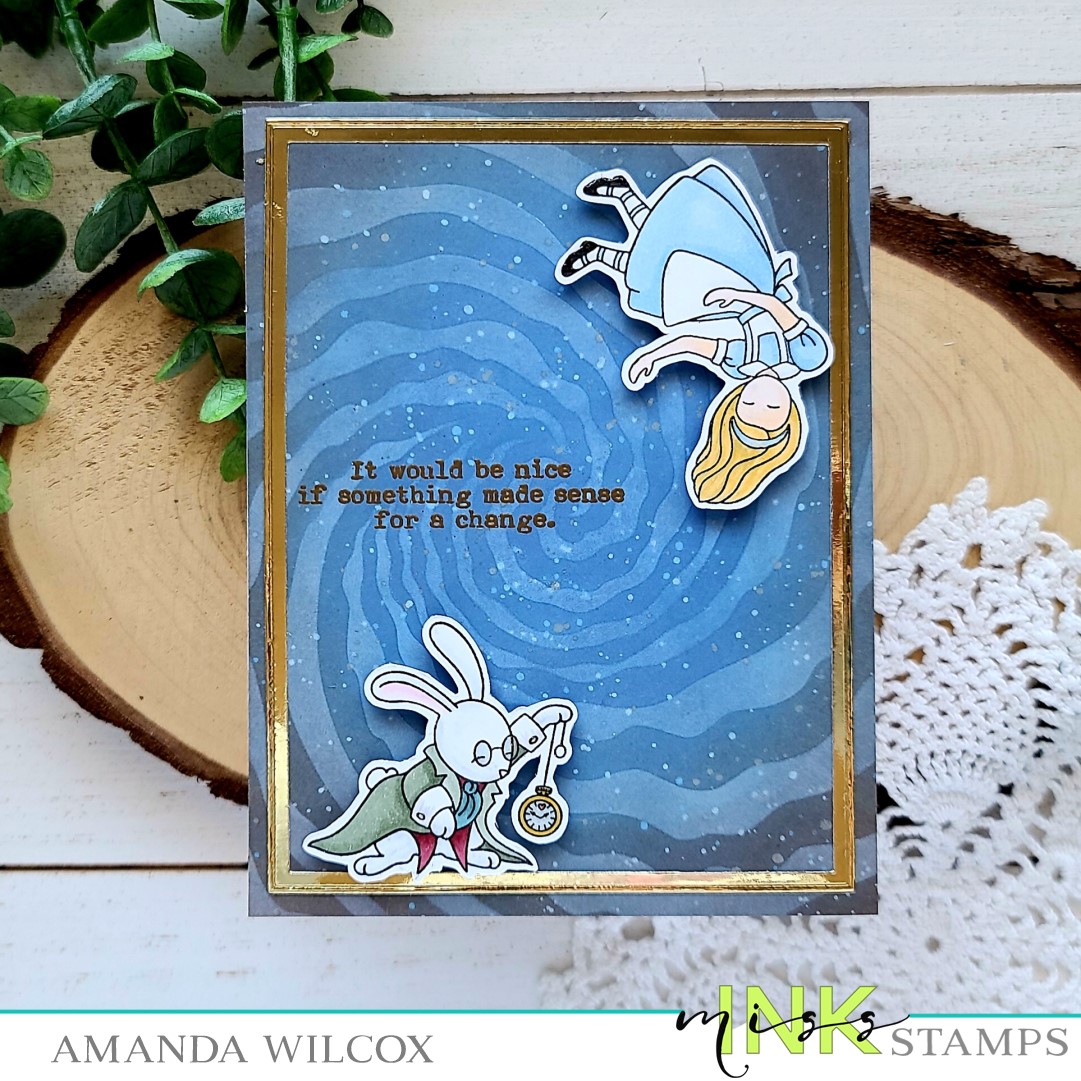
I started with the background on this card, blending distress oxides and using the Rabbit Hole stencil. I did a little different color combo for my distress oxide blending today and I like how it worked out.

I always start with an oversized panel so I can trim whichever way I want. It helps if my stencil isn’t centered or the ink blends one edge better than another. Anyway, today I used faded jeans for the center and ground espresso for the edges. Then I splattered the panel with watered down bits of both colors. I sprayed my stencil with pixie spray and laid it over top, then pounced on some tattered rose for the swirls. I flicked some of this watered down ink over the panel as well.

Next, I stamped and colored my images from Alice and used the scan-n-cut to cut them out. I added foam squares to the back and used them as a guide for where to stamp and heat emboss my sentiment. This is one from the Wonderland Wisdom set. These quotes are fantastic. Once that was complete, I added the background panel to a card base and adhered my images in place.

Things looks a little sparse so I went back to the drawing board and came up with the fun idea to add a frame. I used the Trinity Stamps embossed edge rectangles. I cut one from gold mirror cardstock and then cut the center out with the next size down. I added liquid glue to the frame and carefully fit it around the images. I love what this does for the whole design!

For finishing touches, I added glossy accents to the rabbit’s watch, glasses and buttons, and Alice’s shoes and headband.

Given the world we live it right now, I think this card is fairly appropriate and would be fun to send to just about anyone. Don’t you?

I appreciate you sharing your time with me. Have a fabulous day!

Thermoweb – Time to Fly Toner Sheets

Hello again! Cheers to a new week and a fresh start! Today I’ve got a couple of fun cards to share with you featuring the newest limited edition release of toner sheets from Thermoweb called Time To Fly! They are super adorable butterflies and dragonflies! I couldn’t choose so I made a card with each of them for you!

I used a combination of grass green and passionate pink deco foils on both cards. I paired these awesome products with stamps, dies and stencils from Pink & Main, Trinity Stamps and Newton’s Nook.

For this first card, I used the Pink & Main Smile die cut for the sentiment and paired it with a cute snail from Trinity Stamps Mouse House. I love that stamp set and was super happy to add this guy to my card. I also stenciled some cute clouds from the Newton’s Nook Cloudy Sky stencil for the background.

That foiling is SO MUCH FUN in the light! The colors are so awesome, it’s almost mesmerizing! Let’s check out the second card too!

For this card, I inked up the Trinity Stamps Catching Some Rays stencil in the background and added their Scripty Birthday dies for a sentiment and topped things off with adorable bugs from the Bunny Burrow set.

I love playing with this card in the light too! All that fun, happy color is sure to make the recipient smile for both of these cards!

For a full tutorial, head over to the Thermoweb blog and check it all out!

I appreciate you sharing your time with me. Have a fabulous day!

Trinity Stamps – Slimline Room Builder Scene

Hello everyone! I have a really fun card to share with you today featuring Trinity Stamps products. I had a blast creating a sweet slimline scene filled with some of my favorite bunnies for a great Mother’s Day card.

For cards like this I like to die cut my room pieces from white and use my blending brushes to ink them up in the colors I like. The exception to this thought are the chair rail and base board which I cut from kraft cardstock this time. They are really skinny pieces and easier to cut from the color you want.

I stamped and colored images from Dust Bunnies and Dir-tea Bunny for my characters in the scene and then decided to use smaller images from the Dust Bunnies set to fill in the “pictures” in the frames for the wall.

I used liquid glue to adhere the pieces to my scene and then a combination of liquid glue and foam squares to adhere my bunnies down. I chose a sentiment from the A Sentiment For (almost) Everything set and cut it out with a banner from the 4-bar Card die set and popped it up with a foam strip.

I did finish things off with glossy accents on all of the bunnies noses. I think this scene is just so sweet and it was really fun to build and customize too! You could change the number of little bunnies you use based on the mom that the card is for and everything. There are so many possibilities.

To make things easier, for those looking for the products I used, I will link them below.

Products:
Dir-Tea Bunny stamps
Dir-Tea Bunny dies
Dust Bunnies stamps
Dust Bunnies dies
Slimline Room Builder dies
A Sentiment for (almost) Everything
4-bar Card dies
Glossy accents

I appreciate you sharing your time with me. Have a fabulous day!

Trinity Stamps – Happy Easter

Hello again! Today I’m over on the Trinity Stamps blog sharing this really bright and fun Easter card featuring come products from the most recent release. I love how these sets work so well together and had a blast putting this fun card together. I hope you enjoy it!

I used images from the new Gnome Bunny, All Cracked Up and Spring In My Step stamp sets for today’s card. I colored the images with my copics and cut them out, then started setting my scene.

I inked up panels with distress oxide inks and used the Slimline Great Outdoors Borders, Slimline Scenic Borders and Embossed Edge Rectangle Stack dies to cut everything out.

I glued the yellow panel to a white card base and popped the white panel up with foam tape. I glued the sky and hill with liquid glue and popped the grass panel up with foam tape as well. I used a combination of foam squares and liquid glue to adhere my images. Then I stamped a sentiment a cut it out with a Slimline Banner and placed it with foam squares.

For finishing touches, I added glossy accents to the flower centers, chick’s beak and legs, parts of the butterfly and parts of the Easter eggs too!

I just love this sweet scene and had so much fun playing with all that rainbow color!!!

I appreciate you sharing your time with me. Have a fabulous day!

Trinity Stamps – Some Bunny Mug

Hi everyone! I’m back with another fun caffeinated card to share with you featuring some goodies from Trinity Stamps‘ most recent release.

For today’s card, I die cut the coffee mug card die from Bristol Smooth cardstock and heat embossed the Easter eggs from Gnome Bunny in white. Then I watercolored them with my zig clean color real brush markers. Then I took one of the extra bunny images in Slimline Bunnies, stamped him and colored him with my zigs too. I also stamped a sentiment from that set and fussy cut them both out. I popped them up on my cute mug with foam squares and this quick and fun card is all finished!

This die set comes with an optional insert for a gift card too! I haven’t decided who is getting this fun card yet but I just might add that insert to the inside and make this an extra fun surprise for someone!

Remember, the Coffee Lovers Spring|Summer Hop is still going on! I’m linking this cutie up and hope you’re playing along with us!

I appreciate you sharing your time with me.

Therm-O-Web | Sassy & Craft Collaboration

Hey friends! Over on the Thermoweb blog this week we’re having a fun collaboration with Sassy & Crafty. Today I’m sharing how I made these two really wild and fun cards!

I used deco foil on the hippie card with two of Sassy & Crafty stamp sets – Hippie Patches and Flower Child, along with a Sassy & Crafty stencil called Spiral Shift. Here’s a closer look at it.

For the super cute and fun cow card, I used the Electro-pop Neon Flock with a Sassy & Crafty stencil, along with their Have a Cow stamp set. Isn’t it just so fun!?!

That fuzzy flock is so cool in person and fun to feel too! I really love how this one turned out!

If you’re looking for all the details, photo tutorial and products used, head over to the Thermoweb blog and check it all out!

I appreciate you sharing your time with me. Have a fabulous day!

Coffee Loving Cardmakers – Coffee Time

Hi again! Today is Tuesday Tea over on the Coffee Loving Cardmakers blog, in the middle of the Spring|Summer Coffee Lovers Hop! Today I have a pair of cards featuring Super Sponsor Jane’s Doodles to share with you.

I started these cards by stamping the images from Coffee Time on Bristol Smooth cardstock and heat embossing them in black. Then I used my Zig Clean Color Real Brush markers to watercolor them in. Then I ran them through the scan-n-cut and started playing with them to decide on final designs.

For this first one, I inked up a white panel with ground espresso distress oxide by dragging the pad across the paper. Then I used gathered twigs distress oxide around the edges. I spritzed it with water and die cut it with Super Sponsor Trinity Stamps’ embossed edge rectangle die. Next, I dug out a very old Bo Bunny stamp set and stamped the coffee stain rings on the panel with ground espresso distress oxide ink. Then I chose 2 smaller embossed edge rectangle dies and cut out frames in white and black and glued them down with liquid glue. I popped up my images with foam squares. Last, I stamped and heat embossed a sentiment from Coffee Time, cut it into a strip and popped it up as well.

For the second card, I took a white panel and arranged all the images from Coffee Time on them and stamped them repeatedly creating my own patterned paper. I had so much fun placing each image and seeing how I could make them fit together like a puzzle. Then I pulled out two die sets from Super Sponsor Newton’s Nookcircle frames and banner trio. I cut a circle from vellum and a banner from black. I heat embossed a different sentiment on the banner and adhered it to the bottom of the circle. Then I popped my images up with foam squares and hid more foam squares behind those on the vellum circle so both layers have dimension.

I hope you’re having a fun week with all of the caffeinated inspiration and that you’re playing along with us too! Remember to head HERE to link up your coffee creations before Friday.

I appreciate you sharing your time with me. Have a fabulous day!

Rubbernecker Stamps – Coffee Rainbow

Hi again! Welcome to a bright new week! It’s spring break here so there is extra time for morning coffee, crafting and all the fun things! Today I have a clean and simple card to share with you featuring the coffee cup die cut from Rubbernecker Stamps and a Studio Katia script coffee die, along with a couple of embellishments from Twiddler’s Nook.

I started by cutting my coffee cups from white cardstock, the tops from black and then I cut a rainbow of sleeves…not completely sure what I was going to do but wanted all the options. I used liquid glue to adhere all the pieces to my cups and started playing around. That’s when I thought of the coffee script die and finally had an idea. I cut that from white cardstock 4 times and glued them to a white panel. I ran than panel through my die cutter with a Trinity Stamps slimline modern embossed panel die. Then I glued my cups in place and trimmed off the excess.

I finished the card off with 2 coffee beans from the Twiddler’s Nook caffeinated crafting embellishment mix and tried to decide what to do with those extra cups I had left over. Duh, silly. A tag to go with my fun card!

I had the red and orange cups left so I cut a piece of yellow bakers twine, sandwiched it between the two and adhered them with liquid glue. Then I cut the coffee script and it’s shadow from white cardstock again and glued it to one side.

It’s so cute how they match but you have room on the back of the tag to write if you’d like, too!

I’m linking this beauty up to the Coffee Lovers Spring|Summer hop HERE. I hope you’ll play along with us! It’s great fun and there are SOOOO many prizes up for grabs!

I appreciate you sharing your time with me. Have a fabulous day!

Trinity Stamps – Sunnyside Up Release Day

Happy weekend everyone!!! I’m super excited to be popping in today to share that it’s release day for Trinity Stamps and we’re having an Instagram hop to celebrate! Here’s the fun card I have over on my Instagram today, but be sure to head there and comment for chances to win!

This new set is called Spring in my Step so I just had to play with this cute gnome a little extra. I stamped my images and colored them with copics, then cut them out. I thought it would be fun to make a circle shaped card so I used the embossed circle stack to cut a card base, card front and a slightly smaller circle for my scene. I used blending brushes and dye inks to ink them all up.

I die cut one of the smaller circles with the slimline scenic border grass die and glued it to the sky. I popped this up with foam tape on the circle card front. Then I glued my flowers down and popped the chick and butterfly up with foam squares. I stamped my sentiment on a slimline stitched banner and popped it on with foam squares as well.

Now, because this is a super special card, I added my gnome with an action wobbler!!! He’s so fun to play with! Now, after I did that I pulled out my glossy accents to finish everything off and forced myself to set it aside to dry before playing some more.

My daughter jumped in to help me video this cute gnome in action! Have a look!

Isn’t that just so much fun!?! We love it! Now, head over to Instagram and hop along with us for more inspiration!

Trinity Stamps – Hey Chick! Sneak Peek

Hello everyone! It’s sneak peek time for the upcoming Trinity Stamps Sunnyside up release that is happening on Saturday! Super exciting stuff we’ve got to share with you! Today I’m over on the Trinity blog sharing a sneak that peeks a handful of the different sets coming! It was so fun to combine a bundle of secondary images from the sets to create a happy Easter card.

I inked up my background with distress oxide inks to create a faux ground and fun sky. I used mowed lawn and twisted citron for the grass, with spun sugar and tattered rose for the sky. After that was blending, I added the lots of dots stencil and went over the sky with tattered rose again. Then I splattered it with water and flicked watered down tattered rose ink on the panel. Next, I die cut the panel with the largest embossed rectangle die. To create the skinny white frame, I took 2 of those dies and taped them down and cut a white panel.

I used liquid glue to adhere the inked panel to a card base, then the frame to that. Then I used a combination of foam squares and liquid glue to adhere my images down creating my scene. Then I cut the phrase “hey, chick!” from the graham cracker alphabet dies three times and used my quickie glue pen to adhere them together, then to the card front.

Moving on to finishing touches, I added star dust Stickles to the chick cheeks and bits of the butterflies. Then I finished things off with glossy accents on various parts of the Easter eggs, chick beaks and feet, and butterflies.

We’re having an Instagram hop on Saturday so I hope you head there and hop along with us. There will be tons of inspiration and prized to be won too!

I appreciate you sharing your time with me. Have a fabulous day!