Trinity Stamps – No Place Like Home…

Happy Thursday everyone! I’ve got one more fun holiday card for you today before my blog turns into a week full of amazing caffeinated creations for the Fall | Winter Coffee Lovers Hop!

The most recent holiday release from Trinity Stamps was packed full of so many amazing products, I haven’t even been able to play with them all yet. It’s crazy! There are a couple of slimline interactive dies and I made sure to try one out for today’s card.

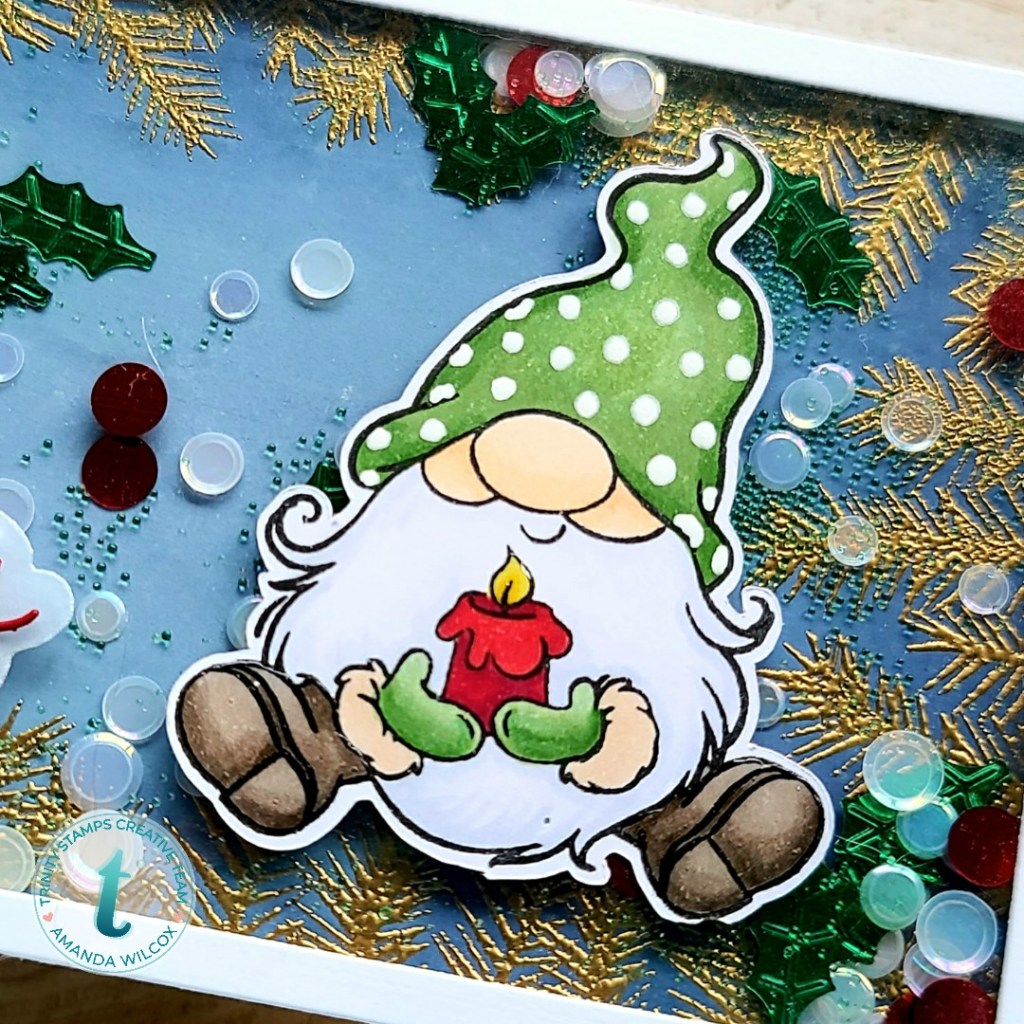
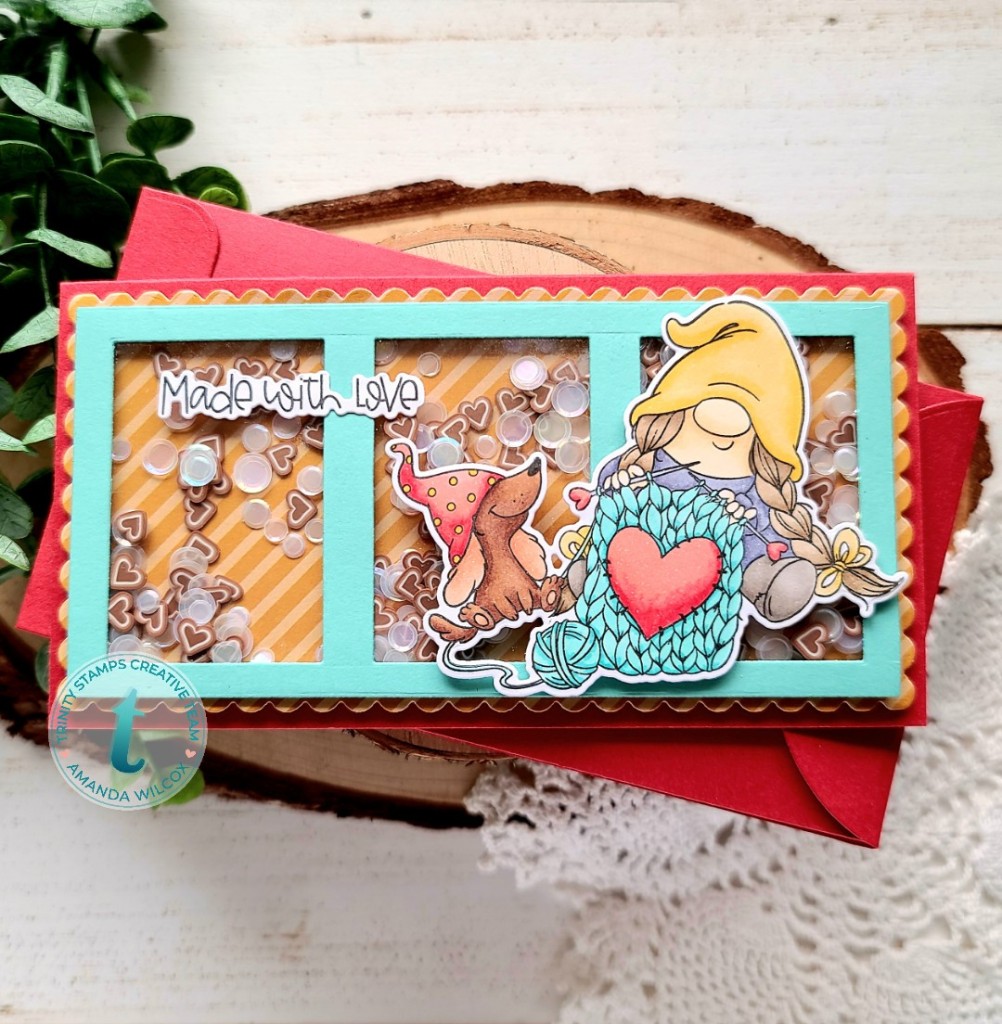
It’s a slimline surprise slider card. So much fun! I stamped and colored my Gnome for the Holidays guy with copics and used the coordinating dies to cut him out. Then I took a white panel and cut the slimline surprises pieces out. I inked up the top panel with distress oxides in pumice stone, shaded lilac, mermaid lagoon and tumbled glass. I spritzed it with water and blotted it dry. Once the panel was dry, I stamped and heat embossed the snowflakes from Christmas Magic and the words from No Place Like Home with white embossing powder.

I adhered my pull tab piece to the back of the front panel and then glued the panel to a card base. I threaded some ribbon through the hole the tag topper die gives you so it’s easy to open this awesome slider up.

Then I popped my gnome up with foam squares and moved on to glossy accents for finishing touches. I am going to adhere a gift card under the slider portion and write my message on the inside of the card. I think that will be a super fun way to give a gift this Christmas.

I appreciate you sharing your time with me. Have a fabulous day!

Trinity Stamps – Jingle All the Way

Welcome to a wonderful new week everyone! I hope you had a fabulous weekend. Today I’m sharing a super shiny, full of wonderful Christmas card featuring a new stamp from Trinity Stamps. I had fun working out of my comfort zone watercoloring with metallic watercolors. I hope you like it.

I took a panel and blended weathered wood and stormy sky distress oxides on it and spritzed it with water. I let it dry and then heat embossed the new Jingle All the Way stamp with silver embossing powder. Then I took out my Kuretake Starry Colors watercolor palette and painted it. I think I used all of the colors in that set. Once it was dry, I trimmed the panel down to 3×4.25 and popped it up on a white panel that measures 3.5×4.5.

Last, I ran a blue panel through my die cut machine with the starry skies coverplate. I didn’t like how flat it looked against the ink blending so I inked up the edges with a darker blue ink to just a bit of depth. I adhered the panel to a white card base and popped the white panel up with foam tape.

I absolutely love this new stamp. It’s so fun and has so many coloring possibilities. This card is so shiny and eye catching and it was a blast to sit and watercolor with these metallics. It’s a fabulous palette to have.

I appreciate you sharing your time with me. Have a fabulous day!

Miss Ink Stamps – Do You Want to Build a Snowman?

Hello everyone. Can you believe it’s November already? This wild and crazy year is flying by. Today I’ve got some snowy fun to share with you featuring a few stamp sets from Miss Ink Stamps and a fun winter embellishment from my shop called Snow Queen.

I started today’s card with the background panel. I stamped the Holiday Home image and cut out a mask for it. Then I stamped Pine Forest over the top so I had a layer of trees way back in the background. I removed my mask and colored the image with copic markers. Then I used dye inks and my Trinity Stamps blending brushes to add some color to the sky and the ground.

Then I chose the critters I wanted to use from Snow Buddies, stamped and colored them with copics too. I used my scan-n-cut to cut them out and moved on to assembling my card.

I cut a hill from some white glitter cardstock and glued it to the bottom of my scene panel and slid the whole panel into an acetate sleeve. I wrapped the sides around and used double-sided tape to adhere them down. Then I sprinkled in the Snow Queen embellishment mix and sealed the top up tight. Next, I adhered another snowy mound to the front of the acetate and adhered my critters and snow critter to the top of that. Then I glued the whole thing to a card base and it’s all finished!

This is my first infinity shaker card and it was so much fun to create! I’m definitely hooked and will have to give it another go ’round soon!

I appreciate you sharing your time with me. Have a fabulous day!

Birch Press Design – Sending Warm Wishes

Happy Friday everyone!!! We’ve made it through another week and I’m so excited for this weekend! Before I switch back to Halloween festivities tomorrow, I have another wintery Christmas card for you today with a coordinating ornament. I’m also over on the Birch Press Design blog today with a full, photo step-by-step if you would like more detail how to create your own.

I had a lot of fun creating this card. I started with what ended up as my ornament just playing around, then switched out the middle layer for some silver cardstock and kept going. I blended spun sugar and shaded lilac distress oxides for my background and also added a splatter of water and pearl watercolor for some shimmer. I adhered my snowflakes, cut off the excess and adhered my panel to a card base.

I wanted to tie the silver in a little more so I used it on my sentiment too! The stamped, heat embossed banner comes from the Christmas Ornament and Labels set which I thought finished the card off perfectly.

I didn’t want my first snowflake to go to waste, so I cut another set and glued them back to back. I sandwiched some fishing line between one set of points and held it with tweezers while it dried. Then I added Trinity Stamps silver baubles to both sides so no matter which way it hangs on the tree, it’s beautiful! I feel like the silver baubles really tie it in to the card design and they’ll be a perfect gift! Time to make these in all the colors!!! A rainbow set of snowflakes just sounds wonderful to me!

I appreciate you sharing your time with me. Have a fabulous day!

Trinity Stamps – Merry Christmas Gnome

Hello again!!! I have some serious cuteness to share with you today featuring some new goodies from the most recent Trinity Stamps release that just went live last Friday! It’s full of so much holiday goodness, I can hardly stand it!

Today I’ve got this super cute shaker card to share featuring the Comfort and Joy stamps and dies for my main image and the Scripty Christmas dies for a bold sentiment to catch your eye! In the background, I heat embossed the All Spruced Up pine needles in gold over a distress oxide ink blended panel. Using the frame from the Slimline Frame and Fold I turned it all into a fun shaker card!

In typical fashion, my gnome was colored with copic markers and then I added white gel pen dots to his hat for a little added interest. I just love how that turned out.

I die cut the scripty words 3 times from red cardstock and glued them together, then added them to the shadow cut from vellum. I think vellum is my very favorite thing to use for the shadow of die cut words. It’s there but it doesn’t take away from the sentiment. It’s just perfect.

I appreciate you sharing your time with me. Have a fabulous day!

Trinity Stamps – Dropping In

Hi there! Thanks for stopping by today. I’ve got another fun entry into the Cat Lovers Hop today featuring a fun stamp set and goodies from Trinity Stamps.

I knew I wanted to turn this Purrachute kitty Christmas themed so I chose my colors with intention. I colored him with copics and used the coordinating dies to cut him and his sentiment out. Then I stamped Merry Christmas from the Christmas Senti-mini set and die cut them with those coordinating dies too. I didn’t like the stark white banner so I inked it up green for a little contrast.

When deciding on y background, I wanted to stay away from a cloudy sky so I pulled out the quilted coverplate and stencil set. I die cut a teal panel and stenciled green hearts on it. I used a combination of liquid glue and foam squares to attach all of my elements. Then I decided to trim off the edges of my panel so I had a white border on my card front and popped the panel up with foam tape.

For finishing touches on this sweet card, I just added a little glossy accents to the parachute, kitty nose and toe beans.

I love this non-traditional looking Christmas card! And the fact that it’s kind of a hybrid between our two kitties is super fun too! I’m linking this up to the Cat Lovers Hop! Are you playing along too?

I appreciate you sharing your time with me. Have a fabulous day!

Trinity Stamps – Release Day | Merry and Bright

Hey friends!!! Today is Trinity Stamps release day for the holiday release! We’re having a hop over on Instagram, so head over there and hop along for awesome inspiration and comment for a chance to win!

Today I’m showcasing a new stamp set called Merry and Bright. I just love how happy this big tree is! I thought it would be fun to make a gatefold card and have my tree on the belly band holding it all shut. I used one of the candy cane images from the set and heat embossed it on the belly band before popping the tree up with foam squares.

I also used the slimline stripes stencil with some white pigment ink on the panels decorating the front of the card. I love how it all flows together.

For finishing touches, I added some unicorn Stickles to the tree star and ornaments. I can’t leave a card without some sort of glitter and shine!

Don’t forget to head to the Trinity shop to pick up some new goodies and also Instagram to hop along!

I appreciate you sharing your time with me. Have a fabulous day!

Miss Ink Stamps – Life is Nuts!

I’m sure most everyone can relate to the sentiment on today’s card featuring the Miss Ink Stamps set called Oh, Nuts! and a great new stencil called Floral Wave Offset. I just love these squirrels. They’re so cute and this set has so many of them to choose from along with different sized accent images to go with!

I started with an idea in mind so I stamped my images and colored them with copics. Then I used the scan-n-cut to cut everything out. I cut the Trinity Stamps slimline stitched card panels (smallest one) and slimline scalloped card panels (biggest one); both from white cardstock. I took the stitched panel and masked off about 1/3 and inked it up with my blending brushes and dye ink. Then I laid the floral wave offset stencil on top and went over it all again. I moved my mask down and repeated it until I had a strip at the bottom of the panel left to stamp my sentiment. I used the MISTI to do that and popped the panel up with foam tape on the scalloped panel.

Next, I started adhering all my images, creating mini scenes in each colored panel I created. Everything was adhered with liquid glue except the squirrels that were popped up with foam squares.

For finishing touches, I went over the squirrel eyes and noses with black glaze pen and after it was dry went back over top with a white gel pen to add the highlight back in. Then I added white gel pen accents to the squirrels too.

Last of all, I added glossy accents to all of the acorns. I thought this was fun and gave a little extra attention to them throughout the whole design.

I hope you enjoyed today’s project and find some inspiration to create something wonderful.

I appreciate you sharing your time with me. Have a fabulous day!

Trinity Stamps – Made With Love

Hello everyone! I’m over on the Trinity Stamps blog today with a really fun take on the slimline trend…a mini slimline card! It’s been around for a while but Trinity Stamps has added some more goodies to go with it and I thought I’d play a bit!

I colored up my super adorable gnome and her pup from Made With Love and used the coordinating dies to cut them out, along with my sentiment. Then, playing off the colors I chose for my image, I pulled out my Mini Slimline dies and the Clean and Simple Mini Slimline Panels dies. I cut the scalloped panel from the mustard yellow striped paper in the new Autumn Rainbow paper pad.

Then I cut the window panel from some mint cardstock in my stash. I trimmed a piece of acetate and attached it to my window panel with scrappy tape and lined it with foam tape to create my shaker mechanism. Then I poured some chocolate chip heart sprinkles and glass slipper confetti on the striped panel and attached my window panel over the top to seal everything in.

I popped my images up with foam tape and glued my sentiment in place with liquid glue. Then I put the whole thing on a red card base and also used the dies to create a matching red envelope.

This was such a fun card to make! I plan to share it along with a batch of cookies to our neighbors for fun! I think they’ll enjoy the cookies and the card! Don’t you?

I appreciate you sharing your time with me. Have a fabulous day!

Lawn Fawn – Spooky Cocoa

Hey friends! I’m over on the Scrapbook Pal blog today and we’re having some spooky cocoa. The weather is changing and things are getting ooky spooky around here! It’s great since this is my favorite time of year!

I had 2 new goodies from Lawn Fawn that I have been dying to use and thought it would be so much fun to combine them! So today we’re having Halloween themed cocoa with some ghostly steam rising from our cup!

I created my Lawn Fawn Stitched Mug shaker mechanism, filled it with fun embellishments from Trinity Stamps and sealed it up. Then I stamped and colored my Lawn Fawn Booyah ghosts with copics, using the coordinating dies to cut them out. Then I used liquid glue to adhere the accessories to each ghost.

To create my background, I used some Tombow brush pens on watercolor paper and did some messy ink smooshing. I always have so much fun with this technique! Once it was dry, I trimmed it to 4×5.25 and popped it up on a black card base with foam tape. I adhered my whipped cream and spoon to the back of my mug and glued it directly to the card front, while the ghosts were popped up with foam squares. (The whipped cream came from the frosting of the stitched cupcake dies from Lawn Fawn.)

Then I stamped and heat embossed a banner from Bannertastic and a sentiment from Booyah and die cut it. I used a quickie glue pen to adhere my banner, trying to hide the glue behind the embossing lines.

For finishing touches, I added black glaze pen to the Frankenghost’s eyes, glossy accent’s to the witch’s hat buckle and spider and white gel pen accents throughout the images.

I had so much fun mixing and matching and making things a little spooky for Halloween!

I appreciate you sharing your time with me. Have a fabulous day!