Coffee Loving Cardmakers Design Team

Yippee!!!! I’m sooooo excited to finally be able to spill the beans…the coffee beans that is! I’m joining the Coffee Loving Cardmakers Design Team for the 2020 year! This is an amazing opportunity and I’m so honored to be joining the fabulous group of talented cardmakers!

To celebrate this super fun announcement, I made a cute little coffee card with one of my new Newton’s Nook stamps – Slothy Coffee.

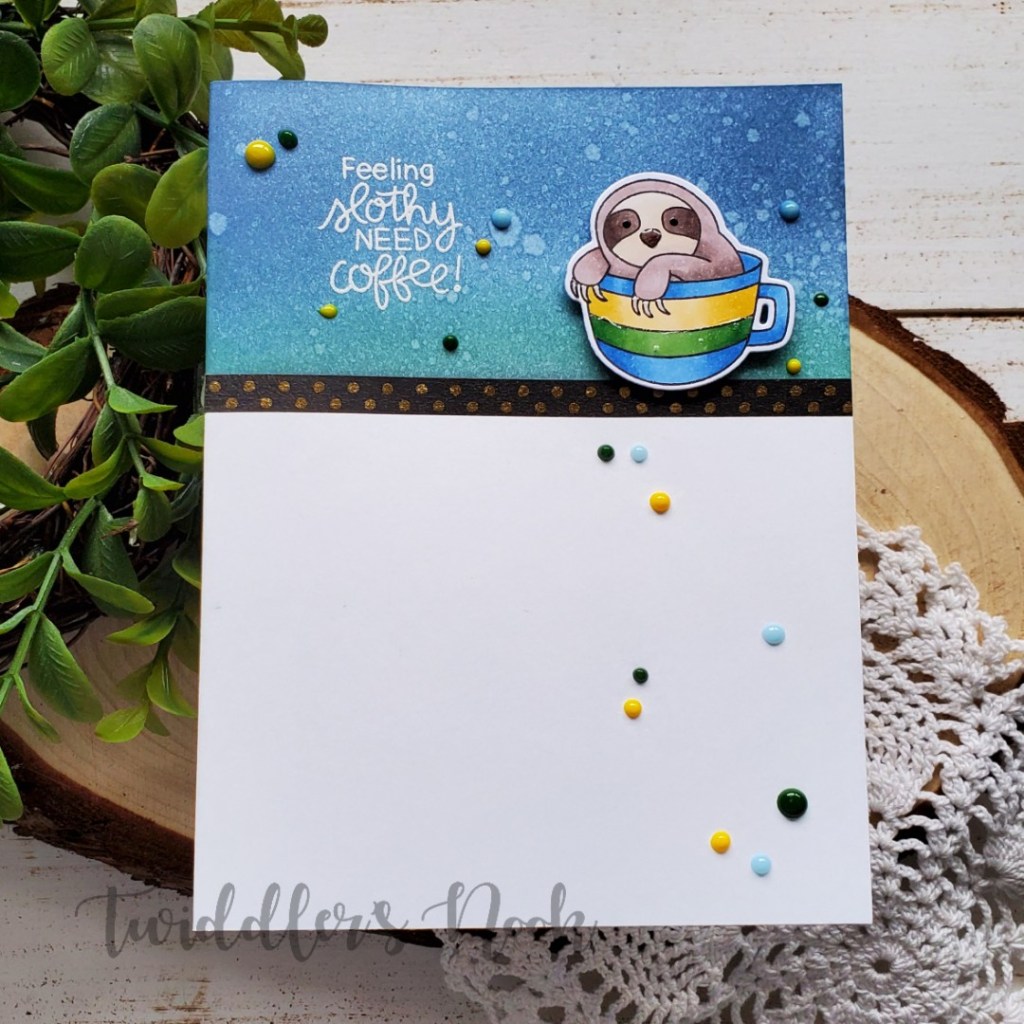
To make it I masked off the top portion of my card front and blended distress inks, then spritzed them with water. I stamped, colored and die cut my sloth and popped him up with foam squares.

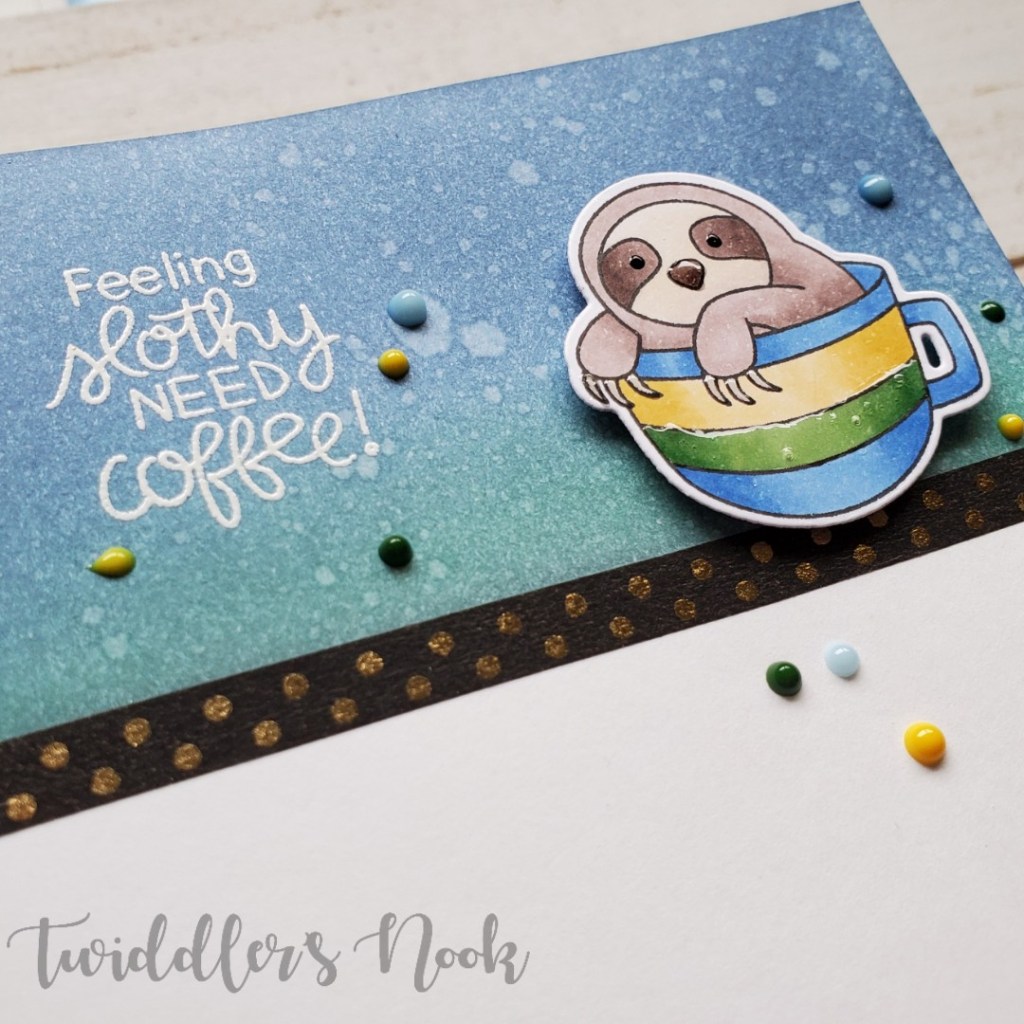
Using him as a guide, I stamped and heat embossed my sentiment in white. I love how it pops off the dark blue background. Then I added a strip of washi tape from my stash to break up the transition between the card front and inked area.

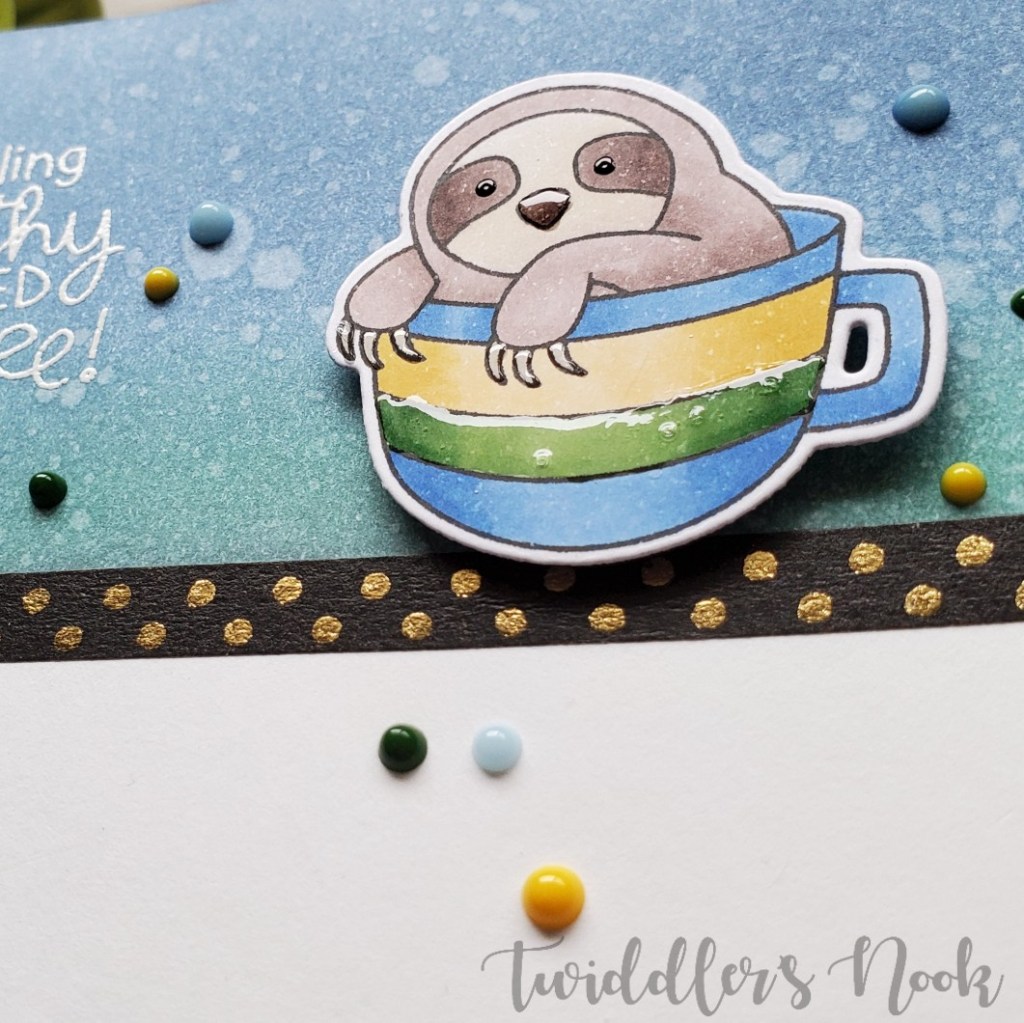
For finishing touches I added black glaze pen to his eyes, glossy accents to his nose and claws and the stripe on the mug. Then scattered Nuvo Crystal drops across the card-front for added interest.

This is a super simple but really fun card to make and share with any of your coffee loving friends!

I appreciate you sharing your time with me. Have a fabulous day!

Avery Elle – Peek-a-boo Balloon

Hello everyone! Thanks for stopping by today. I hope your holiday was wonderful and you’re recovering from all the excitement! Ours was wonderful and after a few days of cleaning up things are getting back to normal. I was finally able to jump in the craft room and play with some new Avery Elle stamps that I received a few weeks ago. I’m totally crushing on their newest Valentine release!

Today I’ve pulled out my favorite – Peek-a-boo pals – again and paired one with the new Peek-a-boo Balloon for a great birthday shaker card.

I actually started this card by ink blending my background with distress inks – scattered straw, picked raspberry and salty ocean. Then spritzed it with water and set it aside to dry. Next, I stamped, colored and die cut my images from Peek-a-boo Pals and Peek-a-boo balloon. I glued the clouds to the inked panel and started on my shaker.

For that part, I die cut my Plus Frame twice and sandwiched acetate in-between. I scattered some shaker bits to the center of my inked panel, added foam tape to the frame and stuck it down. Then I glued my balloon and monkey to the acetate. For the sentiment I took some vellum and stamped my sentiment in black ink. I cut flags on the ends and sent it through my Xyron sticker maker so no adhesive showed through and stuck it down.

For finishing touches on this super fun card, I added black glaze pen to the eyes, glossy accents to the nose and balloon scallops and finished with Wink of Stella glitter brush pen on one stripe of the balloon.

I love the bright, cheery colors of this card and those peek-a-boo pals will always have my heart. They are so sweet and fun to play with. I love that Avery Elle has started creating things for us to pair them with like this awesome balloon!

I appreciate you sharing your time with me. Have a fabulous day!

Merry Christmas Card From Me to You

Merry Christmas Crafty Friends! I made one last Christmas card just to share with all of you today.

Just a simple card featuring Trinity Stamps narrow card and bookmark die set and Lawn Fawn’s Stamptember set Merry Christmouse.

I die cut all the components and glued them together. Then stamped, colored and die cut my images. After deciding placement I stamped and heat embossed my sentiment and then popped up my images.

These little mice are so stinking cute! They make me smile every time. I hope you all have a wonderful holiday filled with events and people who make you happy!

I appreciate you taking a moment to stop by. Merry Christmas! Have a fabulous day!

Newton’s Nook Penguin Pile Tag

Happy Christmas Eve everyone! I’m so excited for Christmas this year! It’s going to be so much fun! Do you have traditions or plans for Christmas Eve? I’d love to hear them in the comments! We are always struggling to keep busy until bedtime.

Anyway, I have one last tag to share with you today. All of these personalized tags will be under my tree for the special people in my life. It’s the first year I’ve made tags and it was so much fun!

I love this penguin set from Newton’s Nook so much and this was my first time coloring it with actual Christmas colors! The tag is from Trinity Stamps narrow card and bookmark die set.

I die cut my tag from white cardstock and ink blended it. Then cut the bottom again and ink blended it as well. I adhered these together and splattered water. Then I stamped, colored and die cut my images. I popped them up with foam squares and decided to snag the snowflakes from Newton’s Nook Toboggan Together set and the heart from Cup of Cocoa to stamp in the background.

I added white gel pen accents throughout and black glaze pen to the eyes. Then I added glossy accents to the stripes, polka dots, beaks and feet and Wink of Stella glitter brush pen to the hats and earmuffs. Last I added Stickles to the white parts of the hats.

I did die cut another tag in white and glued the recipient’s name to that one. Once everything was dry I adhered them together and added baker’s twine to the top.

This one is all ready and now everyone in my family has one gift with a special handmade tag on it. I hope they all like them!

Thank you for sharing your time with me during this busy time of year! I hope you have a fabulous day! Merry Christmas!

Peek-a-boo Pals Tag

Hello everyone! I hope you had a great weekend and are all ready for Christmas! I’ve been super busy with family holiday stuff but finally managed some time in the craft room to make a couple of last minute projects.

Today I’m sharing another Christmas tag. I loved the star-shaped tag I did before so I decided to try a heart. I love how it turned out!

I used the Lawn Fawn scalloped hearts and inside out stitched hearts paired with Avery Elle polar peek-a-boo pals stamps.

I die cut the scalloped heart from blue cardstock and then the inside out stitched heart 3 times from white. One went on the back with the recipient’s name and the other 2 got ink blended and glued to the front. Then I stamped, colored and die cut my pals and adhered them as well.

For finishing touches I used black glaze pen to the eyes and small noses and white gel pen accents throughout. Then I added glossy accents to the deer hooves and nose and penguin’s beak. I added Wink of Stella glitter brush pen to the antlers, hats and scarves and Stickles to the pompoms on the hats.

The last thing I did was punch a hole and thread some baker’s twine through it.

Super cute and I loved using non-traditional colors for a Christmas tag.

I appreciate you sharing your time with me. Have a fabulous day!

Elf Popcorn

Welcome back and happy Friday everyone! Today I wanted to share a project I designed about 5 years ago and have made them every year since.

It’s essentially a wrapper for a package of microwave popcorn. The front looks like elf clothes and then I add a little piece of cardstock to the back so you can write a message.

To make these I cut 8.5×5.5 green cardstock. Then I cut a red patterned paper (pants) to 8.5×2.5 and a black strip (belt) 8.5x.75. I designed a belt buckle on my Cricut and cut those from gold cardstock and threaded the belt through.

Next I glue the belt and pants to the green panel and score that whole piece 2 1/8 from each side. To make the collar I use a 2″ circle scallop punch, cut it in half and glue the two pieces to the top. Finally I add scor-tape to the back, wrap it around the popcorn and seal it shut.

I have this adorable pair of stamps from Stampendous that I like to put on the back. This white panel is 3×4 inches and I just use tape runner to adhere it. I’ll write a quick note and it’s ready to give. I make these in mass, 44 to be exact, because that’s how many packs come in a Costco box of popcorn. Lol!

These make great teacher and classroom gifts, or put one on all your coworker’s desks like I’m doing today!

I appreciate you sharing your time with me. Have a fabulous day!

Trinity Stamps – Do Re Me Ow

Hello everyone! I’m so happy to be back crafting and sharing fun things with you. My whole family got really sick, including me, which doesn’t often happen. So we’ve been laying low and I haven’t had much energy to craft.

Last night I finally got back in there and made this super fun, punny Christmas card for my daughter’s choir teacher. It features a Trinity Stamps set called DO RE ME OW that is definitely one of my favorites of the year! I hope you enjoy it.

I started by ink blending a background and spritzing it with water. Then I die cut some white glitter cardstock for a snowy hill and set to stamping my images. I colored them with copics and die cut them with the coordinating dies. I love that this set also cuts out the words! So cool!

Then I started assembling everything. The words, music notes and fence are glued directly to the card and everything else is popped up with foam squares. Finally, I moved on to finishing touches, which is my favorite part!!!

I had colored the Christmas lights on the pole but decided to use Nuvo Crystal Drops on them instead. I love how it turned out! I also added glossy accents to the glass on the light, all the kitty noses and tongues, and the sticker on the box.

I put Stickles on the kitty boots and hats and used my Wink of Stella glitter brush pen on the music notes, words and snow on the light pole.

The inside of the card finishes the punny question from the front with, “DO RE ME OW” and under that I added the sentiment from the set, “We wish you a meowy Christmas.” My daughter is so excited to deliver this with his gift tomorrow. I’m sure it will give him a chuckle.

Thank you so much for stopping by today! I’m so happy to be back at it! Have a fabulous day!

Trinity Stamps – Season Greetings Silhouettes

Good morning everyone! I was really restrained over Thanksgiving weekend with all the amazing sales going on but I did splurge on 2 orders. One was the amazing $25 grab bags from Trinity Stamps! I just had to have one! It came in this week and I had a moment to play with this new-to-me set called Season Greetings Silhouettes. It’s beautiful and totally the opposite of what I usually reach for so I really enjoyed creating with it.

I started by arranging my stamps to get an idea of the layout. Then I cut a 5.25×4 inch panel and grabbed my distress inks. I inked up that panel with weathered wood, faded jeans and black soot distress inks and splattered it with water. Then I stamped a few trees directly to the background and die cut two stitched hills. Next, I stamped more trees and the deer images and used my Scan-n-cut to cut them out.

I stamped and heat embossed my sentiment at the top and started adhering everything together. This is such a sweet and serene card. I love how calming it is.

Are you finished with your Christmas cards yet? I need to get mine in the mail ASAP!

I appreciate you sharing your time with me. Have a fabulous day!

12 Days of Christmas Tags Winners and a Bonus Tag

Thanks so much for stopping by today to see if you’re a winner from the 12 Days of Christmas Tags series! I want to thank everyone who took a moment to check out my creations, like, comment and share the love through this event and every day. It really does mean a lot and I love reading the comments to see what catches people’s eye and what draws them in. Thank you! Thank you! Thank you!

Today I wanted to share a bonus tag with you as well. But if you’re really here for the winners, you don’t have to wait, just scroll down to the bottom of this post. ❤

This tag is a mash-up between Trinity Stamps and Lawn Fawn dies. I took the bear from Have an Ice Day, stamped, colored and die cut him and then started on my tag shape. I wanted something I hadn’t used but I didn’t have any other true tag die cuts so I made my own again. I die cut the add-on to the flippin’ awesome as my base in white and dark blue cardstock and again in iridescent vellum. Then cut the vellum with a simple stitched hillside border to make my ice.

Next, I took my blue tag base and splattered it with gold and pearl watercolor and adhered the ice to it. Then I glued the white tag to the back so I can add the recipient’s name later on. I popped up my bear with foam squares and added a holly jolly candy cane from Trinity Stamps to the bear’s hand.

For finishing touches I added glossy accents to the skates and bear’s nose. Then, I took my Wink of Stella glitter brush pen to the scarf, mittens and tops of the boots. I also added black glaze pen to the bear’s closed eye and then some ribbon through the hole I punched.

This is also one going under my tree for Christmas so the secret name was die cut and glued to the back just the the others. I hope you’ve enjoyed this series! Thank you for hanging out with me!

On to the WINNERS!!!!!!!!!

Winner 1 – $15 gift card to Newton’s Nook
The random number generator chose Day 4, comment 8 which was Krystal.

Winner 2 – Loaded enveloped of fun goodies that I made
The random number generator chose Day 5 and the IG comment picker chose @beccay217.

Winners please direct message me on Instagram or Facebook or email me at twiddlersnook@gmail.com to claim your prizes. You have until Monday at 6 p.m. PST or I will choose new winners.

I appreciate you sharing your time with me. Have a fabulous day!

Newton’s Nook – Hot Chocolate Day

Hello everyone! Happy Friday! I hope you’ve had a wonderful week and have enjoyed the last 12 days of Christmas tags. I am leaving commenting open until this evening for those posts. I will choose winners and post them on here and Instagram in the morning. Be sure to check back and see if you’re the luck winner.

And on to today’s fun card. I’m playing along with the Newton’s Nook Inky Paws Challenge – Snow Day! Everyone needs hot chocolate on a snow day, right?!? My daughter and I always go play until we’re too cold, come in and warm up with a cup full and then do it all over again.

I’m so in love with the end result of this card even though I wasn’t sure when I started with the color palette. It’s just so sweet! I started out with the layering plaid stencil and moved on to color and die cut my images from the Cup of Cocoa.

I cut a piece of cardstock and stenciled it with the snowfall stencil and added a piece of purple glitter washi tape to the bottom to ground my images. Then I cut a frame from the Framework set and adhered it. This little panel is popped up on the plaid background with foam tape. Finally, I added my images with foam squares to give them a little dimension.

Last I stamped my sentiment and started on finishing touches. I put glossy accents on the snowman nose and buttons, candycane, Newton’s nose and the dots on the mug. I also added white gel pen accents on all of the mugs.

I’m so pleased with the outcome of this card and can’t wait to share it with someone. I think I’ll tuck a packet of hot cocoa inside for fun!

I appreciate you sharing your time with me. Have a fabulous day!