Miss Ink Stamps – We’re All Mad Here

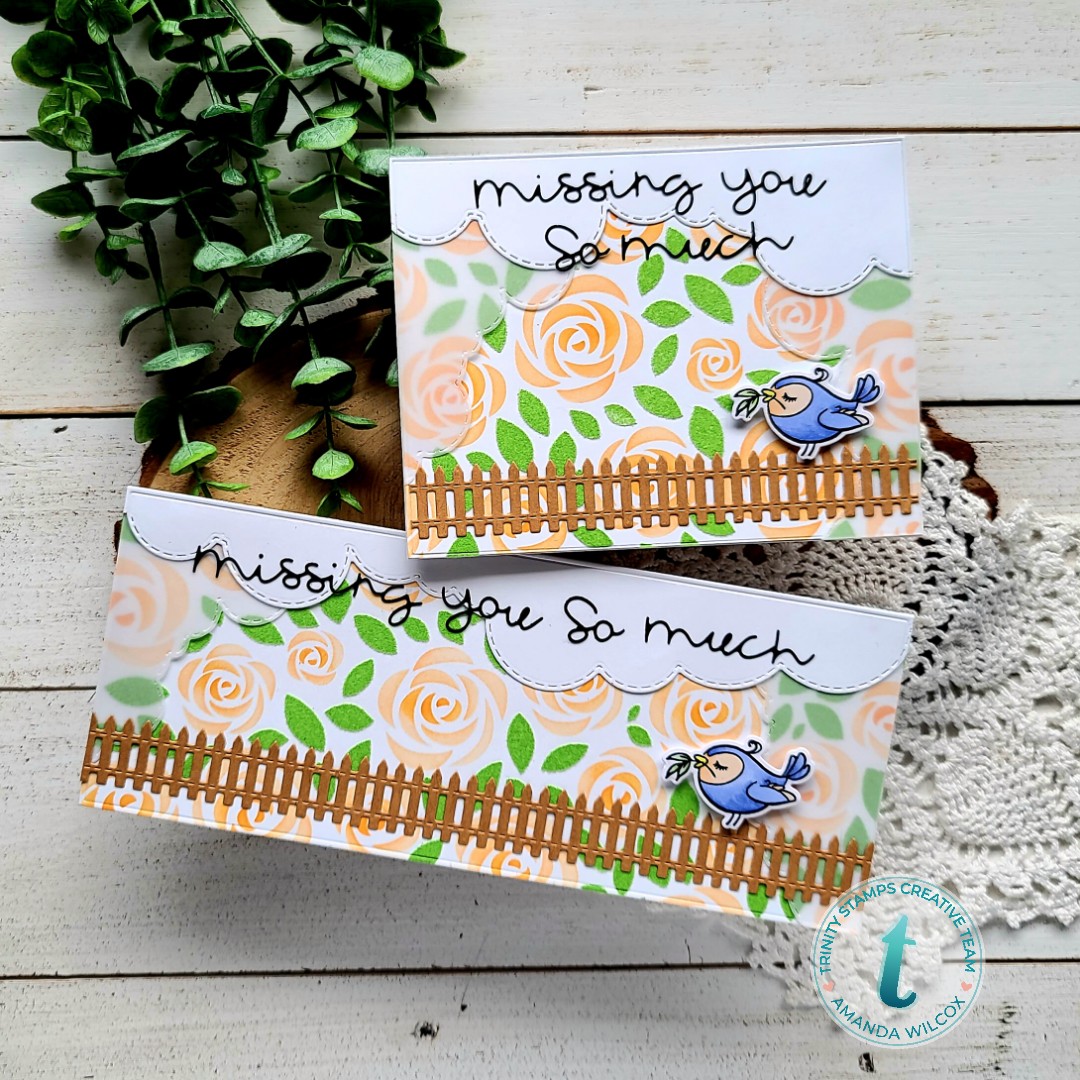
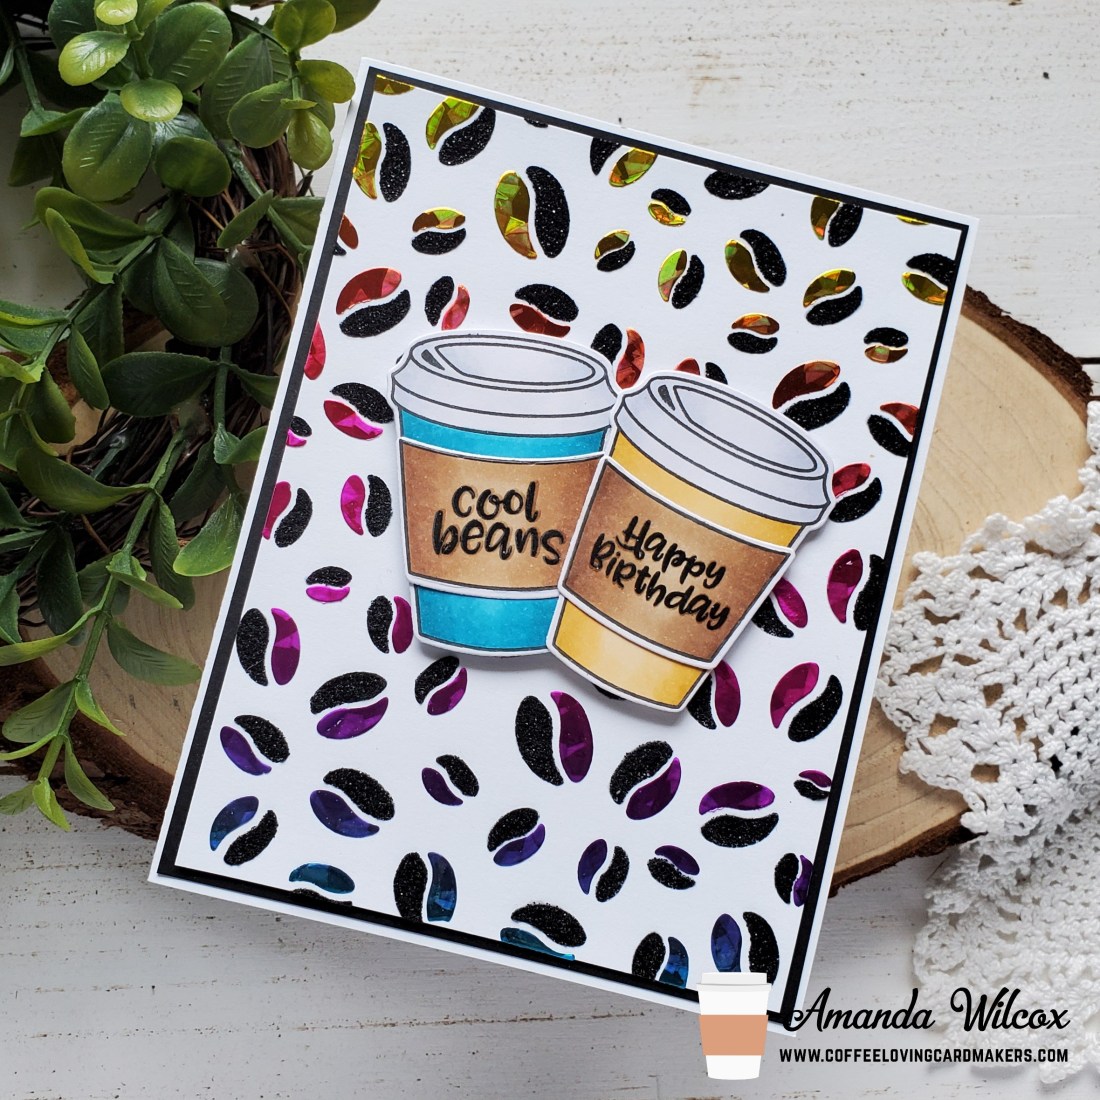
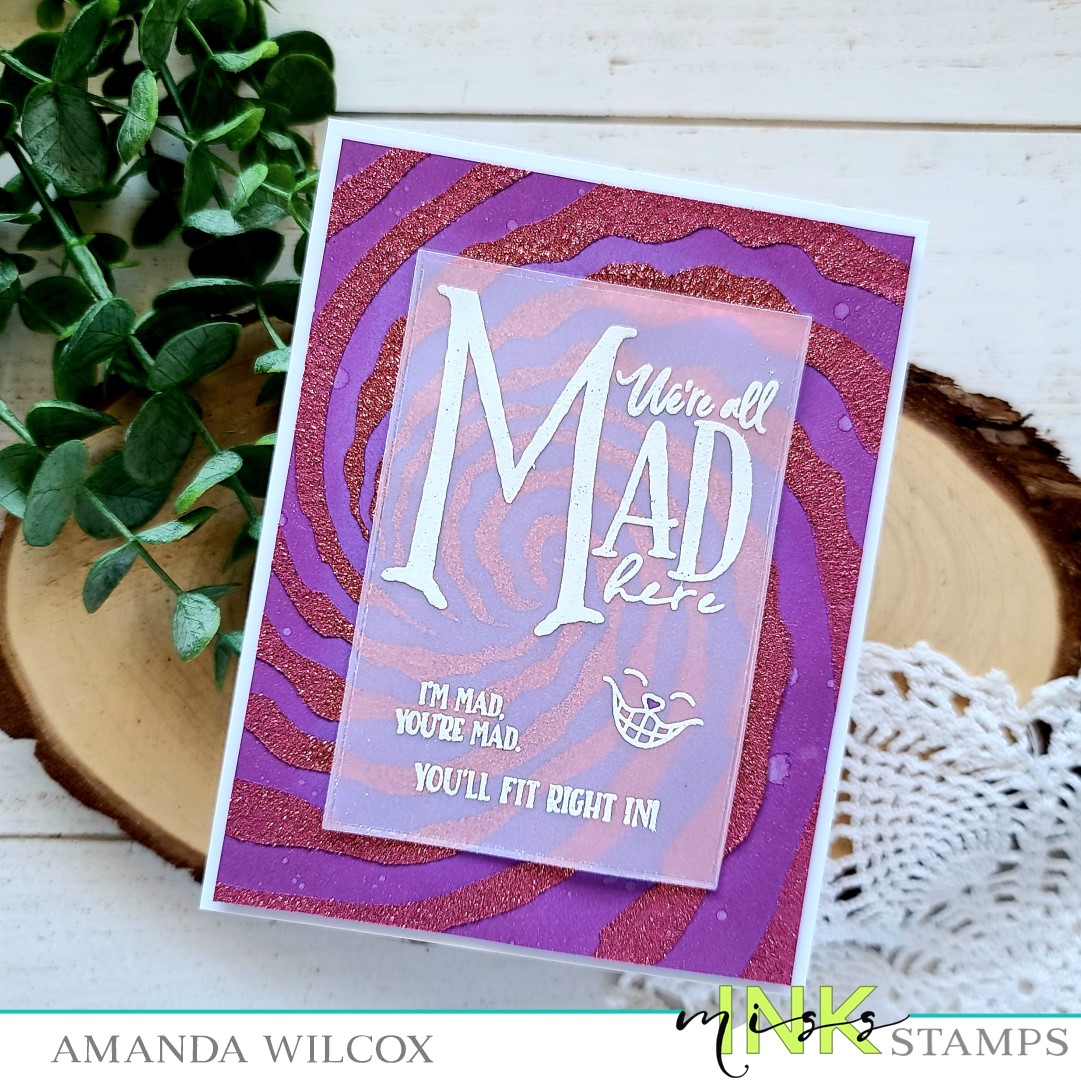
Hi again! I’ve fallen down the rabbit hole again…those wonderful Miss Ink Stamps Alice in Wonderland products are ahhhhh-mazing! This time for some reason, when I looked at the rabbit hole stencil looked a bit like the Cheshire Cat’s stripes so I decided to play a little bit.

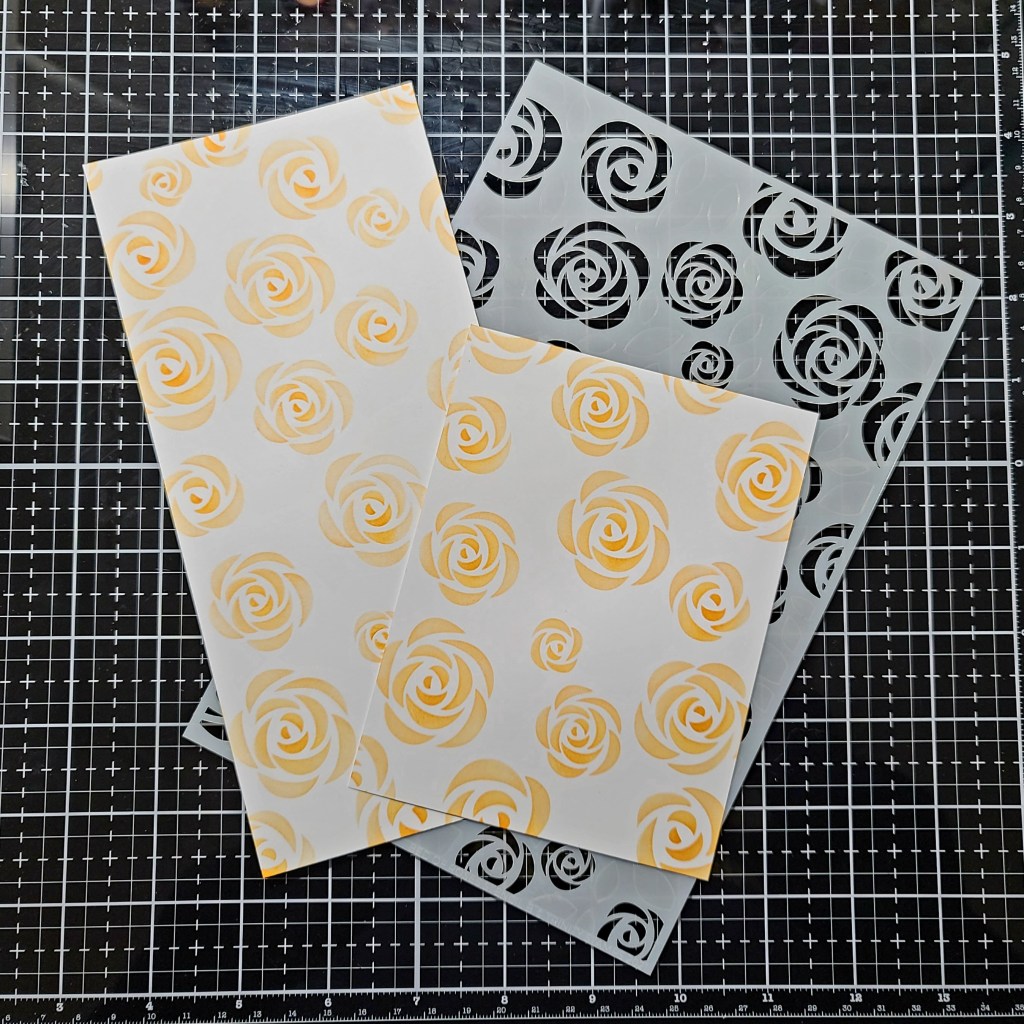
I took some Glitz Glitter Gel in bubblegum and the rabbit hole stencil from Miss Ink Stamps on purple cardstock! It’s totally brilliant and I love it! I left it overnight to dry and when I came back the next day I did think the purple cardstock was a little flat so I inked up the edges with distress oxide ink in wilted violet and spritzed it with my distress sprayer.

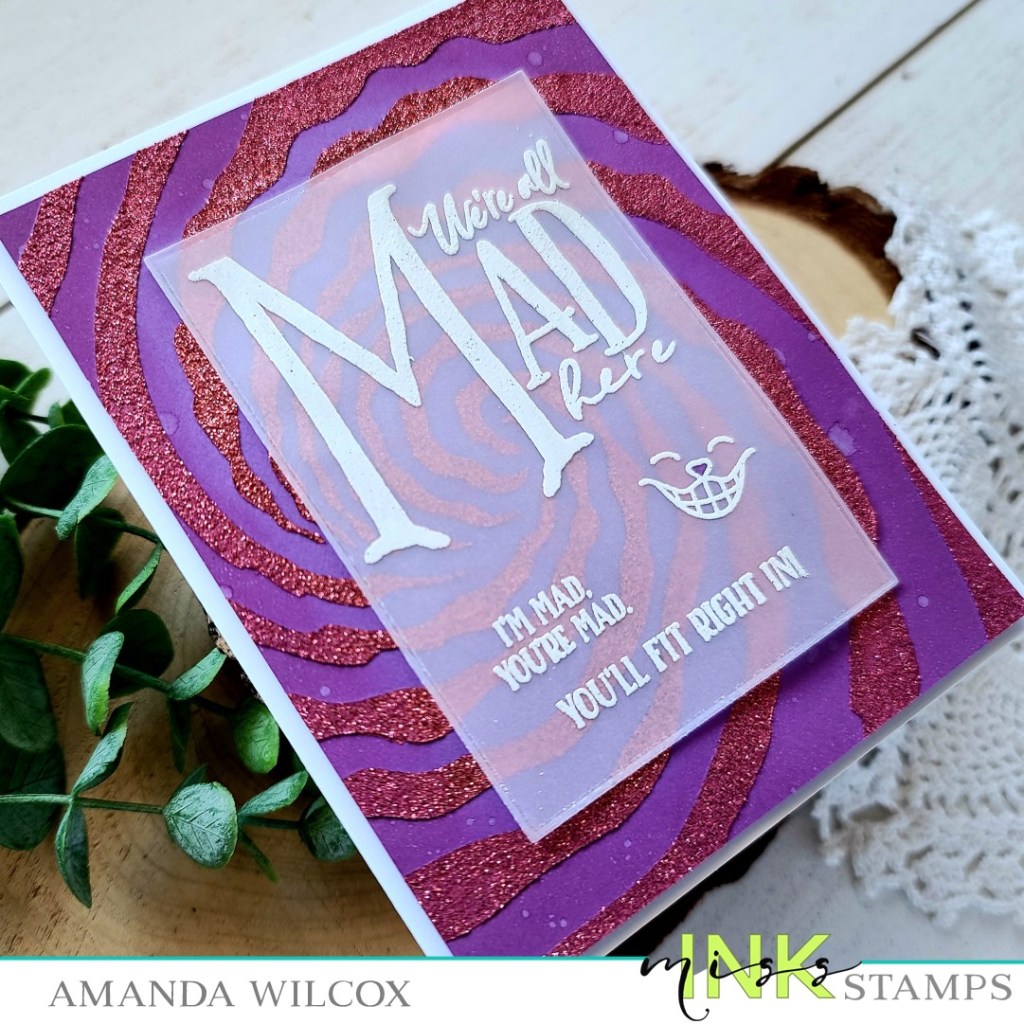
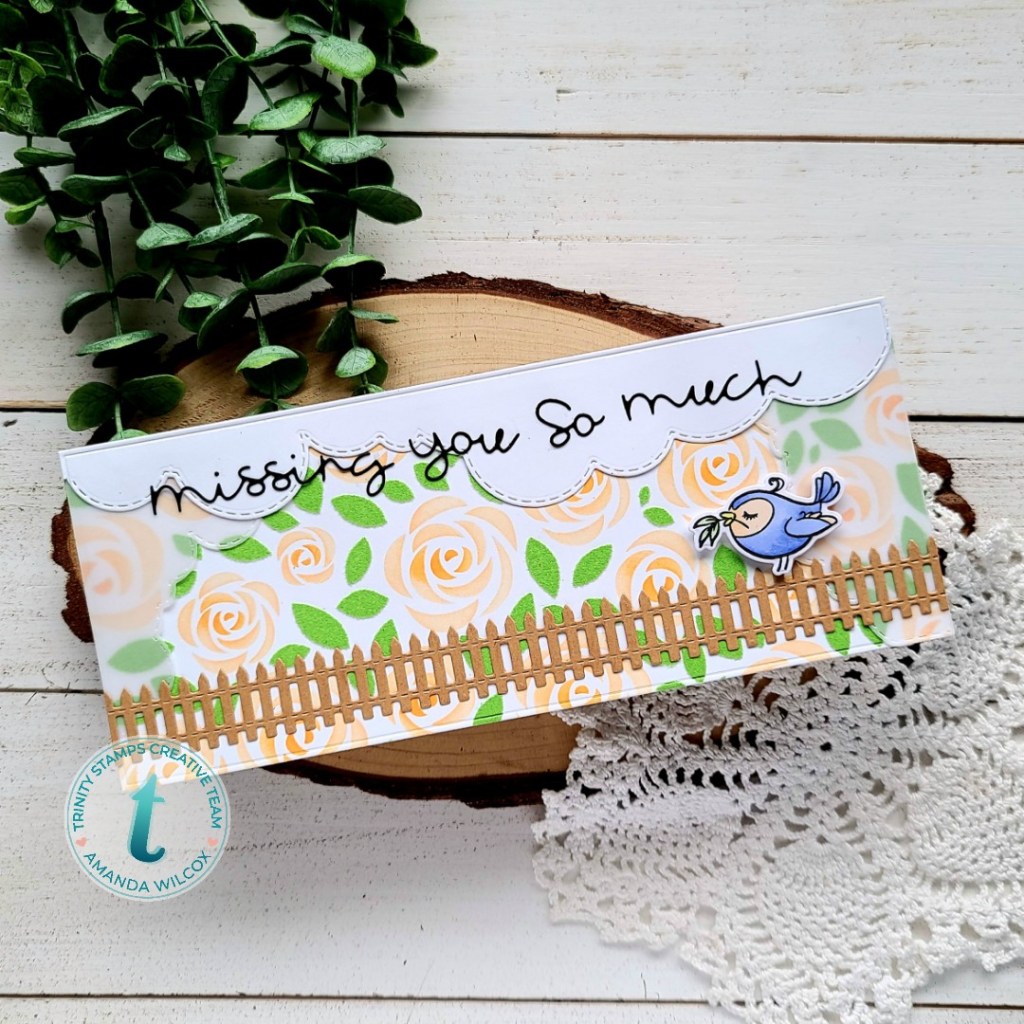
I arranged my stamps how I wanted them and found a Trinity Stamps modern embossed rectangle the correct size and die cut a piece of vellum. Then I stamped and heat embossed my sentiments from Miss Ink Stamps Madness and that awesome image of Chesh’s face from Wonderland Wisdom. I hid some liquid glue behind the embossing and placed it on the stenciled panel, topping it with some acrylic blocks to help it dry flat.

I left it be for a while and came back to finish things up. I trimmed 1/8 inch off each side of the stenciled panel and added foam tape to the back. Then I adhered it to a white card base and my card is finished.

Isn’t it splendid?!? I just love how the bright, vibrant colors turned out! It’s so fun and the Alice sentiments just make me happy.

I appreciate you sharing your time with me. Have a fabulous day!

Miss Ink Stamps – How You Bean?

Hi everyone! I shared this card on social media earlier in the week but hadn’t had a chance to write up a post about it. Someone had asked so I wanted to pop in with a quick explanation how I created this fun mini slimline card. It features stamps and stencils from Miss Ink Stamps and dies from Trinity Stamps.

I started by die cutting the largest panel from Trinity Stamps Clean and Simple Mini Slimline Panels die set from a melon cardstock and a second from kraft. Then I used champagne metallix gel from Thermoweb over the Circular Harlequin stencil from Miss Ink Stamps and set it aside to dry. I stamped and colored images from Miss Ink Stamps Brewtiful and colored them with my copic markers. Then I fussy cut them all out.

Once the metallix gel was dry I used one of the Trinity Stamps Lift the Flap dies to create a flip up window. Using that panel as a guide, I stamped sentiments on the kraft panel that would show when the flap was opened and moved on to assembly.

I adhered the melon panel to the kraft one with tear tape and then used liquid glue to attach all of my images. The trick here is to not attach something to the flap and the card front. You have to choose one. Haha. I stamped one more sentiment and trimmed it into a small strip and attached it as well. Last, I used liquid glue to adhere the panels to a white card base that measures 3×6 inches and trimmed off images that hung over the edge.

I hope this helps and inspires you to create something wonderful.

I appreciate you sharing your time with me. Have a fabulous day!

Trinity Stamps – Missing You So Much

Hey there! I’m over on the Trinity Stamps blog today with a fun idea. I’ve made the same card two different ways…same products and design, same colors and everything but one is slimline and the other is traditional A2 size.

I started these cards with the backgrounds. I really wanted to play with the new Bed of Roses stencil from Trinity Stamps. They make stencils specifically sized to fit slimline and A2 size panels, which extends the life of your product x100 in my book!

I inked up my panels with two different yellow/peach colors of ink so there was a little dimension in the flowers. The darker color is focused toward the center but isn’t perfect.

For the second layer which are the leaves, I used Thermoweb Transfer Gel Blanco and set it aside to dry all the way. Once it was dry, I ran it through my laminator with the awesome green flocking transfer sheets so I have fuzzy leaves! Seriously people, I could play with these all day long. I love this flocking!

To build my cards, I die cut the backgrounds from the modern embossed slimline panels and rectangles so they have a finished look. Then I die cut 2 fences from the Slimline Great Outdoors Borders. I took the clouds from the Slimline Rainbow Builder and cut them from white and vellum. I stamped the bird from Best Place to Be twice and colored it the same, using the coordinating dies to cut them out. Finally, I die cut my sentiment from the Beary Special Sentiments set.

For assembly, I simply used liquid glue to adhered the background panels to card bases and then carefully used liquid glue to adhere the clouds, hiding glue on the vellum pieces behind other pieces. The birds are popped up with foam squares for a little added interest. And last, I added the sentiments with a Quickie Glue Pen because the lines are so fine.

I love how versatile all of these awesome products are and how you can stretch them in different ways.

I appreciate you sharing your time with me. Have a fabulous day!

Trinity Stamps, Newton’s Nook and Lawn Fawn – Cheers!

Hey friends! We had a VERY special birthday in our family last week and I wanted to pop in to share one of the birthday cards I made to celebrate. My sister-in-law turned the big 21 and we couldn’t let it fall by the waist side.

I was able to pull from some of my favorite companies and create this super fabulous birthday card/gift certificate for her brother to give her. I started things off by stamping and coloring the Trinity Stamps Happy Hour set that came out last year. I used the coordinating dies to cut the images out. Next I began working on the background with the Newton’s Nook plaid stencil, some olive green and red ink and then I went over it a second time with Thermoweb transfer gel, and then gold decofoil. Pulling from all of those colors, I used the Newton’s Nook circle frames dies to cut a stitched circle from red glitter paper. Then I used a smaller Spellbinders circle die to cut an olive green one to layer.

I heat embossed Happy from Happy Hour on the green circle and die cut 21st from Trinity Stamps Marshmallow Number dies. I used the same ink from the stenciling to go over the top layer of the 21st so it coordinates. At this point I started layering things together and realized that the top of my card was sparse. I dug around and found the scripty cheers die from Lawn Fawn and thought it was the perfect match! I cut it from white cardstock and inked it up with the red and green from the background.

I am so excited about how awesome this card turned out! So much texture and depth with the different cardstocks, layers, heat embossing and decofoil. It’s exactly what I was hoping for.

I appreciate you sharing your time with me. Have a fabulous day!

Coffee Loving Cardmakers – Cool Beans

Hello everyone! I’m up on the Coffee Loving Cardmakers blog today with this awesome and crazy cool beans birthday card. I was chatting with a crafty friend this weekend and she dared me to go wild and crazy with the Trinity Stamps coffee bean stencil. So I totally accepted and this is what I came up with.

To make this fun card, I started with the background by using Thermoweb transfer gel on the first layer of the Trinity Stamps coffee bean stencil. I let it dry overnight and came back with rainbow shattered glass deco foil. Then I lined up the second layer of the stencil and used black glitz glitter gel on the other half. I just love how this turned out!

Here’s a closer look at the top half of the colors. This is where I pulled the yellow from for one of my coffee cups from the Avery Elle cool beans stamp set.

And then here’s the bottom half where I pulled the blue from for my other coffee cup. I colored those, stamped my sentiments on the sleeves and the clear heat embossed over them. I used the coordinating dies to cut them out and moved on to assembly.

I started with a white cardbase, trimmed a black panel to 4 1/8×5 3/8 and glued it down. Then I trimmed the stenciled panel down to 4×5 1/4 and glued it down too. The coffee cups are popped up with foam squares.

It’s a crazy, fun card and I have plenty of crazy, fun friends who would get a kick out of this wild card.

I appreciate you sharing your time with me. Have a fabulous day!

The Rabbit Hole Designs Caffeinated Owl

Hey everyone! Sharing this super shiny Caffeinated Owl card today from The Rabbit Hole Designs. In reality, it’s probably too shiny for this owl but I love it! I know the Therm-O-Web collab is over but I’m still loving those products for awesome backgrounds like today’s.

Here’s how I made it:

  • Took a black cardstock panel and, using my trusty Pixie Spray (I’m addicted now!) adhered my stencil down and spread Deco Foil transfer gel across it and left it to dry. I intentionally made the gel high and low and almost distressed looking instead of smooth and even. You could do it either way depending the look you’re going for.
  • This is when I stamped, colored and cut out my owl.
  • Once the background was dry, I heated up my laminator and sent the black panel through with aqua Deco Foil. To do this I took a piece of parchment paper and folded it in half. Inside of that I put my cardstock with the dried transfer gel and then the aqua Deco Foil (color-side up) on top of that and sent it through my laminator.
  • For assembly, I cut my foiled piece at an angle and adhered it to a black card base. Then added a piece of gold washi tape across the seam for a break in the color. I really like what this added to the card.
  • Next, using my owl for placement I stamped and heat embossed my sentiment along the edge. Then popped my owl up with foam squares.

Voila! This card is done! I am in love with the aqua deco foil, especially with the black card stock. I can’t wait to try it with other cardstock colors, maybe for Christmas. I love red and teal together for non-traditional Christmas colors.

I appreciate you sharing your time with me. Have a fabulous day!

Here are the products I used:

Caffeinated Owl

Puzzle Box Stencil

For more information, news and updates check out these links.

The Rabbit Hole Designs/Therm-o-Web Collab – Gourd-geous!

I’m super excited to share this fun card using both The Rabbit Hole Designs and Therm-o-Web products!

Fall is my favorite time of year so I immediately grabbed Gourd-geous! from the September release and started coloring.

Here are the details:

  • Using Pixie Spray, I adhered my Deco Foil Starburst Stencil to my cardstock and covered it with Champagne Mist Metallix Gel.
  • While that was drying I stamped, colored and cut my pumpkin from Gourd-geous!
  • I took the largest label from the Nested Label Dies and cut it from vellum. Then I carefully heat embossed my sentiment in black embossing powder.
  • When the background was dry, I die cut he same label from the background and black cardstock 4 times and glued them all together for a raised look.
  • I glued the “frame” that was left to a card front, then glued the labels back in their spot, added the vellum label to that and popped my pumpkin up with foam squares.
  • For finishing touches I added glossy accents to the pumpkin’s eyes and nose.

Here’s a closer look at the subtle shimmer the Metallix Gel gives and the glossy eyes of the glowing pumpkin.

Such a fun card. I would love to send this to a girlfriend this fall. I think it would fit in perfect! Don’t you?

I appreciate you stopping by! Be sure to check out the Therm-O-Web blog for more inspiration from their design team too.

Here are the products I used:

Gourd-geous!

For more inspiration, news and updates check out these links.

Therm-o-Web Deco Foil with Heat Embossing

I recently purchased some Deco Foil by Therm-o-Web with no idea how I was going to use it. I intended to pick up transfer gel but that hasn’t happened yet and I was itching to get some shiny on my cards. So off to the land of Pinterest and YouTube I went. I found an older video by Jennifer McGuire (linked here) that showed how to use foil on heat embossing. So I decided to give it a go and here’s what we came up with! 😀

Not too shabby, if I do say so myself. The general idea I used here is distress ink blend the background, stamp and heat emboss a star background stamp. Then lay foil over my panel and run it through my laminator in a copy paper folder. Then I trimmed it down to 4×5.25 and added it to a card base with foam tape.

For my sentiments I used Honey Bee Stamps layered happy die cut. The top layer, in yellow, is die cut three times and then covered in glossy accents. This idea is another one from Jennifer McGuire in a more recent video. (linked here) Then I added birthday from Lawn Fawn Wild for You set and popped it up with foam tape.

Between the glossy words and that awesome Deco Foil background, this card is so eye catching and fun to move around in the light. I can’t wait to play around with more types of Deco Foil and with more techniques.

Have you used Deco Foil before? What techniques have you tried? Any favorites? Leave a comment below. I’d love to know!

I appreciate you sharing your time with me. Have a fabulous day!