Miss Ink Stamps – For My Friend…

I just can’t resist this fabulous pup from Miss Ink Stamps in the Slim’s Whims stamp set. He’s too fun to color and the sentiments crack me up! So I’m back again today with another card I made featuring him.

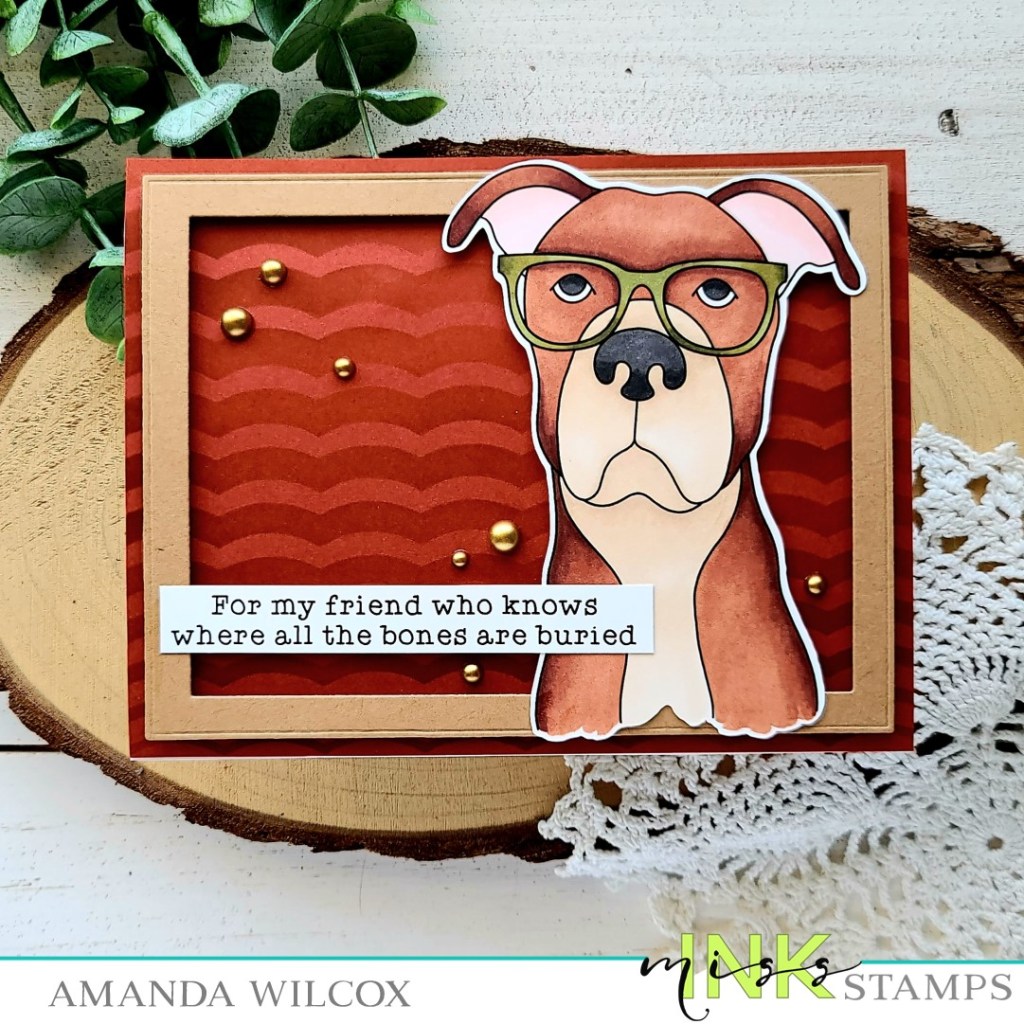
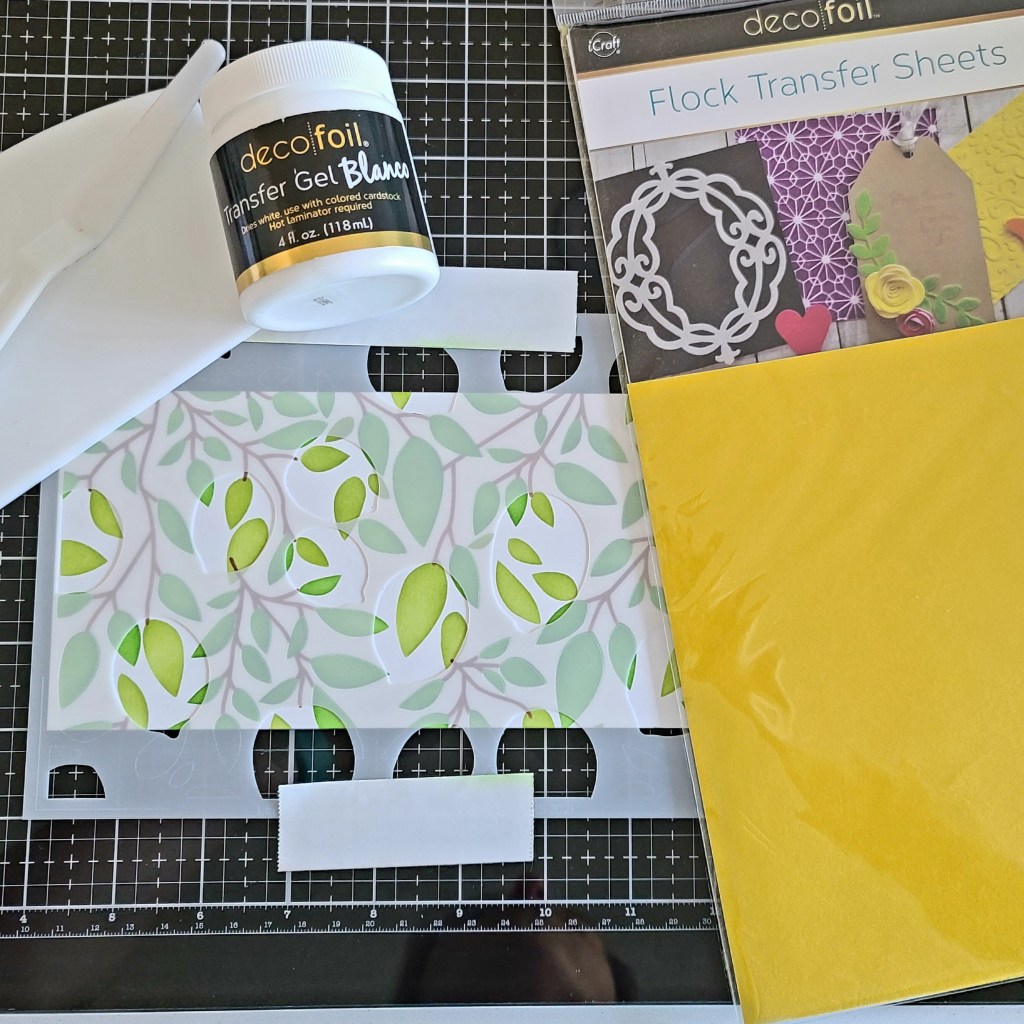
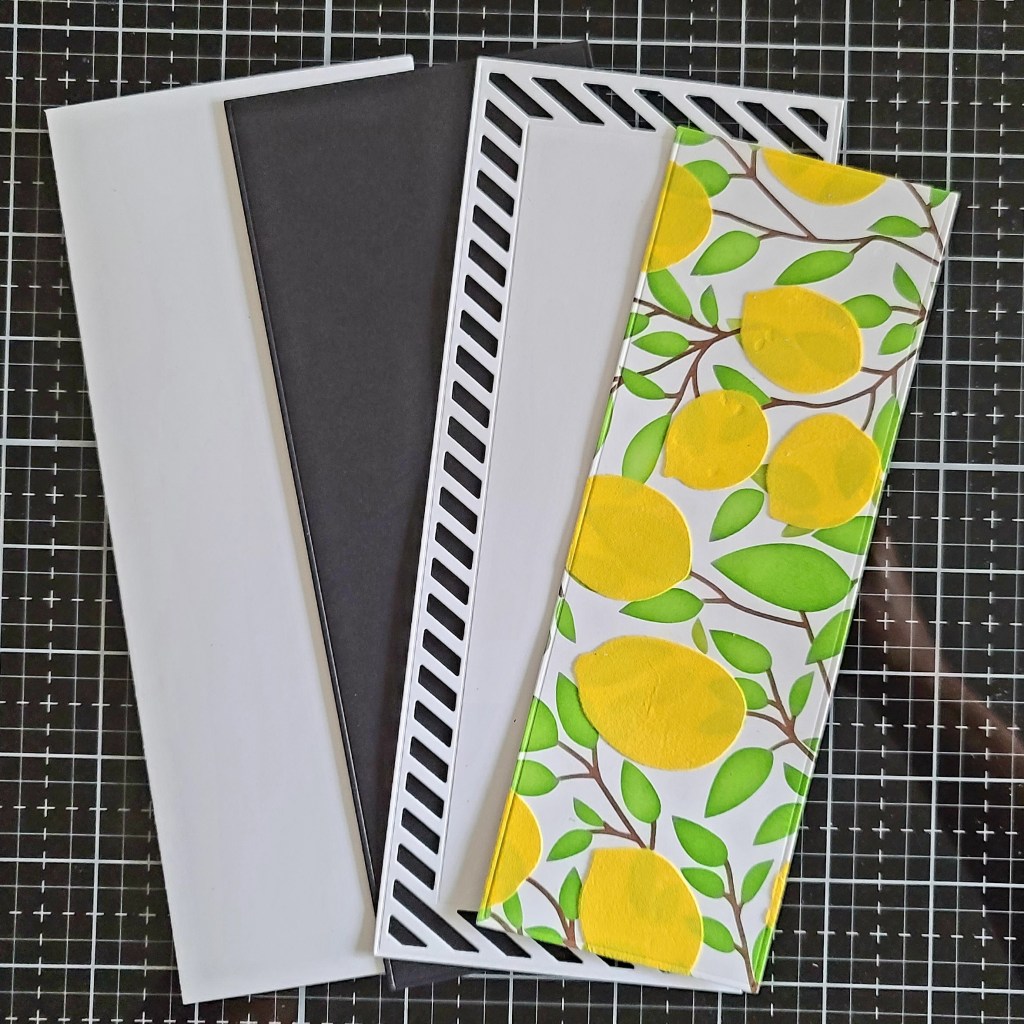
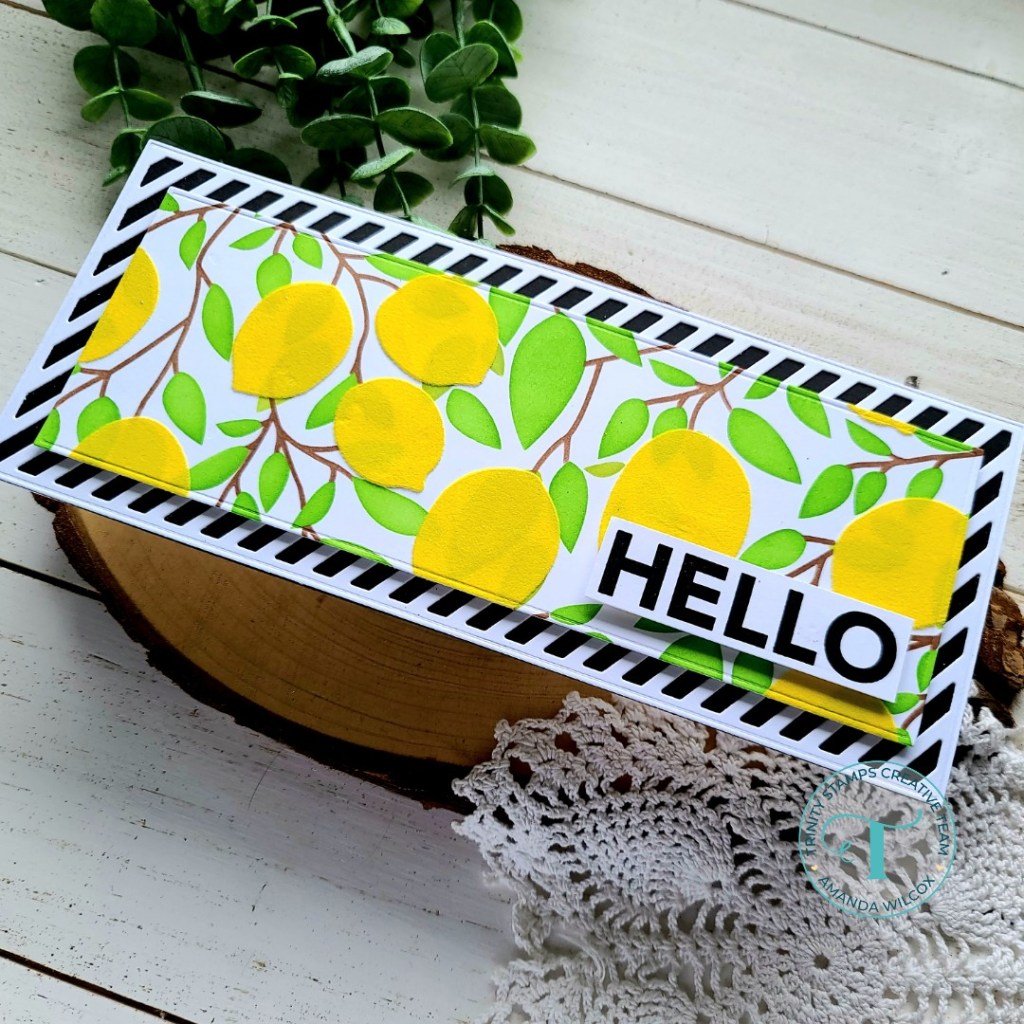
I stamped Slim and colored him up with my copic markers. Then I used the scan-n-cut to cut him out. I chose a sentiment and trimmed it into a strip, then switched gears to stencil my background.

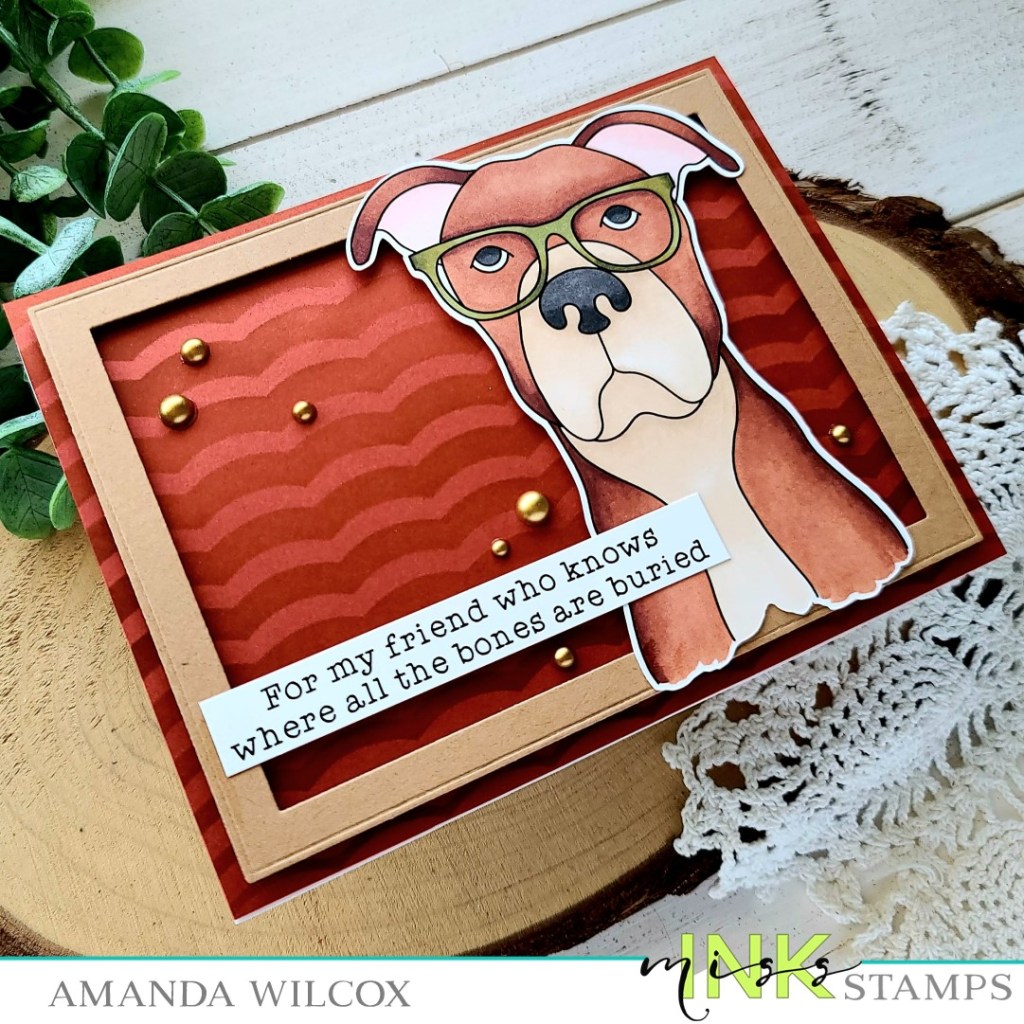
I wanted to play off the army green that I used for his glasses so I chose a dark orangey-red cardstock and my scallop stencil from the Miss Ink Stamps Basics Bundle. I used an ink from my stash similar to the cardstock for a tone-on-tone look. Once the inking was done I used liquid glue to adhere it to a white card base. Next, I die cut a piece of kraft cardstock with a Trinity Stamps Embossed Edge rectangle die and then took a die 2 sizes down and cut the center out creating a frame.

I added foam strips to the back of the frame and popped it in place. Then I added foam tape to the back of Slim and the sentiment strip and placed them on the card front too.

To finish things off I glued down a scattering of Trinity Stamps gold satin baubles around the design. I love how these colors play off of each other. Great for a masculine card if you needed one!

Products used on today’s card:
Miss Ink Stamps Slim’s Whims stamps
Miss Ink Stamps Basics Bundle -scallop stencil
Trinity Stamps Embossed Edge Rectangle dies
Trinity Stamps Gold Satin Baubles
Thermoweb Foam strips
iCraft liquid adhesive

I appreciate you sharing your time with me. Have a fabulous day!

Trinity Stamps – Sending Monster Hugs Easel Card

Woo-hoo! We’re half way through the week my friends! I hope you’re having a great day! I have a really fun easel card to share with you featuring stamps and dies from Trinity Stamps. Let’s start with a look at the front and then we’ll get into the steps to make it too!

I just love monster themed things so I find myself going back to these great stamps and dies! For this card, I started by stamping one of the monsters from Monster Love and colored it with my copic markers. Then I used the coordinating dies to cut it out.

Now to switch to the card front and base. It’s not really as difficult as it looks. I broke it down into simple steps. First, I ink blended a white panel with distress oxides inks – festive berries and aged mahogany. I spritzed the panel with water and let it dry. Then I die cut it with the largest Embossed Edge Circle die, plus 2 more white circles the same size. Then I scored one of the white circles at 1/4 inch and 2 1/2 inches.

I burnished the score lines and carefully glued the white circles together by just the small tab – this is where your card opens. Then I glued the red card front to the larger bottom tab. So the middle section of the scored white circle has nothing attached to it at all.

To decorate the front of my card, I used the Sending Hugs dies and cut the elements from black and white cardstock. I like to layer my letters for extra dimension so sending and hugs are cut 4 times and glued together. I adhered “sending” and “monster” to the card front, then carefully wrapped my monster between the “hugs” letters and glued them all together before gluing them to the card front.

Last, I took the scrap of inked cardstock and die cut the small banner from the 4-Bar Card die set and stamped “just because” from the Sentiment for (almost) Everything set on it. I added a foam strip to the back and adhered it to the inside of my card. This forms the stopper for the easel mechanism of your card.

For finishing touches on this card I added black glaze pen to the monster’s eyes and then white gel pen accents to the letters in “hugs” and on the monster too. Instead of trying to keep track of all of the little dots for the “i” in sending, I let them fly wherever they may and used Nuvo Crystal Drops in black ebony to add my own dot. So much less stress and you’d never know.

I hope you enjoyed this project and will give it a try sometime!

Products used on today’s card:
Monster Love stamps and dies
Sending Hugs dies
Embossed Edge Circle Stack dies
A Sentiment for (almost) Everything stamps
4-Bar Card die set
Distress Oxide ink – festive berries and aged mahogany

I appreciate you sharing your time with me. Have a fabulous day!

Trinity Stamps – Happy Mail

Welcome, welcome friends! I have some unbearably adorable happy mail to share with you all today! I tried a new distress oxide ink combo and played with one of the new Trinity Stamps sets – Special Delivery. It’s got another round of those super cute bears that I just love and this one has a pup too!

I started by stamping and coloring those cute images with my copic markers. Then I used the coordinating dies to cut them all out. Next, I die cut the largest Slimline Scalloped Panel die from white cardstock. I pulled out distress oxide inks and blended them together at an angle. Left to right I used chipped sapphire, peacock feathers and twisted citron. I splattered it with water and the flicked pearl watercolor on it too. Next, I watered down a bit of black acrylic paint and, without rinsing my watercolor brush, I picked up the paint and flicked it too. This turned out so cool! It’s like a pearl charcoal paint splatter. It’s beautiful in the light.

Next, I die cut the word happy from the Marshmallow alphabet dies 3 times and glued them together. I partial stamped a sentiment from Special Delivery and heat embossed it. Then I trimmed it into a little block. I used liquid glue to adhere the inked panel to a white slimline card base.

I used liquid glue to adhere the word happy, then added foam squares to the back of my images and the word mail and started adhering them to the card base. For finishing touches I added glossy accents to parts like the mailbox flag, smiley faces and critter noses. Then I came in with unicorn Stickles for the flowers at the base of the mailbox.

This little stamp set is absolutely adorable but keep in mind too that it works fabulously with a bundle of other products from Trinity Stamps like the Cozy Cottage, Cottage Kitchen, Cozy Christmas Cottage, Cozy Bear and You Lift Me Up!

Products used on today’s card:
Special Delivery stamps and dies
Marshmallow Alphabet dies
Slimline Scalloped Panels and Banners
Distress Oxide inks – twisted citron, peacock feathers, chipped sapphire
Glossy accents
Stickles – unicorn

I appreciate you sharing your time with me. Have a fabulous day!

(This blog uses affiliate links whenever possible, at no additional cost to you.)

Trinity Stamps – Christmas in July Fun

Hey friends! Popping in a second time today with another Christmas in July card for your inspiration vault. I had a little fun this weekend playing with some Trinity Stamps goodies from last year that I hadn’t gotten to yet and came up with this fun Christmas slimline card.

I knew I wanted to create a fun scene with this adorable Cozy Christmas Cottage stamp set so I stamped a bundle of images that I thought would make a cute room and colored them with my copics. Then I used the coordinating dies to cut them out and started playing to decide if I wanted a portrait or landscape card. Originally I was thinking portrait and then I pulled out the Slimline Room Builder dies and that went out the window because it was too perfect!

I cut the room builder floor from brown cardstock and the wainscoting portion of the wall from light green. Then I cut the chair rail and baseboard from white. I also die cut the Slimline Hip to be Square die from white for my “windows. I inked up a slimline panel with some light blue ink for the sky outside my windows and adhered the Hip to be Square panel to that. Then I glued the squares that came out back in where I didn’t want windows showing open. Next, I adhered the layers of my room builder – the floor and walls, etc.

With the room built I used a combination of liquid glue and foam squares to place all of my images filling in the scene and decorating the tree. For finishing touches I added bits of glossy accents and unicorn Stickles throughout the design.

At this point I didn’t want to muddle the cute room scene with a sentiment so I will choose one later on for the inside of my card that fits the recipient. I don’t do this often but it makes for a nice versatile card.

Products used on this card:
Cozy Christmas Cottage stamps and dies
Slimline Hip to be Square die
Slimline Room Builder dies
Blending Buddy brush
Copic markers
Glossy accents
Stickles – unicorn

I’m going to link this fun card up to the BYSHC Christmas in July Hop today too! So excited to have a few cards in my stash already for the holiday season.

I appreciate you sharing your time with me. Have a fabulous day!

Miss Ink Stamps – Thank You Very Much!

Hey friends! Miss Ink Stamps has a new release coming and we’re sneaking peaks over on Instagram for the next few days before the release goes live on Saturday! Today I have a super cute and silly gnome card to share with you.

My dad is a huge Elvis fan. I grew up watching those movies and dancing to that music so this set just made my heart happy to create with!

I colored up the images with my copic colors and trimmed it down. Then I used the Trinity Stamps Embossed Edge Rectangle Stack to create some layers. Starting with the base which is white adhered to a white card base. I really wanted that matching embossed edge so I didn’t mind the extra layer. Then a cool gold glitter layer adhere with foam strips. Last there is a black layer also popped up with foam tape and the little scene adhered to that with liquid glue.

For finishing touches I added glossy accents to the gnomes glasses, buttons and belt, along with the microphone and stand. I thought there needed to be a little shine but I didn’t want it to compete with the cool glitter cardstock layer.

This is just too much fun! I love the whole little scene. Remember there are giveaways on Instagram from today until the release so be sure to head over and comment on the Miss Ink posts.

Products used on today’s card:
Miss Ink Stamps Thank You Very Much stamps
Trinity Stamps Embossed Edge Rectangle Stack dies
Glossy accents
Thermoweb Foam tape
iCraft Ultra Bond liquid adhesive
Pink & Main gold glitter cardstock

I appreciate you sharing your time with me. Have a fabulous day!

Trinity Stamps – One Layer Wonder

Hey friends! I’m over on the Trinity Stamps blog today with a really fun birthday card that is all one layer! I used the new Pretty Party Decor stamp set. And I didn’t pull out the foam squares for even a second this time! Trust me…it was difficult. Lol! But this card is so fun. Let’s check it out!

Today I started by laying out my stamps on a card base to see if the design in my head would even work. This can be very helpful when doing cards with lots of to same stamp over and over again or making sure spacing looks how you think it will.

Then I chose one of my favorite distress oxide ink blends and started blending on an oversized white panel. The magic combo is abandoned coral, tattered rose and dried marigold. These colors just make me happy every time I put them together!

I splattered the panel with water and once it was dry I die cut it with the largest Modern Embossed Rectangle die and started my stamping!

The first round of stamping was all the black – sentiment and strings – which I stamped with VersaFine ink. I sprinkled clear embossing powder on the sentiment and heat set it. This is a big reason I like using VersaFine…and it covers beautifully on the first impression. Then I moved on to stamping the lanterns at the bottom of the strings with aged mahogany distress oxide ink. I heat set that and then stamped the detail over the top of them with VersaMark and heat embossed them with gold.

I came back and added a few more strings and then moved on to the confetti stamps in this set. I started with a scattering and heat embossed them with clear embossing powder and then went back and added more filling things in and embossed those in gold.

It’s hard for me to make masculine cards but when this was finished I immediately thought that you could change the colors and make this card fit great for a guy’s birthday too!

Products used on today’s card:
Pretty Party Decor stamps
Modern Embossed Edge Rectangle dies
Distress Oxide Inks – aged mahogany, abandoned coral, tattered rose, dried marigold

I appreciate you sharing your time with me. Have a fabulous day!

Miss Ink Stamps – You Color My World

Hey friends! I’m back today with another Miss Ink Stamps card. I just had to bring that awesome Rainbow Builder stencil set and play again. I just love these so much!

I started by cutting a white panel to 4×5.25 inches. Then I centered the largest layer of the rainbow stencil I wanted to use and inked it up. Then I switched to the second layer and ended with those fun accents details in dark blue this time.

I trimmed a piece of cardstock in the general shape of the rainbow to use as a mask from the outer stenciling I wanted to do. I taped down the Tiny Snowfall stencil next and inked it up in dark blue. Then I came back with the Starry Night stencil and gold glitter glitz gel. While the glitz gel was drying I stamped and heat embossed a sentiment from Sunshine and Rainbows on a dark blue cardstock with white embossing powder. I used the Trinity Stamps 4-bar Card die set to cut it into a sentiment banner.

I added foam tape to the back of the stenciled panel and popped it on a white card base. Then I used a little liquid adhesive to adhere the banner down and my card is all finished. Isn’t this so fun?!?

Products I used on today’s card:
Miss Ink Stamps Rainbow Builder stencil
Miss Ink Stamps Tiny Snowfall stencil
Miss Ink stamps Starry Night stencil
Miss Ink Stamps Sunshine and Rainbows stamps
Trinity Stamps 4-bar Card dies
Thermoweb Glitter Glitz Gel – gold
iCraft Ultra Bond liquid adhesive
Thermoweb foam tape roll

I appreciate you sharing your time with me. Have a fabulous day!

Trinity Stamps – Best-Tea

Welcome, welcome!!! Thanks so much for stopping by today. I’m over on the Trinity Stamps blog for another fun Wednesday. Today we’re having a sweet tea party with a couple of adorable bears! I love how large these images are! They fill up a slimline or an A2 size card but they also work wonderfully with the new A7 card size products as well! Today I really wanted to try them on a slimline, so let’s get started.

I stamped and heat embossed the images on Bristol Smooth cardstock and watercolored them all with my Zig Clean Color Real Brush markers and a water brush pen. When they were dry, I used the coordinating dies to cut them all out. Then I started die cutting the elements for my scene so I could get inky messy!

I die cut 3 panels with the largest Slimline Modern Embossed Panels die. Then I used the Slimline Great Outdoor Borders dies to cut a hill and some grass with two of the panels. Then I came in with distress oxide inks and inked each panel up. I spritzed them all with water and blotted them dry. Last, I die cut the sweet picket fence from the Great Outdoors Borders and moved on to assembling my card.

I used liquid adhesive to adhere the background layers together. Then I added foam squares to the back of my images, including the sentiment and decided on final placement. I wanted some depth so I used liquid glue to adhere the tree stump and girl bear. Then I removed the release paper on everything else and popped them in place.

Isn’t this scene just too cute for words?!? I love these sweet bears! My brain is working trying to figure out what else I can have them sit on!

Products I used on today’s card:
Best Tea Party stamps and dies
Slimline Modern Embossed Panels dies
Slimline Great Outdoors Borders dies
Distress Oxide inks – mowed lawn, twisted citron, gathered twigs, ground espresso, mermaid lagoon, salty ocean
Thermoweb foam squares
iCraft Ultra Bond liquid adhesive

I appreciate you sharing your time with me. Have a fabulous day!

Miss Ink Stamps – For You Mini Slimline

Hello everyone! Today I’m over on the Miss Ink Stamps blog with this sweet little mini slimline card and coordinating envelope. I just love these mice and their sidekicks from Say Cheese! so I pulled out the penguins, which I hadn’t used yet and decided to color them up!

I also colored a couple of clouds and a butterfly to fill in my scene. Once they were colored I used the scan-n-cut to cut them all out and switched gears to stenciling and ink blending.

For that I die cut the scalloped panel from the Trinity Stamps mini slimline card and envelope die set. I taped off from the stitching to the edge and affixed my Miss Ink Stamps Square Dance stencil. I inked it up with a light purple ink. I removed that panel, die cut the bookmark tag from the same die set and replaced it in the same spot so the stenciling lines up perfectly. This time I inked up with a light blue ink. Next, I taped down the Tiny Snowfall stencil and used a dark blue on that. It gives a really fun texture to the sky.

Finally, I die cut another small panel with the bottom of the bookmark tag die and inked it up with the Oopsie Daisy stencil and green ink. I removed the stencil and inked the whole panel up again giving the whole thing a light green color. I cut the top of that little panel off with a Trinity Stamps Great Outdoor Border die to create a little hill. One last thing before assembling the card, I stamped a sentiment from Sunshine and Rainbows on a banner from the mini slimline die set and die cut the words “for you” from the same set.

For assembly, I created a mini slimline card base measuring 3×6 inches and adhered my scalloped panel with liquid adhesive. I added foam tape to the back of the tag and popped it in place, lining up the stenciling. Then I added foam squares to the back of my images and sentiment banner and used them for placement of the words being glued in the sky. For those skinny pieces I used a glue pen to adhere them. Then I removed the release paper from my images and popped everything in place.

Finishing touches on my card were to cut some strips of yellow bakers twine and thread it through the top of the tag. Then I added glossy accents to noses and beaks and black glaze pen to all the eyes. I used unicorn Stickles on the butterfly and the pom poms on the mouse’s hat. Once the black glaze pen was dry I added white gel pen dot highlights to the eyes.

Products used on today’s card:
Miss Ink Stamps Say Cheese! stamps
Miss Ink Stamps Sunshine and Rainbows stamps
Miss Ink Stamps Square Dance stencil
Miss Ink Stamps Oopsy Daisy stencil
Miss Ink Stamps Tiny Snowfall stencil
Trinity Stamps Mini Slimline Card and Envelope dies
Trinity Stamps Great Outdoor Borders dies
iCraft liquid adhesive
Thermoweb foam tape
Thermoweb foam squares
Stickles – unicorn
Glossy accents

I appreciate you sharing your time with me. Have a fabulous day!

Trinity Stamps – Hello Lemons

Hey friends! Today I’m over on the Trinity Stamps blog sharing this fuzzy, fun slimline card featuring more new goodies from the most recent release!

To create my card, I started by grabbing the Lemon and Leaves stencil, choosing some inks, my blending brushes and a white panel for my stenciling.

You’ll notice that I had a yellow ink picked out but as I got that far in my stenciling I thought it would be way more fun to make fuzzy lemons. So I switched gears for that last layer and spread Thermoweb Transfer Gel Blanco through the lemon layer.

After I spread the transfer gel, I set my panel aside to dry while I cleaned up my mess and also turned on my laminator to heat up so it was ready to go when the panel was dry. I ran the panel through my laminator with a yellow decofoil flock transfer sheet in a folded piece of parchment paper. Then I just peeled the flock sheet away from the stenciled panel and MAGIC!

Then I pulled out the Slimline Embossed Edge dies and cut the largest one from black cardstock and the third largest one from the stenciled panel. Then I die cut the new Slimline Striped Frame Panel die from white cardstock.

For assembly, I adhered the black panel to a white card base, then adhere the striped frame panel to that. I added foam tape to the back of the stenciled panel and popped it in place next.

For my sentiment, I stamped hello from the new Big & Bold Sentiments stamp set and trimmed it out with my paper trimmer. I popped it on with foam tape as well.

I just LOVE the bright yellow lemons and their green leaves popping against the white and black of this card! Isn’t it just awesome!?!

Products used on today’s card:
Trinity Stamps Lemon and Leaves stencil
Trinity Stamps Slimline Striped Frame Panel dies
Trinity Stamps Slimline Modern Embossed Panels dies
Trinity Stamps Big & Bold Sentiments stamps
Trinity Stamps Blending Buddy brushes
Trinity Stamps Blending Bar
Trinity Stamps Blending Bar Magnetic Color Caps
Thermoweb Transfer Gel Blanco
Thermoweb Decofoil Flock Transfer Sheets – yellow
Thermoweb Stencil Pal

I appreciate you sharing your time with me. Have a fabulous day!