Birch Press Design – Trio of Ornament Tags

Happy weekend everyone! Today I’m over on the Birch Press Design blog with a step-by-step on how I created these awesome Christmas ornament tags. I know it’s crazy to think about Christmas already but it’s going to sneak up on us before you know it.

These new layered ornaments are just beautiful and so much fun to mix and match! I can’t wait to try these in lots of other color combinations too. Cool blues and teals would be beautiful! Don’t you think?

Here’s a look at each individual tag as well. This was the first one I create and I think it’s my favorite. I just love all that detail and how the baubles finish it off.

Then I tried this one, adding a word sentiment across the middle. I would love to get dies for the word joy or merry. I think they would be just beautiful on this style.

And this last one is just beautiful! I love the cut line detail and the star burst in the center. So pretty!

Do you work on Christmas early? I have friends who try to tackle a little each month all year long and others who won’t touch it until after Thanksgiving. I find myself somewhere in the middle…also lots of great intentions that don’t come to fruition. haha.

I appreciate you sharing your time with me. Have a fabulous day!

Trinity Stamps – Oh, Chute!

Hi everyone! Just popping in with a super fun card featuring Purrachute from the new Trinity Stamps release that went live last Friday. This little kitty with his parachute is just the cutest! And the sentiments in the set are absolutely adorable!

To make this card, I started by coloring my image with my copics and then used the coordinating dies to cut him and the sentiment out. I set those aside and started inking my background. I used distress inks on an A2 panel and splattered it with water. Then I took my Cloudy Day Scene Builder dies and cut the frame, some clouds and the sun out. I popped the frame up with foam tape on the inked panel and adhered my sun and clouds over that.

I popped my kitty up with foam tape and adhered the sentiment with liquid glue and moved on to finishing touches. I started by adding white gel pen accents to the kitty and black glaze pen to his eyes. Then I moved on to glossy accents to the parachute, his toe beans and his nose.

I finished them off with Stickles on the clouds and sun for a little extra interest and shimmer at the top of the card too.

I love that there are two completely different sentiments in this stamp set to change the entire meaning of your card so easily. This little kitty is just the cutest and so much fun to color!

I appreciate you sharing your time with me. Have a fabulous day!

Newton’s Nook – Food, Friends, & Sunshine

Hi there! I’m up Newton’s Nook blog today with this super fun picnic scene card featuring a couple of different stamp sets and a bunch of stencils. It was so much fun to build this scene and I’m excited to share it with you!

I started by laying out my images to get a sense of how much I could fit in my scene. Next, I stamped and colored my images with my copic markers. The sets I used are Woodland Picnic and Newton’s Picnic. Then I used the coordinating dies to cut them all out and moved on to the stenciled elements.

To create the blanket, I took a scrap of paper and inked it yellow with my blending brush. Then I used the plaid stencil with red and orange inks over the top of that. Then on an A2 panel I used the hills & grass stencil to create the background scene. The blue sky was a little boring so I used the cloudy sky stencil with white pigment ink and then heat embossed iridescent glitter over the top of that. I love the texture it gave.

For assembly I popped the blanket panel up with foam tape and trimmed off the extra. Then with a combination of foam squares and liquid glue I adhered all my images. I die cut the ticket shape from the Framework dies and stamped my sentiment, popping it up with foam tape and finally moved on to finishing touches.

I added white gel pen accents to the images, black glaze pen to the critter eyes and glossy accents to various bits and pieces for some glossy texture and added interest.

I am so happy with how fun this card looks! Newton, diving in the basket looking for his kitty treats just cracks me up. While Winston and the squirrel are sensibly eating fruit. Haha!

I hope you enjoyed this card! I appreciate you sharing your time with me. Have a fabulous day!

Twiddler’s Nook Shop

Hey there crafty friends! I’m popping in today to share something that I realized you all might not be aware of. I have an Etsy shop and have been selling my cards for some time but we also create and sell crafty tools and embellishments on there too!

Let’s introduce you to some of the fun things we sell. You can click the links to get to the various “departments” if you’d like to check them out more. Feel free to comment or email if you have questions too!

Magnetic Die Holders

We have created these awesome die holders that are magnetic so you won’t lose your dies on your desk anymore. They’re so handy and come in a variety of styles – paw print, flower and skull – and different colors are available too!

Embellishment Trays

We offer a variety of styles in our embellishment trays too. They are perfect for dumping your baggie of embellishemnts in to sort through and choose what you need. Then use the perfect little pour spout to put them back in without spilling them everywhere.

I also use these trays to hold my die cut images until I’m ready to use them on my card…and let’s be real, I have a few that stay stocked with those extra images that I’m sure will find a home on a card some day.

These trays come in the circle shown above plus a star, honeycomb, skull and adorable cloud!

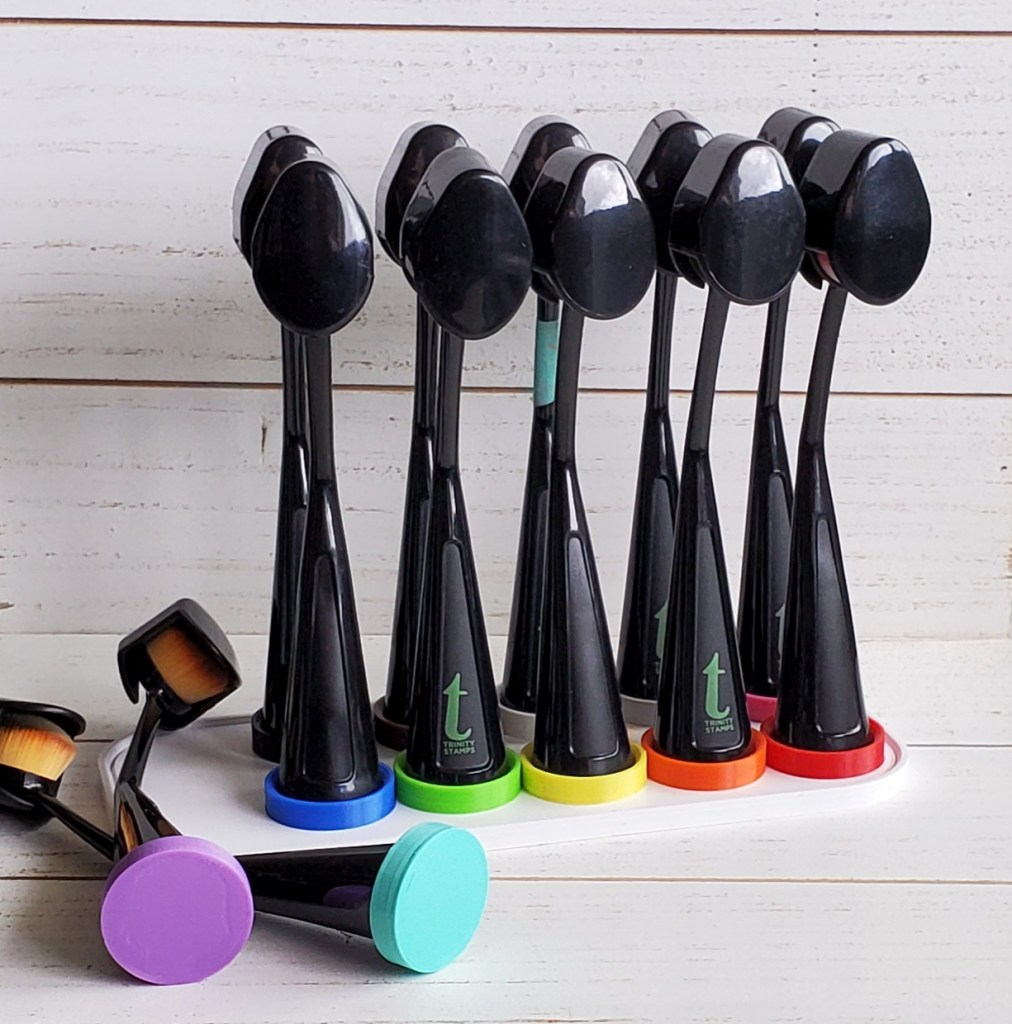
Trinity Stamps Blending Brushes and Colored Caps

I absolutely love the Trinity Stamps blending brushes and wanted to come up with a way to tell what color the brush was for without removing the caps that protect the bristles. This was the perfect solution! The colored caps do multiple things at once…

  1. The tell you the color of ink the brush is for.
  2. They add a little stability so the brushes don’t fall down anymore.
  3. They are magnetic and coordinate with our platforms to really hold them in place when you aren’t using them.

These caps are available in 3 color family sets – primary, neutral and secondary for a total of 12 colors. They coordinate with our single- and double-wide platforms as well. If you don’t have Trinity blending brushes yet, we also have those available on the site in singles or a set of 4.

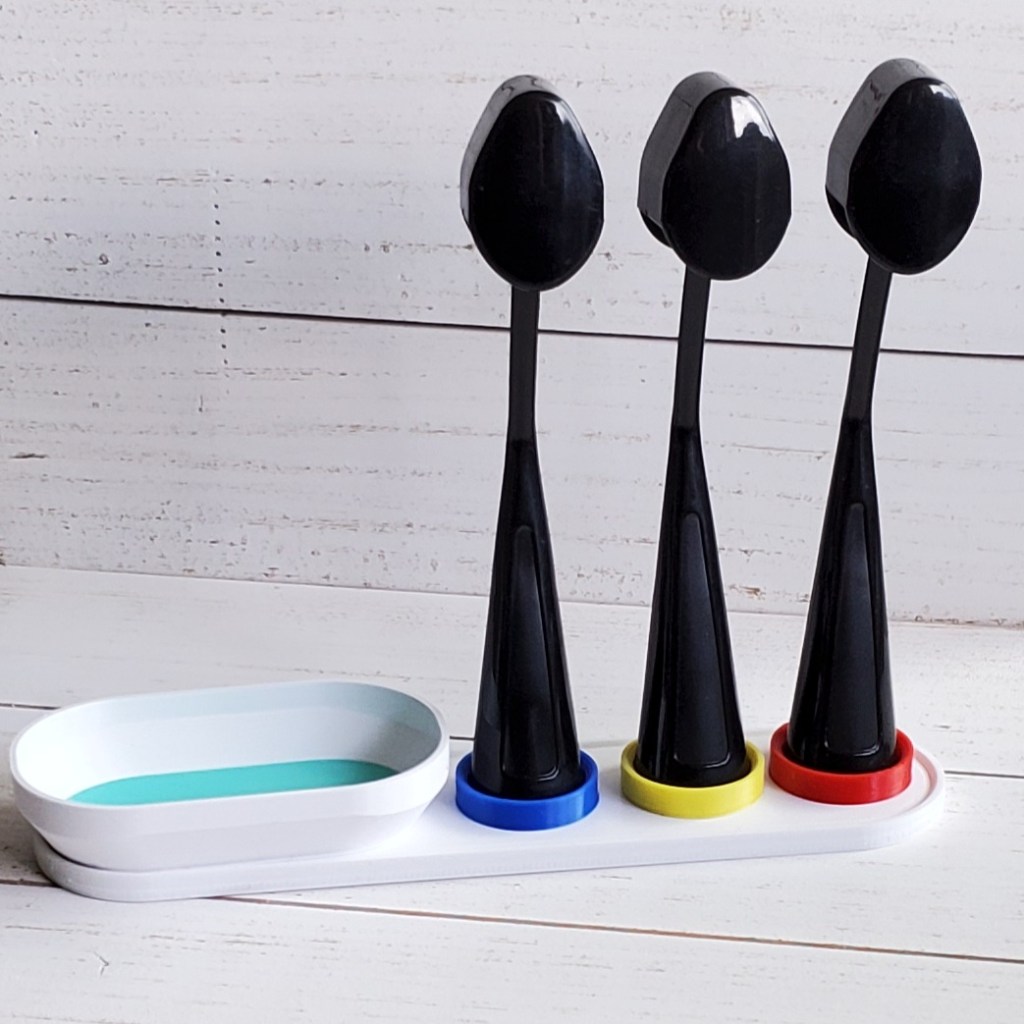
Single– and Double-wide Platforms

Like seen in the 2 previous photos, we offer these great platforms in 2 sizes – single and double – that coordinate with the magnetic brush caps and the next item on the list, the magnetic tray. We are hoping to expand this series with other helpful items in the future too.

Magnetic Tray

We are trying to add to the platform series by adding other tools that will be useful. Right away we thought of this great tray that is magnetic so it can hold your dies when they aren’t in use. It is sized to coordinate with the single– and double-wide platforms too. In the photo you can see it being used on a single-wide platform and 3 Trinity blending brushes.

A fun thing about this tray is that you can choose the color of the insert so all your items can coordinate.

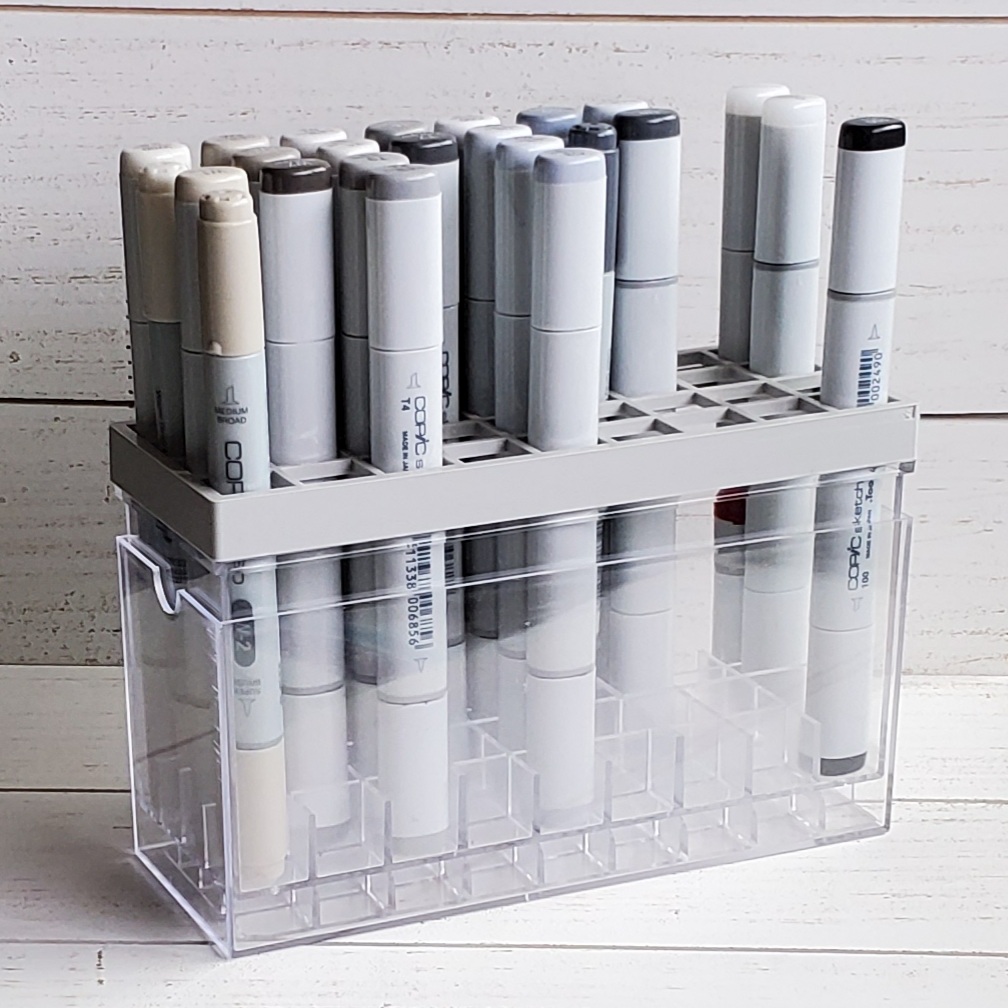
Copic Marker Tray Divider

I have a bunch of these clear plastic holders on my desk to hold all of my copic sketch markers. Well, over time I’ve snagged (and been given) some copic ciao markers and noticed that they fell over because these aren’t made for that shape.

So we set to work and created the gray divider you see in the photo that snaps to the top of your case and holds everything upright even when the slot next to it is empty. It’s been very helpful.
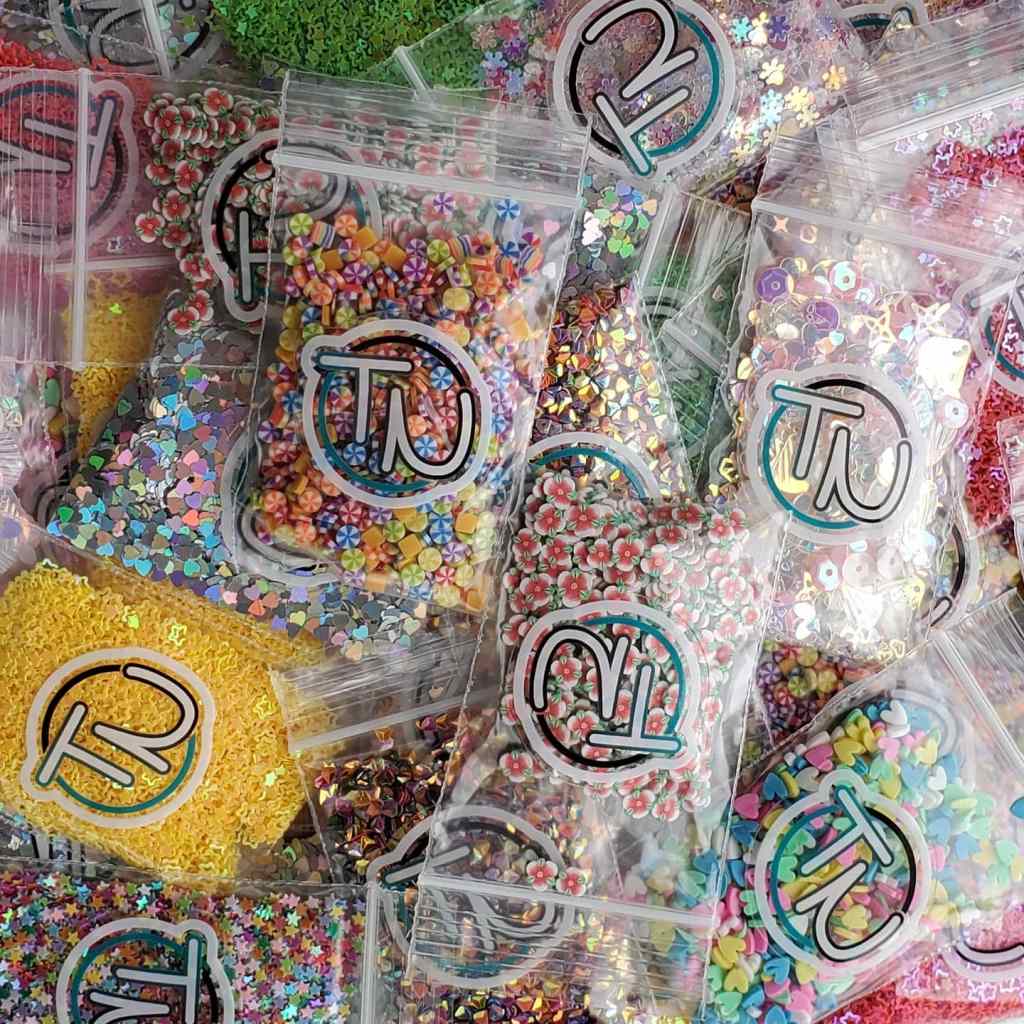
Embellishments

And finally, I’m super excited that we are carrying our own embellishments to use on your fabulous creations! These will be ever growing and changing so if there’s something you really love, be sure to let us know and we’ll make it a regular item we carry. Until then, I plan to rotate through different options to keep the variety fresh and fun!

Did you know these embellishments are super fun for kiddos to put in slime too? My daughter loves doing that. You can get at least 2 batches of slime out of each embellishment package.

❤ ❤ ❤ ❤ ❤

I think that’s all for now friends. I’d love to know your thoughts on our products if you have a moment to leave a comment. Which is your favorite? Have you ordered already and have suggestions for other people?

Thanks for stopping by. I appreciate you sharing your time with me. I hope you have a fabulous day!

Trinity Stamps – You Make Life Colorful

Hello everyone! Welcome to a brand new week! I’m really excited to share today’s card with you. I had some fun watercoloring with my Zig markers and absolutely love the outcome. I used the recently release Blooming Bunch images and a sentiment from A Crafter’s Heart that released earlier this year.

I started by heat embossing my images with silver embossing power on Bristol smooth cardstock and then set to coloring them with my Zigs and a water brush pen. Then I used the coordinating dies to cut them out and moved on to making my card.

I used the diagonal stripes stencil with gray ink on a gray panel and popped my images up with foam squares. I trimmed off the excess and adhered it to a white card base.

I stamped my sentiment and trimmed it into a strip. Then I used an old paper punch to create the flag end. I popped this up with foam squares as well and moved in to finishing touches.

I added a scattering of Seashore Confetti embellishments around my card design and called it done. I love the shine from the heat embossed image and didn’t want to distract from the beautiful watercolor florals.

I think this is just a gorgeous stamp set and the images have endless color possibilities which could turn it into a fall or winter bouquet easily. I can’t believe I’m admitting this but I can totally see a Christmas bouquet already! …and it’s only August! Something doesn’t seem right with that. Haha.

I appreciate you sharing your time with me. Have a fabulous day!