Blog

The Rabbit Hole Designs Caffeinated Owl

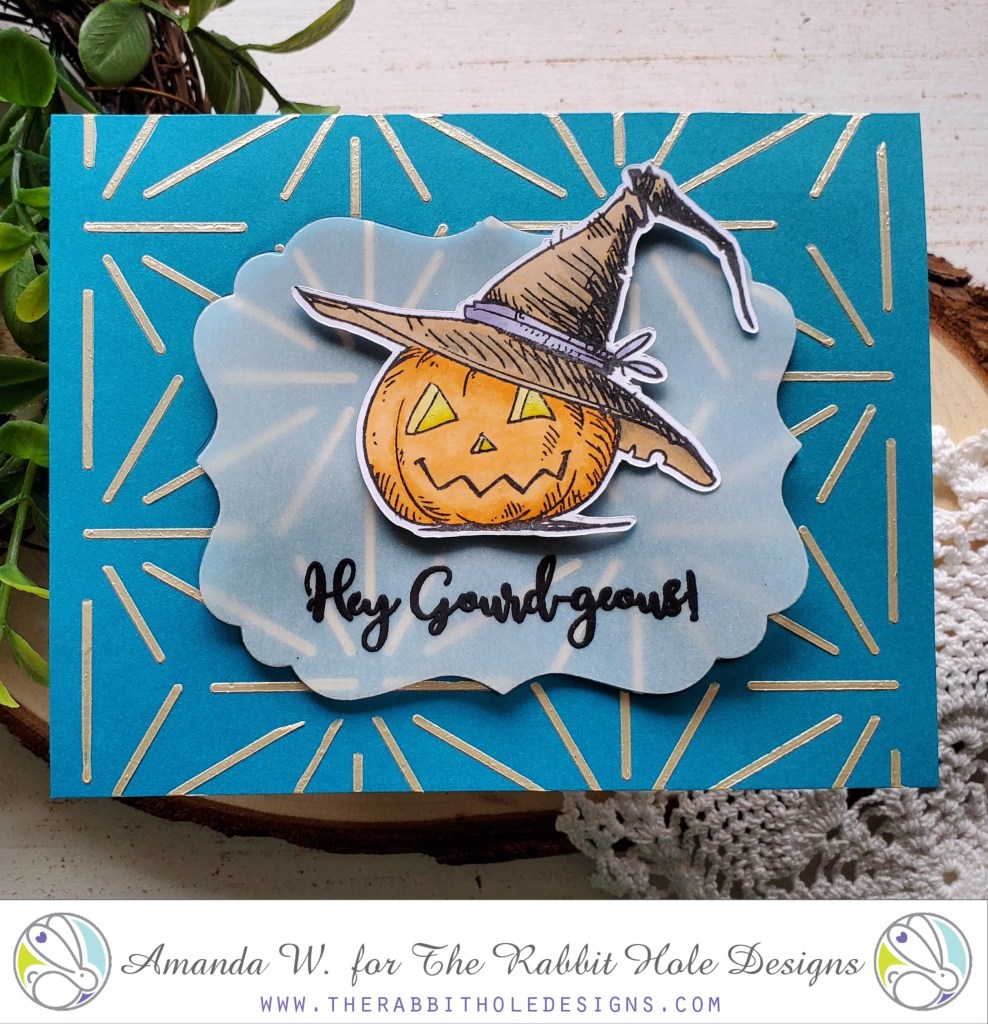
Hey everyone! Sharing this super shiny Caffeinated Owl card today from The Rabbit Hole Designs. In reality, it’s probably too shiny for this owl but I love it! I know the Therm-O-Web collab is over but I’m still loving those products for awesome backgrounds like today’s.

Here’s how I made it:

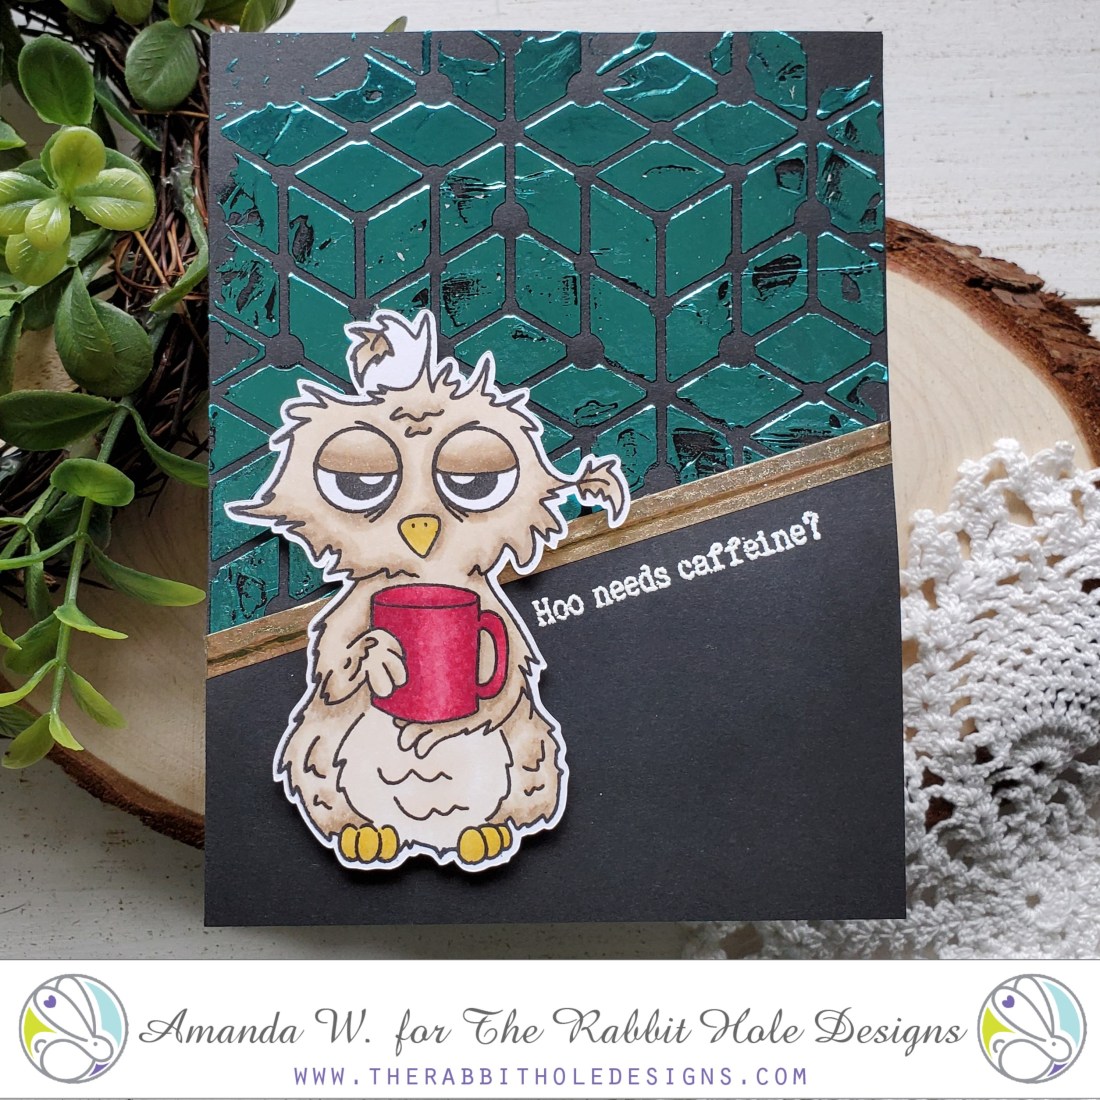
  • Took a black cardstock panel and, using my trusty Pixie Spray (I’m addicted now!) adhered my stencil down and spread Deco Foil transfer gel across it and left it to dry. I intentionally made the gel high and low and almost distressed looking instead of smooth and even. You could do it either way depending the look you’re going for.
  • This is when I stamped, colored and cut out my owl.
  • Once the background was dry, I heated up my laminator and sent the black panel through with aqua Deco Foil. To do this I took a piece of parchment paper and folded it in half. Inside of that I put my cardstock with the dried transfer gel and then the aqua Deco Foil (color-side up) on top of that and sent it through my laminator.
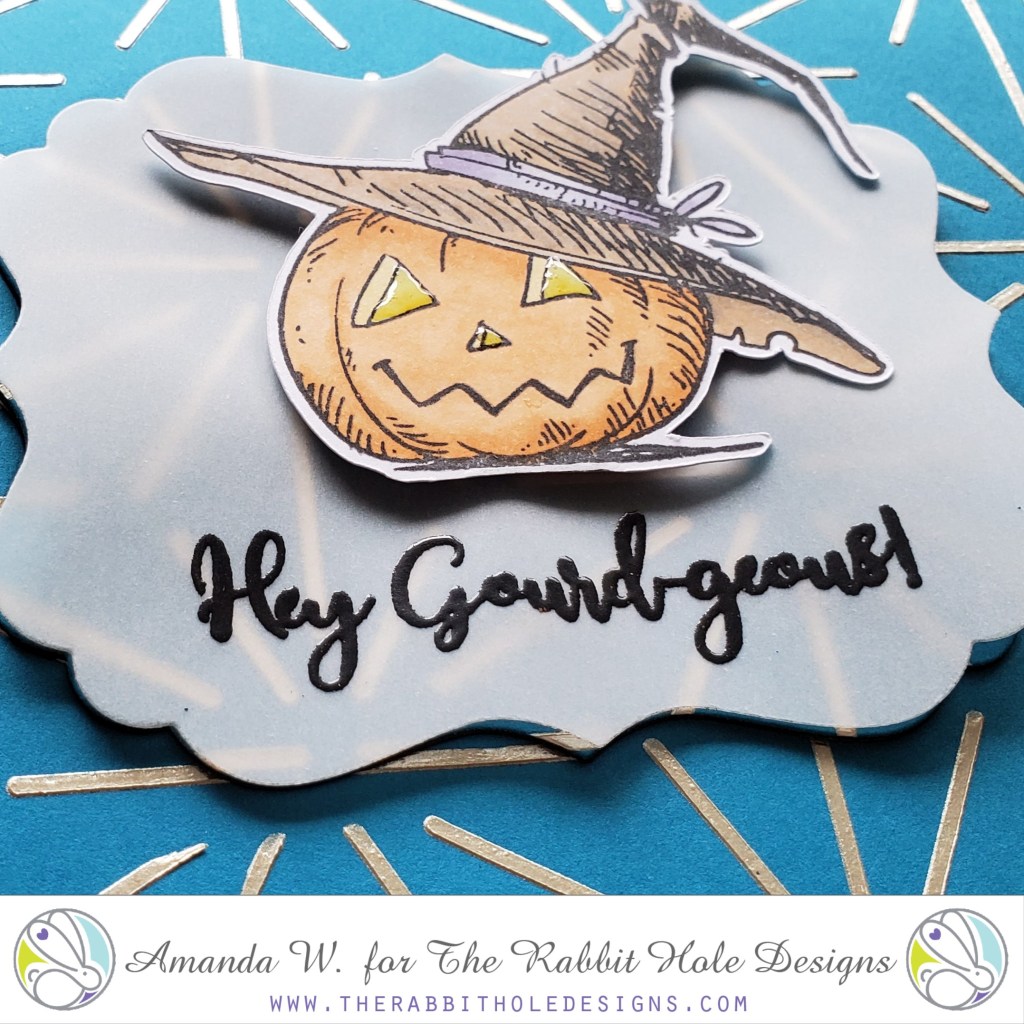
  • For assembly, I cut my foiled piece at an angle and adhered it to a black card base. Then added a piece of gold washi tape across the seam for a break in the color. I really like what this added to the card.
  • Next, using my owl for placement I stamped and heat embossed my sentiment along the edge. Then popped my owl up with foam squares.

Voila! This card is done! I am in love with the aqua deco foil, especially with the black card stock. I can’t wait to try it with other cardstock colors, maybe for Christmas. I love red and teal together for non-traditional Christmas colors.

I appreciate you sharing your time with me. Have a fabulous day!

Here are the products I used:

Caffeinated Owl

Puzzle Box Stencil

For more information, news and updates check out these links.

The Rabbit Hole Designs/Therm-O-Web Collab – Mermaid Hair

I’m super excited to be back today with another collab card featuring The Rabbit Hole Designs and Therm-O-Web products! It’s so fun to use them together. Today I’m going all out GLITZ and GLITTER!!!

Here are the details:

  • Ink blend Twisted Citron, Mowed Lawn and Peacock Feathers Distress inks and then adhered my Candy Twist Stencil with Pixie Spray. Then I covered the stencil with Glitz Glitter Gel in white.
  • While that was drying I pulled out Mermaid Hair and stamped, colored and cut out my images.
  • Then die cut my frame from white cardstock 4 times and glued them together.
  • Last I stamped my sentiment in green ink and cut it apart so I could scatter it in the card design.
  • For assembly I adhered my background glitter panel to the card front, then my frame with liquid glue because of the glitter texture and finally my images and sentiments were adhered with foam squares.
  • Finishing touches on this card were Wink of Stella Glitter Brush on the mermaid tail and fish. You can never have too much glitter when mermaids are involved!

Here’s a closer look. Look at all that shimmer! This card is absolutely stunning in the light! The colors bounce off the glitter gel and it’s so eye catching! The fun and whimsy of the whole card is fabulous!

I hope you enjoyed it. Remember to head over to the Therm-o-Web blog to see what their design team is creating too.

I appreciate you sharing your time with me. Have a fabulous day!

Here are the products I used:

Mermaid Hair

Candy Twist Stencil

For more inspiration, news and updates check out these links.

13 Days of Tricks and Treats – Day 13

Thank you so much for joining me on our finale of the 13 Days of Tricks and Treats! It’s been a blast to create all of these, so much fun to hand them out and I sincerely hope that you have enjoyed following along.

Today’s final treat box was a total collaboration between my daughter and I. I chose the box and she helped with the decorations and stamps. We had a blast!

The box die is one I was gifted a while back and is from Creative Memories. It is meant to hold a gift card, which is what we are doing with a couple of them.

I used a background stamp on just the top portion that you see. Stamped, colored and cut out my Gourd-geous pumpkin from The Rabbit Hole Designs and then popped it up on the box top. We finished these off with clear sequins and purple gem stones and a little Wink of Stella glitter brush pen on the glowing pumpkin eyes.

Here’s a closer look. We managed to fit small Halloween toys in a couple of these going to kids and then gift cards in a couple of others going to my daughter’s teachers for a little fall pick me up.

This is the end of our fun 13 Days of Tricks and Treats series. I really hope you enjoyed it and got a little inspiration along the way.

If you don’t mind, I’d love for you to leave a comment with your favorite one and if you plan to make any treats to hand out this year.

Thank you so much for stopping by. I appreciate you sharing your time with me. Have a fabulous day!

13 Days of Tricks and Treats – Day 12

Thanks for stopping by. We’re keeping the kids on their toes and dishing another trick their way today. Jumping spiders! Okay, they won’t really jump out of the boxes but they are toy spiders that leap up when the suction cup gives way. Silly and fun.

The die set I used for these is Stampin’ Up’s Curvy Treat Box. I cut them out of a polka dot embossed cardstock and sponged the edges with spiced marmalade distress ink. Then cut the tags from bright green (My daughter’s request, she really loves those eye-popping colors. I think she was meant to be raised in the 80s.) but I inked the edges of them with mowed lawn distress ink. We assembled the boxes, inserting the spiders and then tied the tags on with green ribbon from my stash.

The sentiment we chose was from Stampin’ Up’s Seasonal Chums stamp set which she thought was hilarious given what’s inside of the boxes.

I appreciate you sharing your time with me. Have a fabulous day!

13 Days of Tricks and Treats – Day 11

We’re closing in on the end of our tricking and treating adventures. Just a few days left. I hope you’ll continue to join me for these last few.

I’m absolutely in love with how today’s project turned out. In all actuality, there are about 7 shown here but I’ll be making close to 50 of them to hand out to various people in our lives. They are so fun and were really quick to come together.

Spooky right?!? Ha! Well, here’s how I made them…

Starting with reaching WAAAAAAAAAAAAAAAYYYYYYYYY back into my stash. The ghosts are a die from the original Sizzix series that showed up in craft stores almost 20 years ago. Yes, I still have them. No I will probably never let them go because I love them. 🙂 Also used, from pretty deep into my stash, was the scalloped tag topper punch from Stampin’ Up.

The general idea was to stamp the Lawn Fawn gingham backdrop stamp on 2×3 inch tagboard (quite literally the cardboard backing from your notepads; I keep them), punch with the tag topper and corner rounder. Die cut 1″ circles from gold cardstock and glue them down. Then adhere the ghosts and add some fun spiderweb washi tape to the bottom. I threaded some orange grosgrain ribbon from my stash and then tied it with black and white baker’s twine. Last, I added washi tape to one side of a clothespin and used it to clip the tag to a mini bag of candy corn.

Here’s a less cluttered look at just one of these fun treat tags! Isn’t it so fun??? There are always so many ideas that lead to other ideas and these have my mind swirling.

I think it would be great to write a message on the back of the tag, use a simple to and from stamp or just leave it blank. In the past I have glued strong magnets to the back of clothespins like these too. That would make for an extra gift with your gift!

I hope you’re enjoying the fun treat giving ideas and will join me for the last few. Be sure to subscribe so you don’t miss any.

I appreciate you sharing your time with me. Have a fabulous day!

13 Days of Tricks and Treats – Day 10

Welcome back everyone! Today I’m sharing a trick, of sorts. I’m using the Stampin’ Up Mini Treat Bag die set to create thin pocket-type bags. Over the years I have filled these with everything from gift cards to instant soup packets and hot cocoa. Today these kiddos are getting really corny Halloween jokes taped to apple cider packets for a trick to go with their treat.

The die set gives you everything you need to make super fun, complete bags. I almost always use double-sided cardstock so the inside part that shows up top is just as pretty as the rest. For these I used three pieces of double-sided cardstock in various ways to mix and match the patterns.

The dies I used in the set were the star, star border, bow and washi tape along with the actual treat bag. They are all just layered together with liquid glue and then I placed acrylic blocks on them while I cooked dinner to make sure they dried really well.

I love the added bling of the gold cardstock for the bows. Just a little shine among all of the drab is super fun.

Also, the washi tape pieces were die cut from regular cardstock and ink blended with black soot distress ink because they were just a little too bright for the rest of the design. The “trick or treat” sentiment is from Stampin’ Up Seasonal Chums.

I hope you enjoyed today’s trick. Come back tomorrow for more fun Halloween ideas!

I appreciate you sharing your time with me. Have a fabulous day!

The Rabbit Hole Designs/Therm-o-Web Collab – Gourd-geous!

I’m super excited to share this fun card using both The Rabbit Hole Designs and Therm-o-Web products!

Fall is my favorite time of year so I immediately grabbed Gourd-geous! from the September release and started coloring.

Here are the details:

  • Using Pixie Spray, I adhered my Deco Foil Starburst Stencil to my cardstock and covered it with Champagne Mist Metallix Gel.
  • While that was drying I stamped, colored and cut my pumpkin from Gourd-geous!
  • I took the largest label from the Nested Label Dies and cut it from vellum. Then I carefully heat embossed my sentiment in black embossing powder.
  • When the background was dry, I die cut he same label from the background and black cardstock 4 times and glued them all together for a raised look.
  • I glued the “frame” that was left to a card front, then glued the labels back in their spot, added the vellum label to that and popped my pumpkin up with foam squares.
  • For finishing touches I added glossy accents to the pumpkin’s eyes and nose.

Here’s a closer look at the subtle shimmer the Metallix Gel gives and the glossy eyes of the glowing pumpkin.

Such a fun card. I would love to send this to a girlfriend this fall. I think it would fit in perfect! Don’t you?

I appreciate you stopping by! Be sure to check out the Therm-O-Web blog for more inspiration from their design team too.

Here are the products I used:

Gourd-geous!

For more inspiration, news and updates check out these links.

13 Days of Tricks and Treats – Day 9

Welcome to Day 9 of our Tricks and Treats series! Today’s boxes were so much fun to make! I actually ended up making 8 of these and we filled them with a variety of fun things and gave them to different kiddos in our lives.

One extra thing I love about this treat box is that it can hold a gift card with some little candies perfectly. Such a fun way to spruce up the typical gift card holder. I’ve also been known to squish rolled up socks in these for a total surprise to the recipient.

Now that I’ve given you a few ideas what to fill these with, let’s get on with the show.

All of the products I used today are Lawn Fawn except the paper (It’s just from my stash.). I used the scalloped treat box, spooky fence, stitched hillside borders, pick of the patch and jump for joy.

For these boxes, I figured out my general layout and then did them assembly line style – die cut all the pieces; then stamped, colored and die cut the images; then assembled them all. Pretty easy and I got all 8 of them made in an evening.

Here’s a closer look at one of them all put together. They are so fun and I’m sure the kids will have a blast finding what’s inside.

Do you give treat holders out for Halloween? What sort of goodies do you give? Leave a comment below and tell me about it. I’d love to hear.

I appreciate you sharing your time with me. Have a fabulous day!

13 Days of Tricks and Treats – Day 8

Welcome back! Today we’ve got a super cute mini milk carton treat holder to share. To make these cuties I used an older die from Stampin’ Up but many other companies have milk carton style dies available.

To whip these up I just die cut the carton, stamped the starry night background stamp from Lawn Fawn and then assembled the boxes with scrappy tape. Next I stamped, colored and die cut my Happy Howloween pups and accessories and glued them directly to the milk carton. You can glue the carton tops shut but I found over the years that the mini clothespin is super cute and it allows you to open the whole top to get treats in and out so the boxes don’t get destroyed in the process.

Here’s another look with the cartons open. You can see that the clothespin is offset just a bit so it stays on when you open and close the carton. I put some chocolate balls inside that are wrapped in foil to look like eyeballs. It made me laugh to look inside and have something looking out at me.

I hope you’re enjoying all of these treat ideas and find some inspiration in at least one of them.

Thank you for sharing your time with me. I appreciate it. Have a fabulous day!

13 Days of Tricks and Treats – Day 7

I’m silly excited to share a trick with you today! I didn’t want to have too many since these were going to kids but what’s the fun if it’s all treats???

We made these super easy and adorable little boxes and squished rubber snakes in each one. Here is the link to the original post where I got my instructions. She has a video which is always helpful as well.

For mine I cut the box out of purple cardstock and simply took the bats from The Rabbit Hole Designs Hex Yeah stamp set and stamped them all over. I punched the wholes, adhered them with Scrappy Tape and tied them up with orange ribbon.

I did contemplate a sentiment strip somewhere on it but my daughter was so excited with the unassuming simplicity that she convinced me to leave them alone. She’s so excited to share these at school. I think she’s honestly more excited to share the tricks than the treats. She must be my child!

Here’s another look from above so you can see the dimension that you end up with.

I’ve made these numerous times in the past and put whatever candy suits me at the time. There is plenty of room for a few Hershey’s kisses or even the mini candy bars.

I appreciate you sharing your time with me. Have a faboooolous day!