Blog

Newton’s Nook – Scuba Newton is Back!

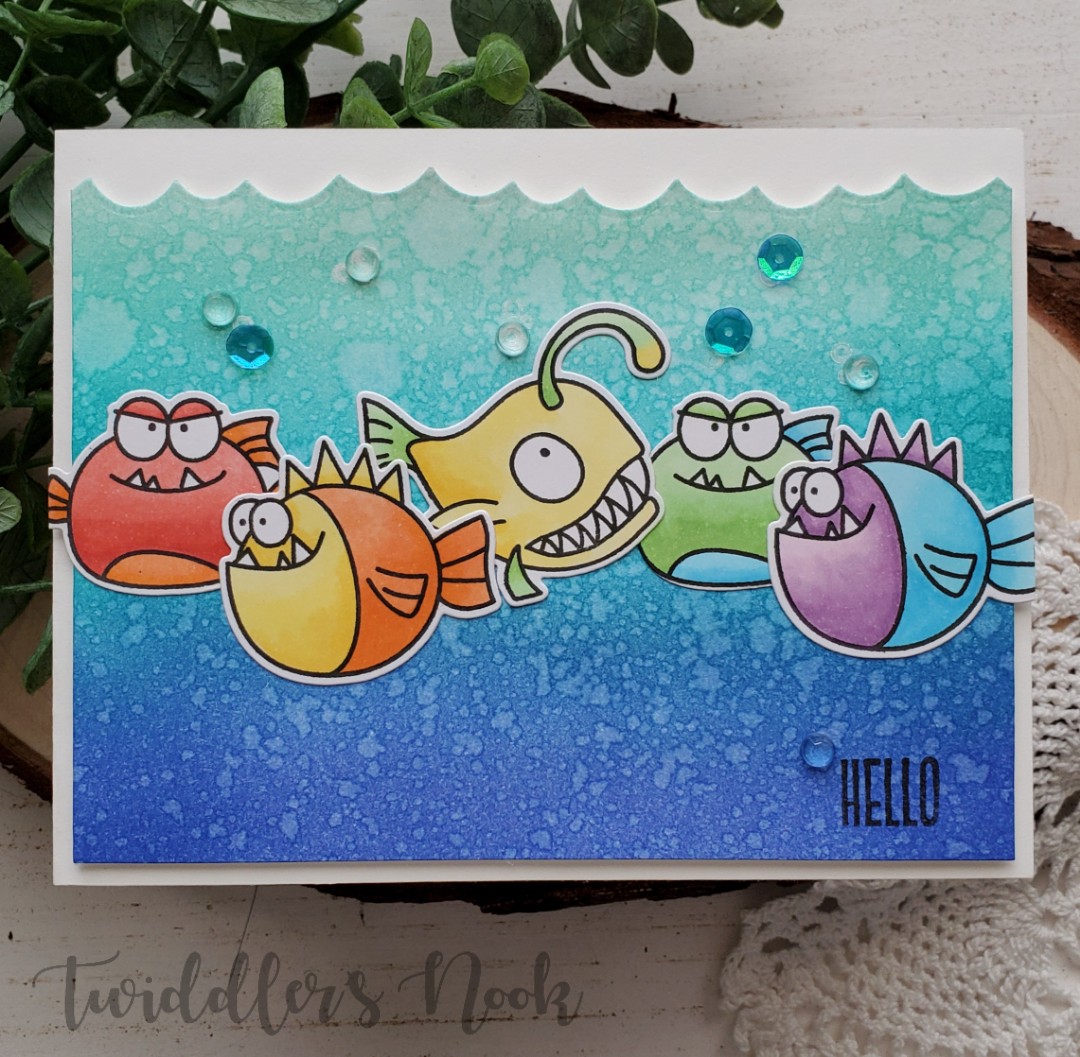
This Scuba Newton set is one of my favorites ever! I am so drawn to all things ocean and water related so it’s not really a surprise but seriously, he’s so flippin’ cute! Get it? He’s got flippers? Ha! You’re welcome. 😉

This card is my second entry into the current Newton’s Nook Inky Paws Challenge. When this challenge was released I hadn’t gotten my newest order yet so I sat out all 5 of my Newton’s Nook stamp sets and started thinking how I could make it work with what I had. This was the first one that came to mind and I knew I had to try it.

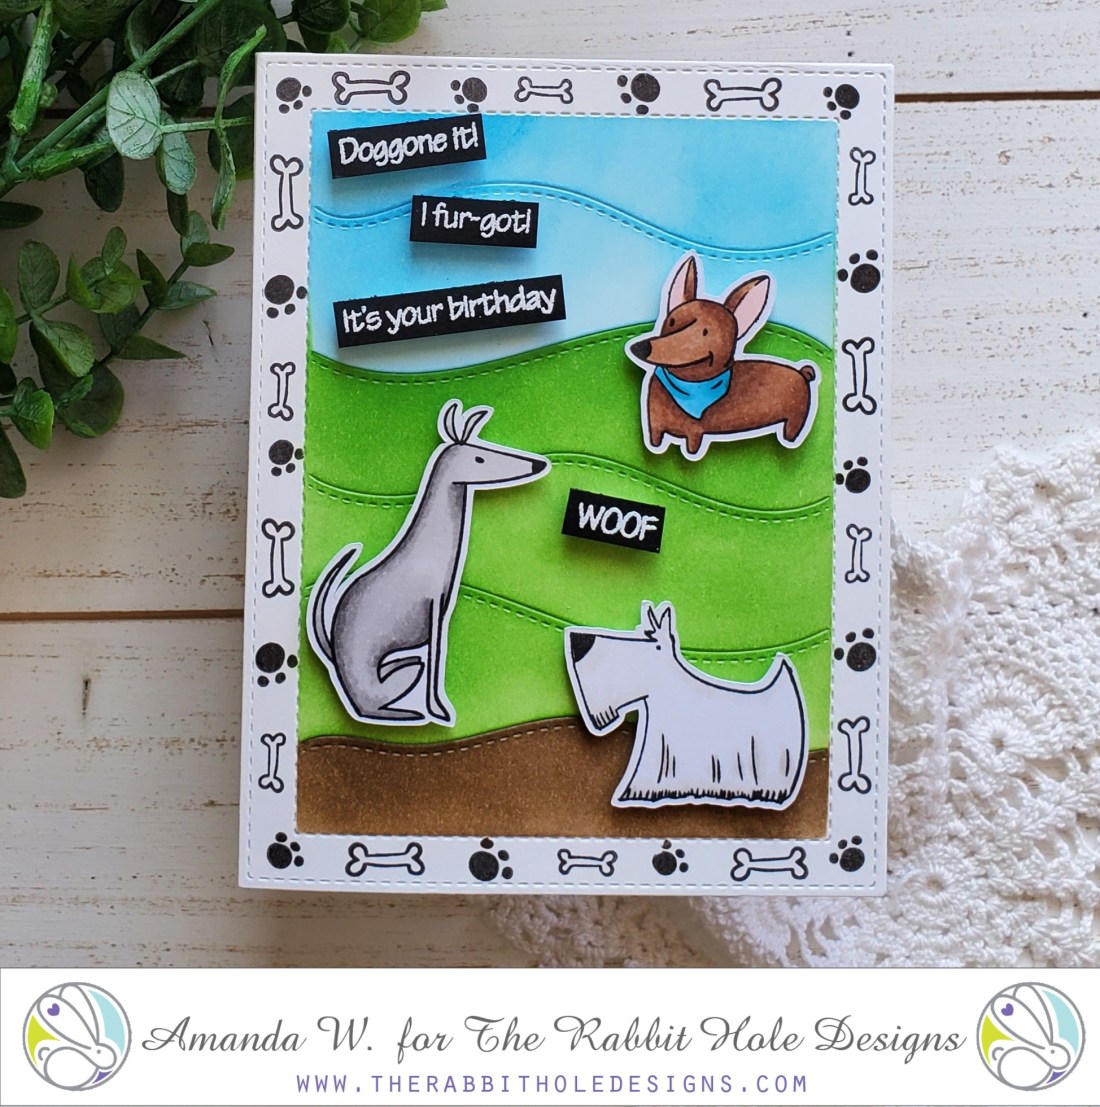
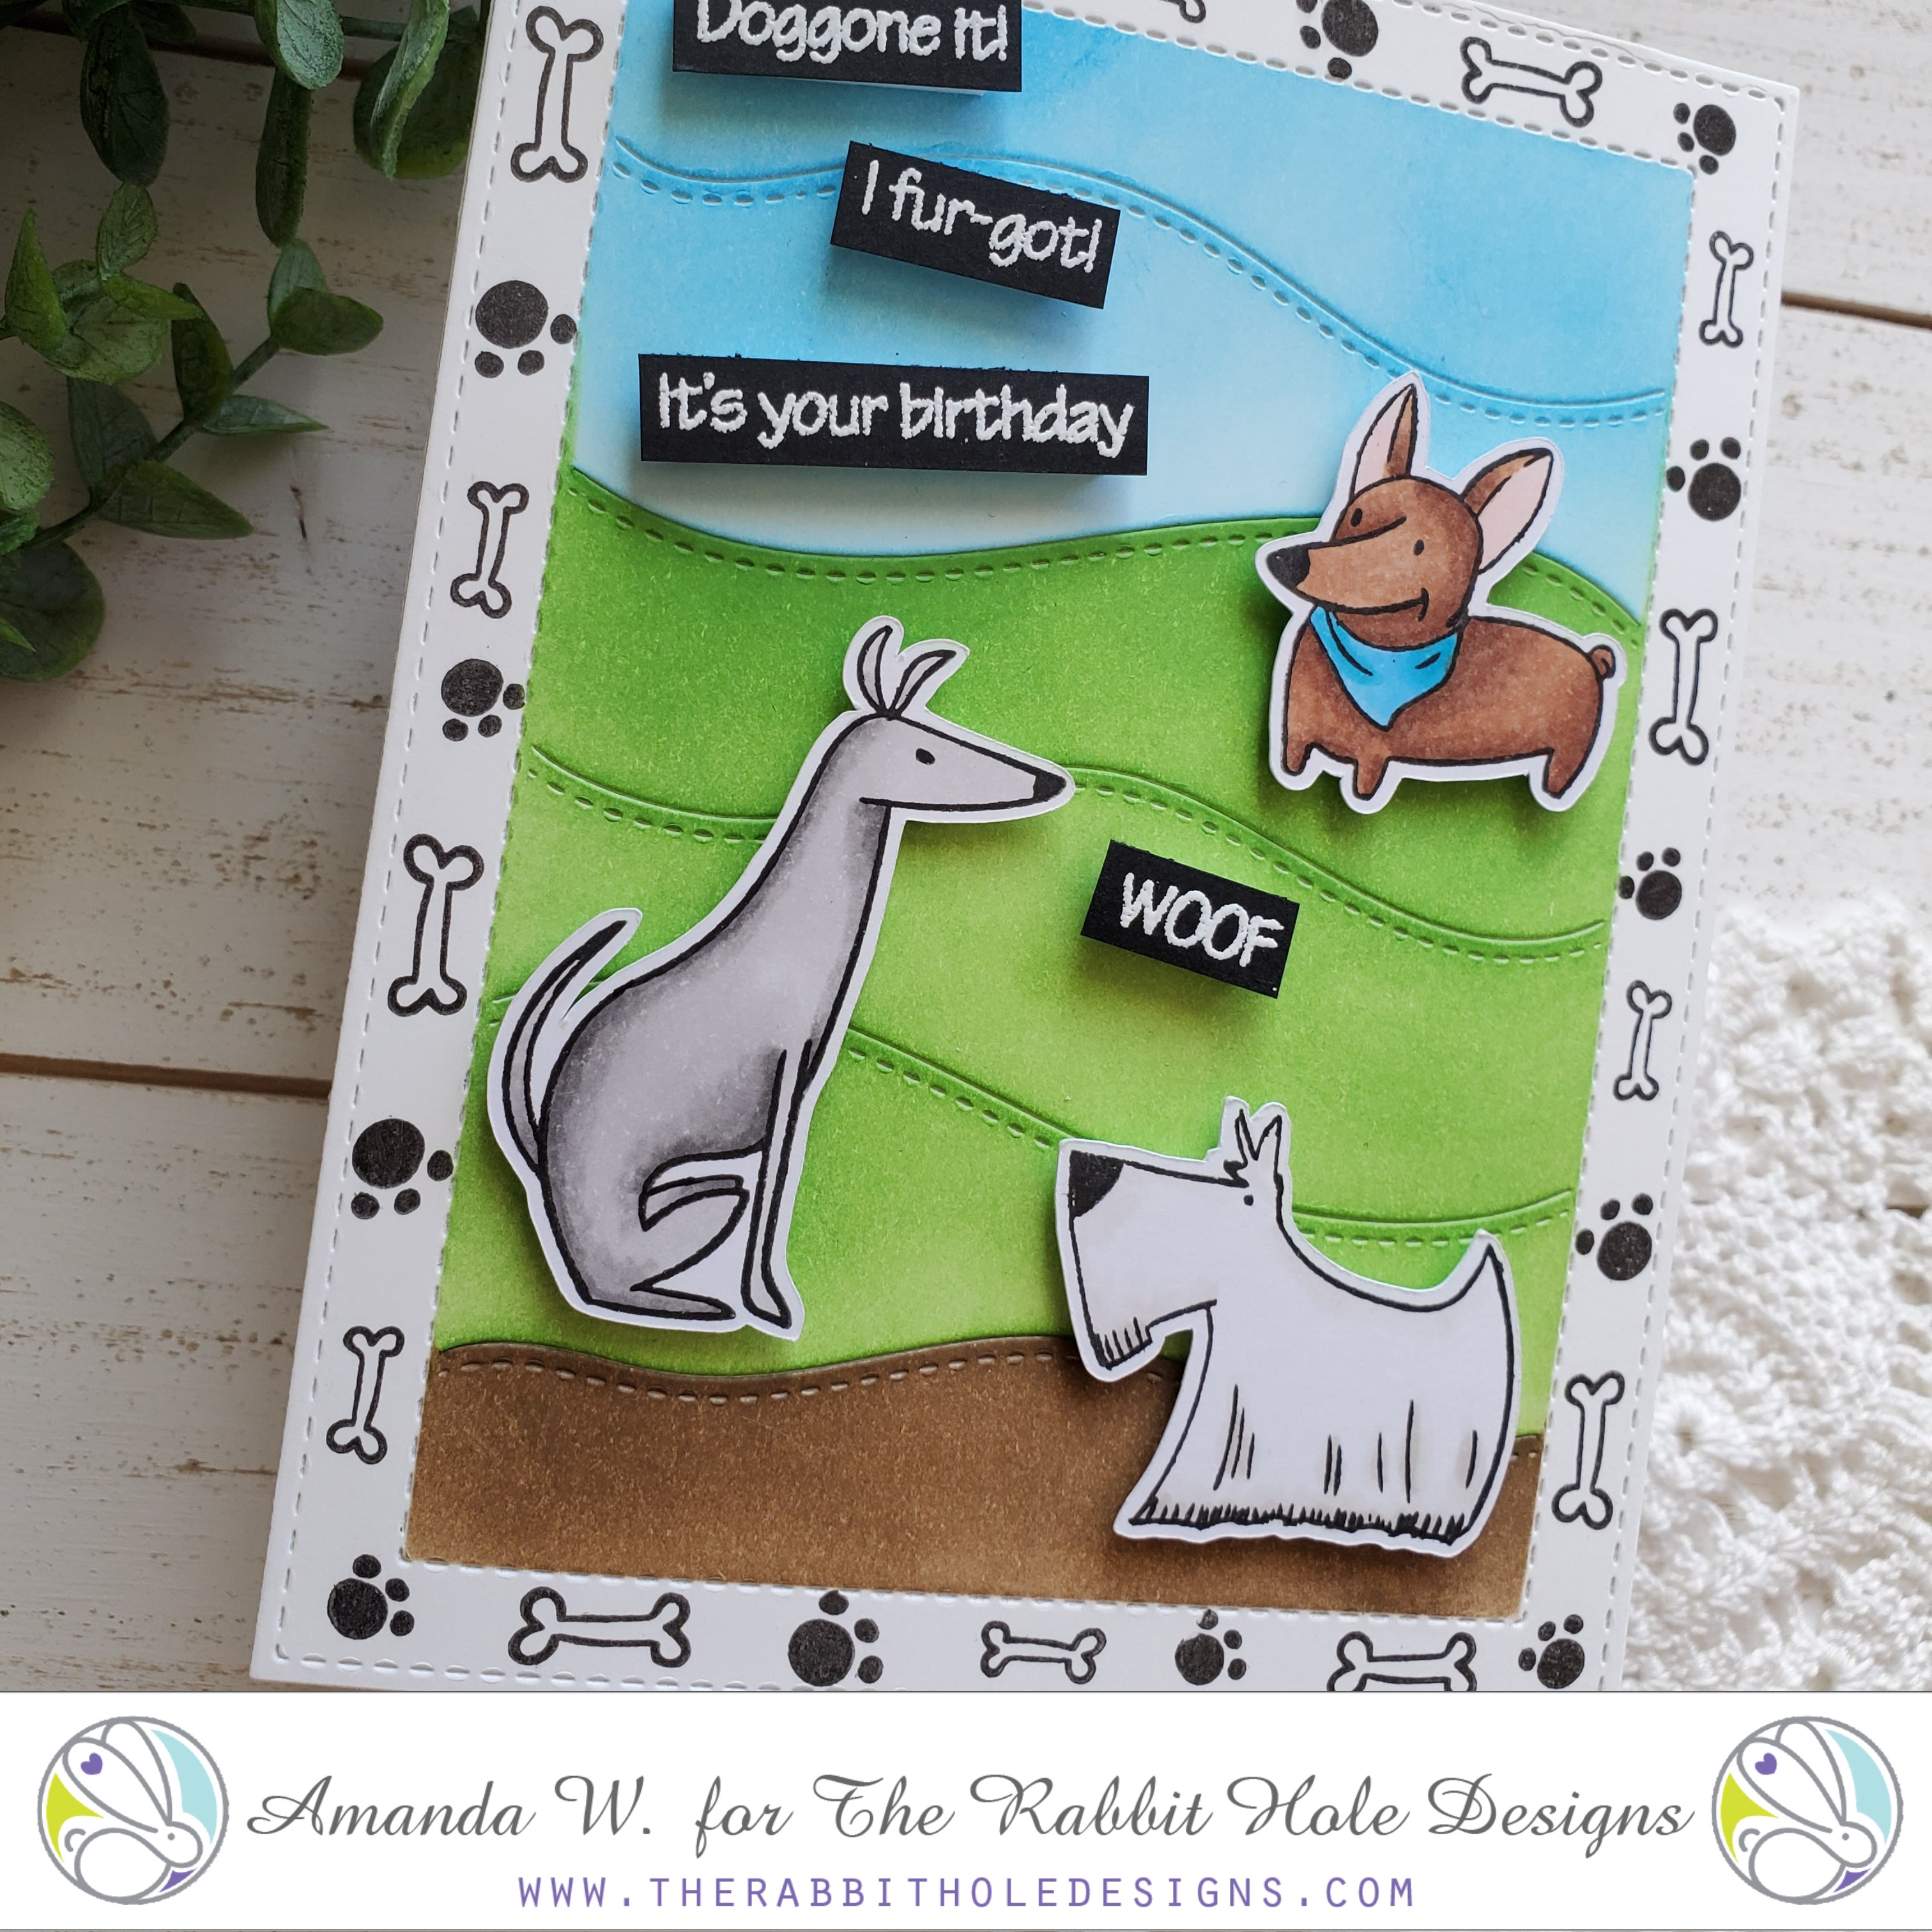
Here are the details:

  • Stamped, colored and cut out my images.
  • Cut a panel 2.75×4 and blended distress inks for ocean and sand. Then used the waves and splashes stencil twice at the top for some texture. Then spritzed it all with water for distressing.
  • I cut down a 5.25×4 panel of patterned paper and adhered it to a card base. Then popped up my ink blended panel with foam tape.
  • Now I started arranging my images and gluing them down. Only Newton is popped up with foam squares on this card.
  • For finishing touches on this card I used glossy accents on Newton’s goggles, white gel pen accents on the fish and Newton and glued down some bubble baubles from Honey Bee Stamps throughout.

Here’s a closer look at Newton’s shiny goggles and some of the other dimension and details of the card. It’s so bright and cheery.

I’m completely ready for fall but one last bright summery card can’t hurt, right?

This card was so fun to create. Mostly because of the coloring I chose for Newton. I’d seen others do it but couldn’t figure out the colors I should use. I decided to bit the bullet and give it a shot. I love him!

Side story: We have a neighborhood cat that does have a home but he loves to get lovin’ from anyone and everyone. We don’t know his name so we call him Pretty Kitty. And this is him! It makes me heart happy. I hope I can recreate his coloring again.

I appreciate you sharing your time with me. Have a fabulous day!

The Rabbit Hole Designs Witches Gotta Stick Together

You say witch like it’s a bad thing… ha!ha!ha! I seriously can’t get enough of this new Halloween release from The Rabbit Hole Designs! They are all so fabulous and fun to create with! Today I’m on The Rabbit Hole Designs blog sharing the fabulous witchy card using the newly released Boo to You stamp set.

Here’s how I did it.

  • Started with a black panel and smeared texture paste across a plaid stencil and set it aside to dry. Once that was dry I flicked gold watercolor on it and let that dry too. Then adhered it to a piece of craft foam for dimension and glued that to a copper panel.
  • I stamped, colored and cut out my image. Stamped and heat embossed my sentiment and die cut it with a label die. Then added gold accents to the top and bottom to go with the base panel.
  • I adhered the background to a white card base and popped the image and sentiments up with foam squares.
  • Voila! Shimmery, witchy goodness!

I really like the flat look of the texture paste and the shiny of the gold paper and watercolor. They mix well. And that green hat! Perfect!

Remember you can pick up The Rabbit Hole Designs products at their website linked below and also at Simon Says Stamp!

Boo To You

For more inspiration, updates and news be sure to check these places:

I appreciate you sharing your time with me. Have a fabulous day!

Newton’s Nook Autumn Mice

Thanks for stopping by today. I’m so excited to share my first entry into the current Newton’s Nook Inky Paws Challenge. This is my first sketch challenge and it was difficult for me at first. But once I got the hang of it, ideas just started flowing.

Today I’m using the new Autumn Mice from the most recent release. I knew I had to have this set as soon as I saw it. These cuties are going to be our Thanksgiving place cards this year!

Here’s how I did it:

  • I stamped, colored and die cut my images.
  • Cut a kraft panel down to 4×5.25 and used distress inks over the falling leaves stencil.
  • Cut a 3×4 panel, blended distress inks for ground and sky and spritzed with water.
  • On a dark blue card base I glued the leaves panel directly down and then popped the smaller panel up with foam tape.
  • I took my images and popped the mouse up with foam squares, glued the leaves directly down along with the back pumpkin and then popped the other pumpkins up with foam squares.
  • I stamped my sentiment in brown ink below the images and started on finishing touches.
  • Those are glossy accents to the mouse’s nose, black glaze pen to his eye and white gel pen accents to all the stamped images.
  • The last thing I did for this card was adhere a white panel to the inside since the card base is so dark. Then I had 4 extra leaves that didn’t fit on the front and I thought they looked great along the bottom of the inside. Now it’s all finished.

Here’s a closer look at this cute mouse’s shiny nose and some of the other details too. I love him blowing in the wind. It’s just so cute! Making this mini scene was so much fun!

As I said earlier, I’m entering this card into the Inky Paws Challenge but I’m also entering it into the Simon Says Stamp Instagram Challenge since it fits in the fall category so perfectly.

Have you tried challenges before? I love how they make me think outside the box and look at my stamps differently.

I appreciate you sharing your time with me. Have a fabulous day!

Avery Elle Christmas Kids Card

I am so stinking excited for the newest Avery Elle release! It is amazing and I fully plan to grow my stash each chance I get. First off though, I had to have the Christmas Kids stamps and dies and barely got in the house before I was opening my package! They are so adorable!

Don’t you seriously love them? And that little girl in front with her hot cocoa? She’s the best! This card was really simple. I blended scattered straw distress ink on the card front, darkest at the bottom to light at the top. Then added stick-it adhesive to white cardstock and craft foam; die cut the Plus Frame from it and glued it down. I used my Misti and stamped my sentiment. Next, I stamped, colored and die cut my kiddos, added foam tape to the back and glued them down too. For finishing touches I added glossy accents to the bird’s beak, kiddos glasses and the mug; and also used my Wink of Stella glitter brush on the snow and star.

Here’s a closer look of that glossy shine and glitter shimmer. I love it all! This card is so simple but absolutely adorable! I can’t wait to make a collection of these with different color schemes.

I appreciate you sharing your time with me. Have a fabulous day!

Avery Elle Rainbow Fishes

Happy Friday everyone!!! Thanks for stopping by to check out this fun rainbow fish card featuring Avery Elle That Bites stamp set. I ordered from the new holiday release last week and was impatiently waiting for it to arrive so I pulled out some of my favorites to play with in the mean time.

Here’s how I did it:

  • Ink blended my background, spritzed it with water, die cut a water border from the top and set it aside.
  • I stamped, colored and die cut my fish and then glued them down in rainbow order.
  • Then I stamped my sentiment and popped the whole panel up with foam tape.
  • For finishing touches I added some fun sequins and gems as bubbles.

Super simple idea but I love all of the dimension and color this card holds! Sure to make the recipient smile with all those toothy fish looking at them when they pull it out of the envelope.

I appreciate you sharing your time with me! Have a fabulous day!

Avery Elle Polar Peek-a-Boo Pals Card Set

Hey there! Thanks for stopping by again. I’m still trying to get ahead on my Christmas card making whenever the fancy strikes me and today I’m here to share a set of fun cards I made with the Avery Elle Polar Peek-a-boo Pals and Wonky Frames dies.

I love all of the Peek-a-boo Pals sets Avery Elle has come out with! They are such a fun and different want to create critters doing fun things on cards. Today’s card have them peeking out of picture frames hanging on the walls. Sooo cute! Here’s how I made them:

  • Stamped a wood grain background on an A2 panel and distress inked it for variegated brown tones.
  • Die cut the wonky frames from white, red and green.
  • I took the centers of the white ones and distress inked them, spritzed them with water and heat embossed the snowflakes from the set.
  • I stamped, colored and die cut all of the critters from the set and prepared to assemble my cards.
  • I glued the wood panel to the card base then the outer and inner portion of the white frame down to that.
  • Now I layered the colored frames to the white ones and the critters to the centers for an added layer of dimension. Then finished those up with the piece that makes it look like it’s hanging with the bow tie.
  • For finishing touches on these cards I added glossy accents to beaks, noses, and lights; black glaze gel pen to eyes; and Wink of Stella glitter brush pen to all of the frames.

Here’s a closer look at a couple of the cards. Those little accents add so much interest. I love it!

Have you started making Christmas cards yet? Leave a comment below and let me know.

As always, thank you for sharing your time with me. Have a fabulous day!

The Rabbit Hole Designs September Release – Day 3

Thanks so much for coming back for day 3 of The Rabbit Hole Designs September release inspiration! Today I’ve got 2 cards using the Pumpkin Friends stamp set. They are adorable and so fun to create with!

I am so excited how cool this first card turned out! It’s ooky spooky but cute and fun at the same time! Here’s how I did it:

  • Embossed a spiderweb on a black panel and drug a white ink pad lightly across it for a wispy look. It’s so cool!
  • I stamped and heat embossed the spiders from Boo To You with clear embossing powder. I love this look!
  • Stamped, colored, cut out my pumpkins and popped them up with foam squares.
  • I stamped the sentiment and cut it into a banner shape and popped it up with foam squares as well.

I am so excited about this next card. It’s so much fun and has little hidden element I can’t wait to show you.

  • I blended distress inks on 2 panels and an additional strip – one for the night sky, the other and the strip for the brick wall and spritzed them with water. Then I ran the wall pieces through the die cutter with a brick embossing folder.
  • I stamped, colored and cut my pumpkins and set them aside.
  • On the night sky piece I smooshed versamark embossing ink on the circles and stars stencil and added glow in the dark embossing powder! Such a simple idea but it’s so fun!
  • For assembly I glued the sky to a card base and the brick wall to that. Then popped the brick edge up with foam squares and also popped the pumpkins up with foam above that.
  • Last I stamped and heat embossed my sentiment and cut it into a strip, adhering it with foam tape as well.

Did you know it’s really difficult to take pictures in the dark? Well, it is but here is an idea of what the stars look like glowing above the pumpkins. It is so much fun!

Here are the products I used for these cards. Remember you can head to The Rabbit Hole Designs and Simon Says Stamp for products!

Pumpkin Friends

Circles and Stars Stencil

REMEMBER: Every order placed directly with The Rabbit Hole Designs will be eligible for a 10% discount. Discount Code TRHD2019 this code will only be accepted until Friday 08-30-2019 12:01 am PST. EXCLUDES Dies and Crafters Essentials. Not applicable to previous orders. May be used more than once. Does not apply to shipping and tax.

ALSO, Simon Says Stamp has a gift with purchase for every order that has The Rabbit Hole Designs products in it. This is so exciting!

GIVEAWAY: To celebrate day 3 of inspiration The Rabbit Hole Designs is giving away the stamp sets Pumpkin Friends and Gourd-geous, to One lucky winner. Winner will be chosen at random from the comments left on participating blogs, so make sure to visit each stop and leave a comment. Leave comments by 11:59 pm PST 08-29-2019 on all participating blogs. Winner will be announced on The Rabbit Hole Designs blog 08-30-2019

Be sure to stop by each blog in the list below and comment for a chance to win. Go back and comment on the previous 2 days if you missed those as well! Fun prizes to be won!

Katie
Shanna
Niccole
Amanda S
Amanda W <— You are here!
Lisa
Charmaine
Echo

The Rabbit Hole Designs September Release – Day 2

Welcome back to day 2 of The Rabbit Hole Designs September release. Today I’m sharing a couple of cards with the new set – Pumpkin Hair Don’t Care. This set cracks me up! I hope you enjoy it too.

Here’s how I made the first one:

  • I started with a kraft card base and ink blended a little distress ink on the edges.
  • I took a white strip of cardstock ink blended it, then put the diamond flower stencil over the top and stenciled black distress ink on that and spritzed it all with water. I adhered this directly to the card front.
  • I stamped, colored and cut my pumpkin out with an oval die and popped it up with foam tape.
  • I stamped my sentiment on the top right corner and added a couple of gems to the bottom right corner.

For this next card:

  • I did all my die cutting first – plaid rectangle and nested circles. I cut the white circle using the stamp as a guide so I knew it would still fit when I cut the edge off.
  • I stamped and colored my pumpkin and stamped my sentiment on a flag banner.
  • Next I stared assembly, working my way from the bottom up.
  • For texture I added braided twine down the left side and scattered gems throughout the card.

This set cracks me up and I have so much fun coloring it too!

Here are the products I used for these cards. Remember you can head to The Rabbit Hole Designs and Simon Says Stamp for products!

Pumpkin Hair Don’t Care

Diamond Flower Stencil

REMEMBER: Every order placed directly with The Rabbit Hole Designs will be eligible for a 10% discount. Discount Code TRHD2019 this code will only be accepted until Friday 08-30-2019 12:01 am PST. EXCLUDES Dies and Crafters Essentials. Not applicable to previous orders. May be used more than once. Does not apply to shipping and tax.

ALSO, Simon Says Stamp is having a gift with purchase for all orders that contain The Rabbit Hole Designs products! This is so exciting!

GIVEAWAY: To celebrate day 2 of inspiration The Rabbit Hole Designs is giving away the stamp sets Pumpkin Hair don’t Care and Boo to You, to One lucky winner. Winner will be chosen at random from the comments left on participating blogs, so make sure to visit each stop and leave a comment. Leave comments by 11:59 pm PST 08-29-2019 on all participating blogs. Winner will be announced on The Rabbit Hole Designs blog 08-30-2019

Be sure to stop by each blog in the list below and leave a comment to increase your chances. You can also go back and comment on yesterday’s posts if you missed out too!

Katie
Shanna
Niccole
Amanda S
Amanda W <— You are here!
Lisa
Charmaine
Echo

The Rabbit Hole Designs September Release – Day 1

Welcome to day one of The Rabbit Hole Designs September release inspiration! Today we’re sharing this awesome new witchy set – Hex Yeah! And I’ve got two fun cards to show you.

This first card is a pop-up shadow box which I learned from Jennifer McGuire. Here’s a link to her post so you can see how I created the basic idea and get measurements.

  • After I made the basic pop up card pieces, I ink blended the inside of the back piece and two hills with distress inks and spritzed them with water.
  • I stamped, colored and cut out my images and set them aside.
  • I stamped the bats on the front corners and heat embossed them. I also stamped my sentiment on the hill going on the front before assembling everything.
  • I followed the video for assembly and then glued the hill on the front panel and attached my cat and pumpkin image directly to that.
  • I attached my inside hill and popped my witch up with foam squares and this card is done.
  • It’s so fun because it folds flat for an envelope but pops up and stands on its own when it comes out.

This next card has a little more to it as well but I love the look it gives!

  • I stamped, colored, cut my images out and set them aside while I worked on the card base.
  • I took a white card base and blended distress inks and cut a rectangle out of the center.
  • Die cut two window frames, glued one to the front, added vellum to the inside and glued the second window frame to that for a finished look inside and out.
  • I attached my images to the front of the card along with a grassy border.
  • For the inside, I glued some wood grain cardstock down for flooring, glued my witch so she shows through the window and stamped my sentiment.

Here is a look at the inside of this one. It’s so great! I love the look of the vellum giving you an idea of what’s inside but not totally showing it off.

Here is the new stamp set I used. Remember you can head to The Rabbit Hole Designs and Simon Says Stamp for products!

Hex Yeah

REMEMBER: Every order placed directly with The Rabbit Hole Designs will be eligible for a 10% discount. Discount Code TRHD2019 this code will only be accepted until Friday 08-30-2019 12:01 am PST. EXCLUDES Dies and Crafters Essentials. Not applicable to previous orders. May be used more than once. Does not apply to shipping and tax.

ALSO, Simon Says Stamp is having a gift with purchase for all orders that contain The Rabbit Hole Designs products! This is so exciting!

GIVEAWAYS:
To celebrate day 1 inspiration The Rabbit Hole Designs is giving away the stamp set Hex Yeah to One lucky winner. Winner will be chosen at random from the comments left on participating blogs, so make sure to visit each stop and leave a comment. Leave comments by 11:59 pm PST 08-29-2019 on all participating blogs. Winner will be announced on The Rabbit Hole Designs blog 08-30-2019

Be sure to hop along to each blog in the list below!

Katie
Shanna
Niccole
Amanda S
Amanda W <—You are here!
Lisa
Charmaine
Echo

Rabbit Hole Designs – Doggone it! I fur-got!

Thanks for stopping by! I’m over at The Rabbit Hole Designs today sharing this super fun belated birthday card using Doggone.

Here’s how I did it:

  • Stamped, colored and cut the pups and then set them aside.
  • I diecut the panel, masked and inked it for dirt, grass and sky. Then reversed the mask to stamp the bones and paws around the border.
  • I adhered that to a card base and popped the pups up with foam squares.
  • Last I stamped and heat embossed my sentiments, then cut them into strips. I adhered these with foam strips.

I have so many dog lovers in my life, I might have to “fur-get” someone’s birthday just to use this. Ha! Ha!

Here are the products I used:

Doggone

For more inspiration, updates and news be sure to check these places:

I appreciate you sharing your time with me. Have a fabulous day!