Blog

Christmas in July with Lawn Fawn

I can’t even believe that we’re already half way to Christmas! This can’t be happening and someone needs to slow down the clocks big time! I thought it would be fun to celebrate this little occasion by making a Christmas card and sharing it with you today.

Lawn Fawn has historically been one of my favorite brands, especially for holiday cards so that it what I chose to use.

Here’s how I did it:

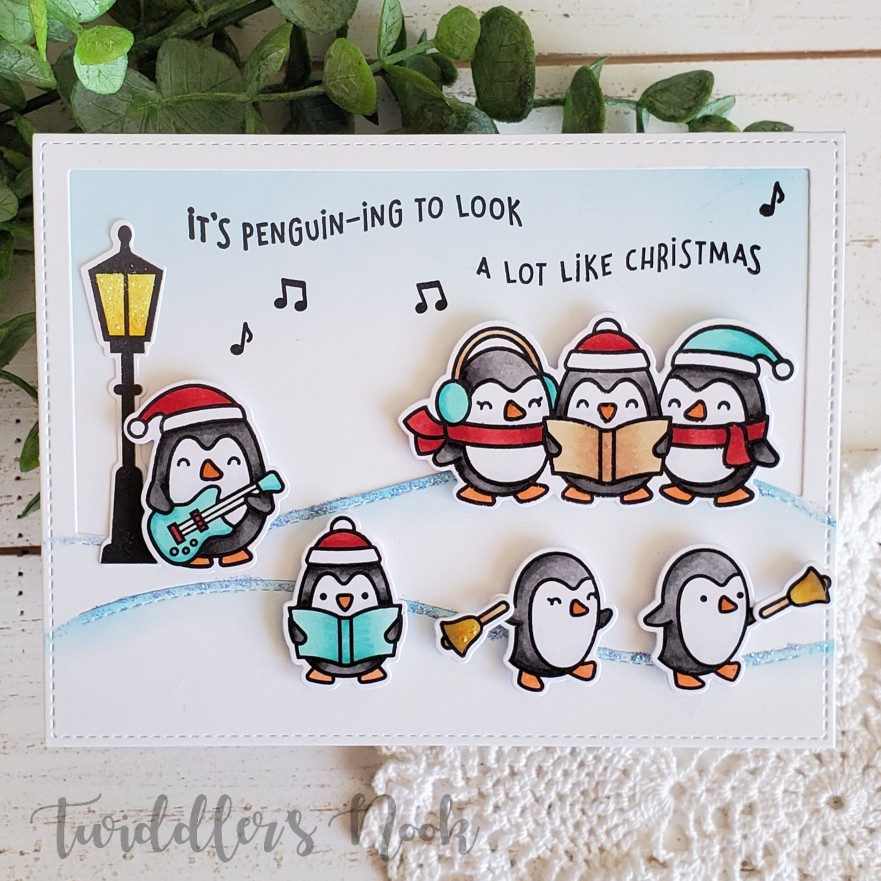
  • Stamped, colored and die cut all my images from Here We Go A-Waddling and set them aside.
  • Die cut the stitched hillside backdrop and inked the hills with distress ink to offset the white a little. I also inked the top of the card front so the sky stands out just a bit.
  • Using the images and hillside as a guide I stamped my sentiment and some music notes in the background.
  • Next I glued the hillside backdrop and light post to the card front and popped up all of the critters up with foam squares.
  • For finishing touches I added glossy accents to all the penguin beaks and bells, Stickles to the hillsides and light, and then Wink of Stella glitter brush to the hats, earmuffs and music books.

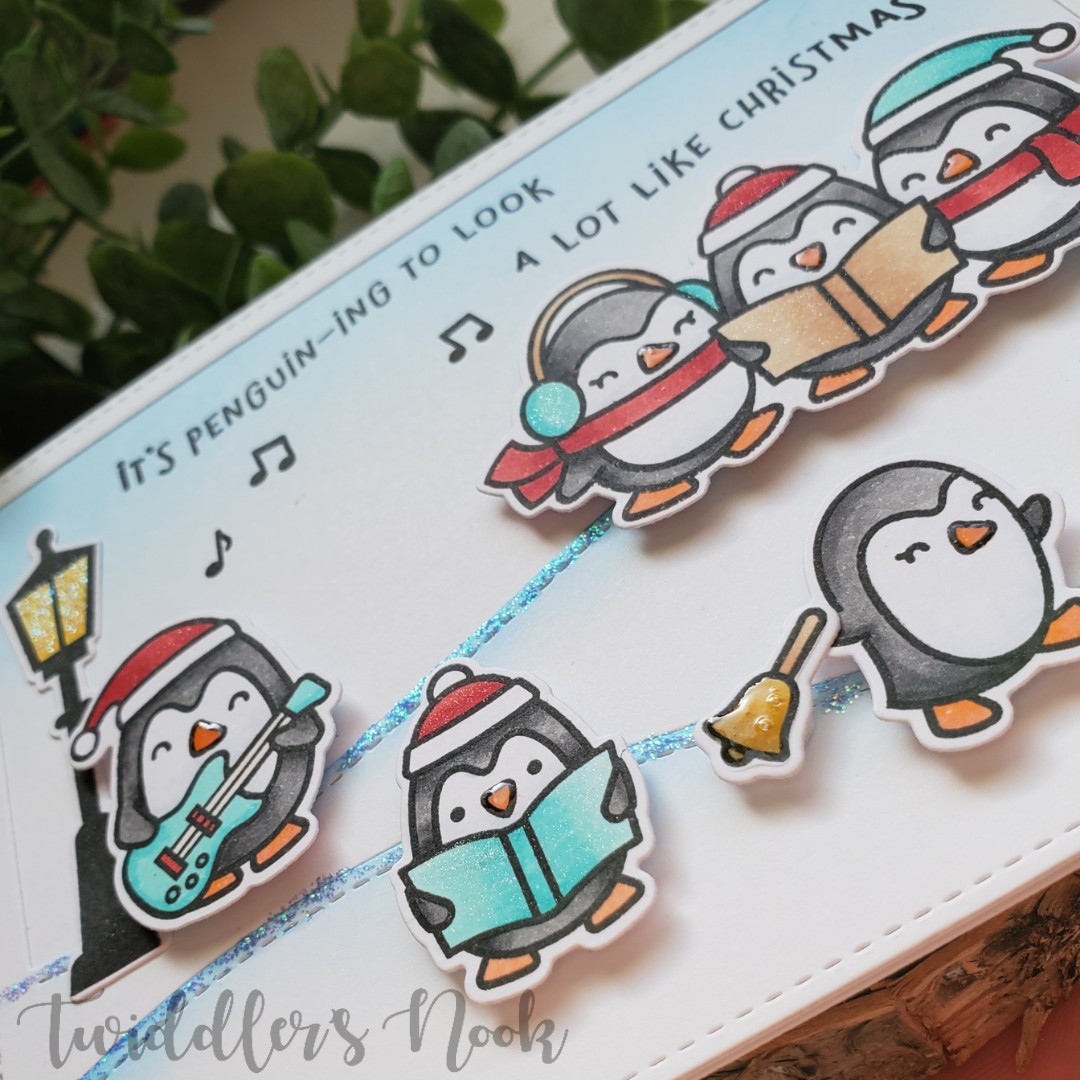
Up close you can see the shine and shimmer from all the little details. This is such a fun card and, dare I say, it got me in the mood to make more Christmas cards ahead of time.

I appreciate you sharing your time with me. Have a fabulous day!

Rabbit Hole Designs Guest Designer – Caffeinated Narwhal Box Card

Welcome back and thanks for stopping by! I’m guest designing for The Rabbit Hole Designs today and so happy to be sharing this awesome Caffeinated Narwhal box card. The Caffeinated Narwhal is available today in the shop so head over and snatch yours up!

Here’s how I did it:

  • I started by die cutting all the pieces I needed.
    • main box card (2) – blue cardstock
    • stitched squares for the small (2) and large (1) flaps – white cardstock
    • stitched square for the back panel – white cardstock
    • stitched hill insert – white cardstock
    • stitched wave insert – white cardstock
    • seaweed, seashells and sea stars – white cardstock
  • Next, I ink blended all of the white cardstock pieces accordingly – blue for the waves and background, brown for the sand and hill, green for the seaweed, orange for the seashells and pink for the sea stars.
  • I cut, stamped and colored my Caffeinated Narwhal and then assembled my box and images.
  • Once it was all put together, I stamped and heat embossed my sentiment on black cardstock and cut it into a thin strip. This is a long sentiment from the Perfectly Blended stamp set so I cut it into pieces so I could fit it on the front flap. I also heat embossed the smaller #stabby from the Caffeinated Narwhal set and attached it to the back panel by the narwhal.

This card turned out so cool! I love how box cards fold up and fit in an envelope to surprise the recipient with 3-D awesomeness! I can’t wait to pop this one in the mail and make someone smile.

For some more inspiration be sure to check out these places:

I appreciate you sharing your time with me. Have a fabulous day!

Flora and Fauna Gnome Life

Today I’m sharing a special card with you. My sister-in-law has a birthday today and I made this card specifically for her and her love of all things gnome. It was just too perfect! Happy Birthday Kellie!!! And here is her card.

Here’s how I made it:

  • Stamped, colored and cut the images and set them aside.
  • On the card base I stamped the two mushrooms from the set in gray ink.
  • I cut a piece of white cardstock and stamped the greenery directly to that and then popped up all the other images with foam squares.
  • I attached the scene to a piece of teal cardstock matching the pot and popped that panel up with foam tape.
  • For finishing touches I added glossy accents to the gnome’s beard and mushroom dots.

This was such a fun card to make and I really think she liked it when she opened it yesterday.

I’ve been having a blast with Flora and Fauna sets lately because they take me outside of my comfort zone and I have to think outside the box. Stay tuned this week for some of Flora and Fauna’s friends swimming through!

I appreciate you sharing your time with me. Have a fabulous day!

The Rabbit Hole Designs Handmade Brew Card Set – Instagram GIVEAWAY

Happy Saturday everyone! Thanks so much for stopping by! Today I’m sharing a simple set of cards I made with a gift with purchase set from The Rabbit Hole Designs called Handmade Brew. I received mine when I made my first purchase with them. Don’t have one yet? Don’t worry, head over to my Instagram where I’m giving one away plus some other fun goodies.

These cards were simple to make. Here’s how I made them:

  • Blended distress inks on the background panel and heat set them.
  • Stamped the coffee cup with versa mark ink on the bottom right corner and heat embossed in white. Then did the same with a different sentiment on each card from Perfectly Blended.
  • Next, I stamped the coffee cup randomly around the rest of the card with versa mark ink and let it dry overnight. This gives a subtle watermark look.
  • I cut a mat for each card in a matching or contrasting color and adhered the layers together. I tied white twine around the bottom portion and glued this whole thing to a card base.
  • For finishing touches I scattered Nuvo Crystal Drops and small heart confetti in matching colors throughout the backgrounds.

These are a super fun set of cards that would be great to give as a gift.

Don’t forget to head over to my Instagram and enter the giveaway. Winner will be chosen Monday, July 22. This giveaway is not sponsored by Instagram or The Rabbit Hole Designs.

For more inspiration, updates and news be sure to check these places:

I appreciate you sharing your time with me. Have a fabulous day!

Rabbit Hole Designs Guest Designer – Caffeinated Narwhal Shaker Card

Hi everyone!!! Thanks for stopping by today! I’m so excited to be guest designing for The Rabbit Hole Designs this month and today I’m sharing this fun caffeinated narwhal shaker card which will be part of the upcoming release on July 24.

Here’s how I did it:

  • Cut 4.25×5.5 inch patterned paper and die cut a scalloped circle from the upper-middle.
  • Add acetate to the back of that piece and then layer foam tape all over except where the window is.
  • Add shaker bits and attach yellow cardstock to the back of that to seal the shaker piece.
  • Stamp, color, cut out narwhal and attach it to the front.
  • Stamp sentiment and cut into a thin strip, adhere it as well.
  • Attach the whole thing to a card base and finish it off with some fun colored crystal nuvo drops.

I love this narwhal! She cracks me up every time I look at her!

For some more inspiration be sure to check out these places:

I appreciate you sharing your time with me. Have a fabulous day!

Spellbinders Small Die of the Month – June 2019

Welcome back! Thanks for stopping by. A few months ago I signed up for the Spellbinders Small Die of the Month Club and have been having so much fun with each one I’ve gotten. It’s a steal of a deal and always fun to get new things to play with! I was so excited for the June release as soon as I saw the sneak peeks. I finally took some time to play with it this weekend and these are the cards I made.

This first design has 4 layers of dies. It feels kind of Moroccan or Indian and I love it! I embossed a black panel and added a strip of the rose gold paper to the left. I heat embossed the sentiment and popped it up with a foam strip. To finish it off I added gems to the middle of the dies and a couple above the sentiment strip.

This style has 3 layers to it. I embossed a gray panel and attached the stacked die cuts. Then die cut the hugs sentiment from black and vellum and glued it down. Last I attached the heat embossed part of the sentiment and finished it off with gems to the middle of the die cuts.

This last style also has 3 layers. I embossed a white panel and attached it to the card front with a strip of green cardstock to the left. Then added the stacked die cuts to that. I added Nuvo Crystal Drops symmetrically on the dies and scattered them on the background as well. The sentiment is heat embossed and popped up, and hugs is die cut from the same green as the strip.

All of the sentiments for these cards came from the Avery Elle Simply Said Hugs set. I love the versatility of this set and use it quite often.

I appreciate you sharing your time with me. Have a fabulous day!

Mama Elephant Stackable Cuties Cards

To be honest, I’ve had these guys in my stash since around Mother’s Day and have been so obsessed with the little agenda critters, I hadn’t used them yet. (Face-palm!) They are so adorable and fun to color! I’m kicking myself for waiting so long. Today I’m sharing a couple of quick and simple cards.

Here’s how I did them both:

  • Stamped, colored and die cut critters.
  • Layered patterned paper, frame and white cardstock on the card base.
  • Using the critter for a guide I colored a little gray copic shadow under it and stamped the sentiment. Then popped the critter up with foam squares.
  • To finish them off, I scattered Nuvo Crystal Drops in coordinating colors across the front.

They are just so cuddly and cute! I can’t wait to make more cards with lots of them stacked up! I feel like this design would be fun to make a whole set of cards to give as a gift too.

I appreciate you sharing your time with me. Have a fabulous day!

Mama Elephant Little Agenda Panda Cards

Today is the last day to enter the Mama Elephant top card challenge and I happened to have a whole bundle of pandas sitting on my desk last night so I made a couple more cards to enter.

This first one uses the hillside cover with different distress inks on each hill. I added pandas galore, stamped a few speech bubbles from stackable cuties and scattered color matching sequins throughout.

Pandas are my absolute all-time favorite animal so I just had to have this set and have been chomping at the bit to play with it!

The next card uses some more pandas from the same set but for a birthday card this time.

For this one I blended distress inks on a panel and sprayed it with water. I stacked 3 of the happy birthday die cuts together and glued it on, popping pandas up with foam squares all about. I finished it off with Nuvo crystal drops in coordinating colors all over.

Let’s be real, I was singing “Everybody was kung-fu fighting…hi-ya!” the entire time I made this card. And giggling…I couldn’t resist. Boy cards can be hard to make but I think this one would work great for that!

I appreciate you sharing your time with me. Have a fabulous day!

Rabbit Hole Designs Current Mewed – Cat

This new stamp set by The Rabbit Hole Designs fits any cat I’ve ever known so perfect. It cracks me up and I had fun playing with it to make this fun card.

Here’s how I did it.

  • Stamped, colored and cut all the kitties and the mouse from Cattitude.
  • Cut a white panel down to 4×5.25, die cut the circles and stamped the sentiment.
  • Ink blended a panel to go behind the circles and glued the two together.
  • Attached that panel to a piece of craft foam and adhered it to a card base.
  • Next I attached all the images to that panel and finished the whole thing off with a scattering of Crystal Nuvo Drops.

Here’s a closer look at the kitties with all their sass. The middle two remind me of my cats. I think next time I’ll color them to match.

For more inspiration, updates and news be sure to check these places:

I appreciate you sharing your time with me. Have a fabulous day!

The Rabbit Hole Designs Pretty in Peonies Thank You Card

Hello again! It’s a flowery kind of day, don’t you think. I’m not typically into flowers but this Pretty in Peony set is just beautiful and I love playing with them. The Rabbit Hole Designs has such a great variety of sets. Be sure to stop by and see what else they have while you’re picking up this beauty!

Here’s how I made it:

  • Stamped and heat embossed flowers and leaves with gold embossing powder.
  • Watercolored with Zig Clean Color Real Brush markers.
  • Stamped my sentiment, scattered some gold jewels about and added washi tape to the edge of the watercolor panel.
  • Mounted the watercolor panel on black cardstock and glued that to a kraft card base.
  • I also stamped the largest peony on the back flap of my envelope in brown ink for a little extra pretty when the recipient opens the envelope.

I just love watercolor flowers! Don’t you? The color variation looks like real flower petals.

Here is the stamp set I used:

For more inspiration, updates and news be sure to check these places:

I appreciate you sharing your time with me. Have a fabulous day!