Blog

Flora and Fauna Gnome Life

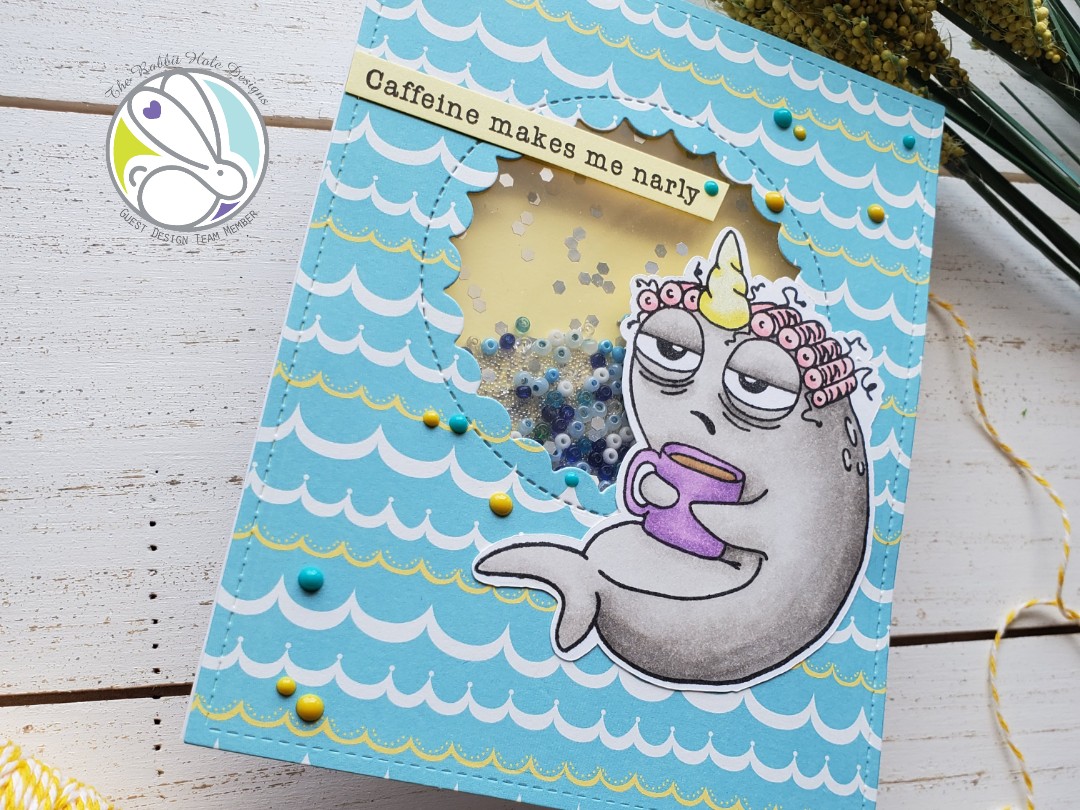
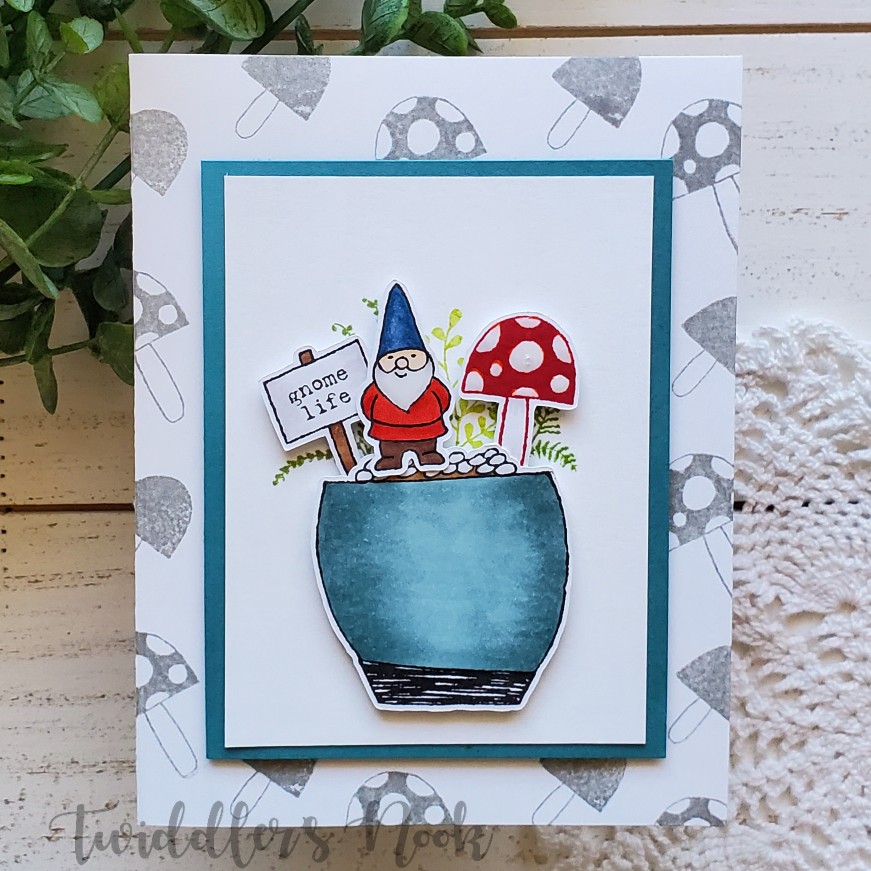
Today I’m sharing a special card with you. My sister-in-law has a birthday today and I made this card specifically for her and her love of all things gnome. It was just too perfect! Happy Birthday Kellie!!! And here is her card.

Here’s how I made it:

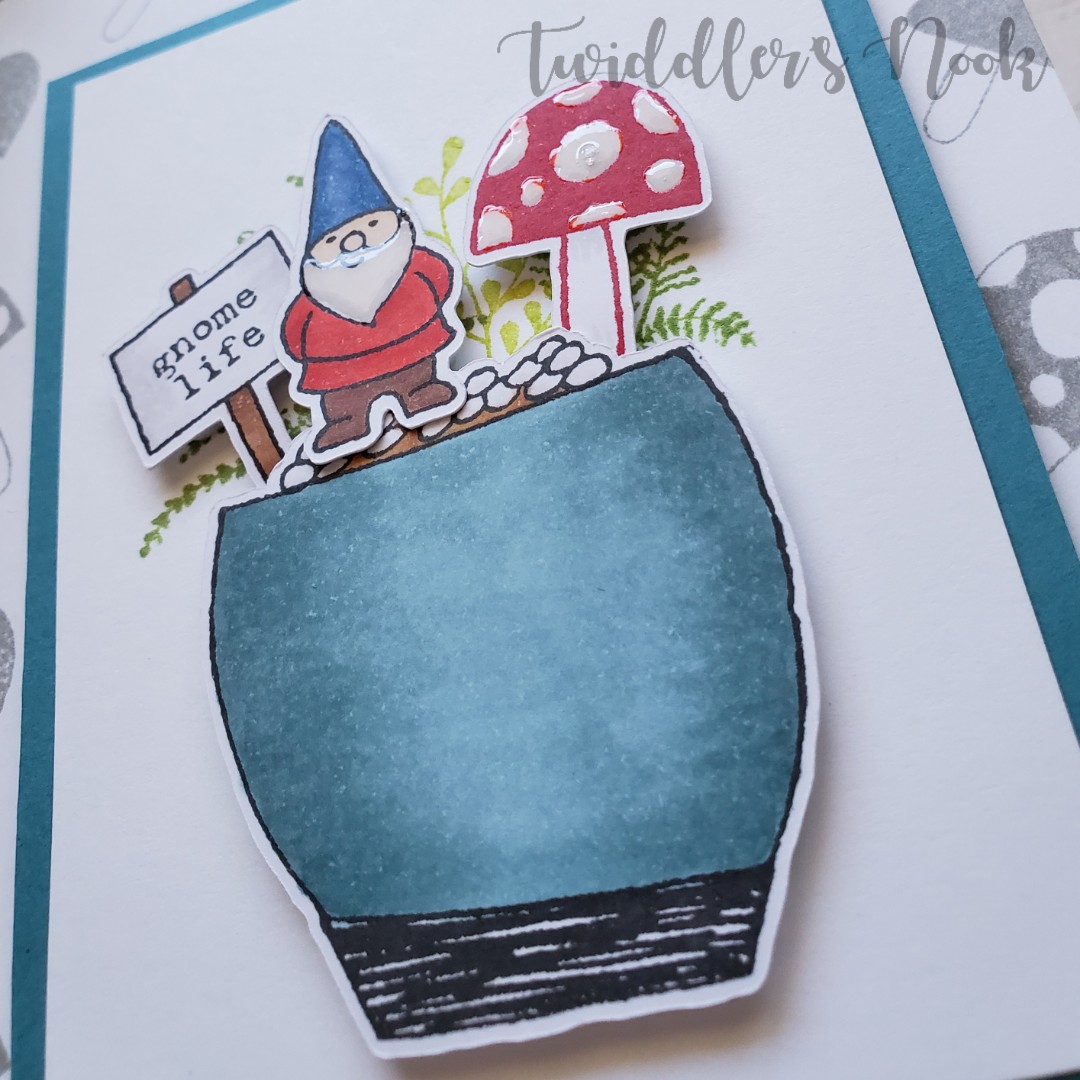
  • Stamped, colored and cut the images and set them aside.
  • On the card base I stamped the two mushrooms from the set in gray ink.
  • I cut a piece of white cardstock and stamped the greenery directly to that and then popped up all the other images with foam squares.
  • I attached the scene to a piece of teal cardstock matching the pot and popped that panel up with foam tape.
  • For finishing touches I added glossy accents to the gnome’s beard and mushroom dots.

This was such a fun card to make and I really think she liked it when she opened it yesterday.

I’ve been having a blast with Flora and Fauna sets lately because they take me outside of my comfort zone and I have to think outside the box. Stay tuned this week for some of Flora and Fauna’s friends swimming through!

I appreciate you sharing your time with me. Have a fabulous day!

The Rabbit Hole Designs Handmade Brew Card Set – Instagram GIVEAWAY

Happy Saturday everyone! Thanks so much for stopping by! Today I’m sharing a simple set of cards I made with a gift with purchase set from The Rabbit Hole Designs called Handmade Brew. I received mine when I made my first purchase with them. Don’t have one yet? Don’t worry, head over to my Instagram where I’m giving one away plus some other fun goodies.

These cards were simple to make. Here’s how I made them:

  • Blended distress inks on the background panel and heat set them.
  • Stamped the coffee cup with versa mark ink on the bottom right corner and heat embossed in white. Then did the same with a different sentiment on each card from Perfectly Blended.
  • Next, I stamped the coffee cup randomly around the rest of the card with versa mark ink and let it dry overnight. This gives a subtle watermark look.
  • I cut a mat for each card in a matching or contrasting color and adhered the layers together. I tied white twine around the bottom portion and glued this whole thing to a card base.
  • For finishing touches I scattered Nuvo Crystal Drops and small heart confetti in matching colors throughout the backgrounds.

These are a super fun set of cards that would be great to give as a gift.

Don’t forget to head over to my Instagram and enter the giveaway. Winner will be chosen Monday, July 22. This giveaway is not sponsored by Instagram or The Rabbit Hole Designs.

For more inspiration, updates and news be sure to check these places:

I appreciate you sharing your time with me. Have a fabulous day!

Rabbit Hole Designs Guest Designer – Caffeinated Narwhal Shaker Card

Hi everyone!!! Thanks for stopping by today! I’m so excited to be guest designing for The Rabbit Hole Designs this month and today I’m sharing this fun caffeinated narwhal shaker card which will be part of the upcoming release on July 24.

Here’s how I did it:

  • Cut 4.25×5.5 inch patterned paper and die cut a scalloped circle from the upper-middle.
  • Add acetate to the back of that piece and then layer foam tape all over except where the window is.
  • Add shaker bits and attach yellow cardstock to the back of that to seal the shaker piece.
  • Stamp, color, cut out narwhal and attach it to the front.
  • Stamp sentiment and cut into a thin strip, adhere it as well.
  • Attach the whole thing to a card base and finish it off with some fun colored crystal nuvo drops.

I love this narwhal! She cracks me up every time I look at her!

For some more inspiration be sure to check out these places:

I appreciate you sharing your time with me. Have a fabulous day!

Spellbinders Small Die of the Month – June 2019

Welcome back! Thanks for stopping by. A few months ago I signed up for the Spellbinders Small Die of the Month Club and have been having so much fun with each one I’ve gotten. It’s a steal of a deal and always fun to get new things to play with! I was so excited for the June release as soon as I saw the sneak peeks. I finally took some time to play with it this weekend and these are the cards I made.

This first design has 4 layers of dies. It feels kind of Moroccan or Indian and I love it! I embossed a black panel and added a strip of the rose gold paper to the left. I heat embossed the sentiment and popped it up with a foam strip. To finish it off I added gems to the middle of the dies and a couple above the sentiment strip.

This style has 3 layers to it. I embossed a gray panel and attached the stacked die cuts. Then die cut the hugs sentiment from black and vellum and glued it down. Last I attached the heat embossed part of the sentiment and finished it off with gems to the middle of the die cuts.

This last style also has 3 layers. I embossed a white panel and attached it to the card front with a strip of green cardstock to the left. Then added the stacked die cuts to that. I added Nuvo Crystal Drops symmetrically on the dies and scattered them on the background as well. The sentiment is heat embossed and popped up, and hugs is die cut from the same green as the strip.

All of the sentiments for these cards came from the Avery Elle Simply Said Hugs set. I love the versatility of this set and use it quite often.

I appreciate you sharing your time with me. Have a fabulous day!

Mama Elephant Stackable Cuties Cards

To be honest, I’ve had these guys in my stash since around Mother’s Day and have been so obsessed with the little agenda critters, I hadn’t used them yet. (Face-palm!) They are so adorable and fun to color! I’m kicking myself for waiting so long. Today I’m sharing a couple of quick and simple cards.

Here’s how I did them both:

  • Stamped, colored and die cut critters.
  • Layered patterned paper, frame and white cardstock on the card base.
  • Using the critter for a guide I colored a little gray copic shadow under it and stamped the sentiment. Then popped the critter up with foam squares.
  • To finish them off, I scattered Nuvo Crystal Drops in coordinating colors across the front.

They are just so cuddly and cute! I can’t wait to make more cards with lots of them stacked up! I feel like this design would be fun to make a whole set of cards to give as a gift too.

I appreciate you sharing your time with me. Have a fabulous day!

Mama Elephant Little Agenda Panda Cards

Today is the last day to enter the Mama Elephant top card challenge and I happened to have a whole bundle of pandas sitting on my desk last night so I made a couple more cards to enter.

This first one uses the hillside cover with different distress inks on each hill. I added pandas galore, stamped a few speech bubbles from stackable cuties and scattered color matching sequins throughout.

Pandas are my absolute all-time favorite animal so I just had to have this set and have been chomping at the bit to play with it!

The next card uses some more pandas from the same set but for a birthday card this time.

For this one I blended distress inks on a panel and sprayed it with water. I stacked 3 of the happy birthday die cuts together and glued it on, popping pandas up with foam squares all about. I finished it off with Nuvo crystal drops in coordinating colors all over.

Let’s be real, I was singing “Everybody was kung-fu fighting…hi-ya!” the entire time I made this card. And giggling…I couldn’t resist. Boy cards can be hard to make but I think this one would work great for that!

I appreciate you sharing your time with me. Have a fabulous day!

Rabbit Hole Designs Current Mewed – Cat

This new stamp set by The Rabbit Hole Designs fits any cat I’ve ever known so perfect. It cracks me up and I had fun playing with it to make this fun card.

Here’s how I did it.

  • Stamped, colored and cut all the kitties and the mouse from Cattitude.
  • Cut a white panel down to 4×5.25, die cut the circles and stamped the sentiment.
  • Ink blended a panel to go behind the circles and glued the two together.
  • Attached that panel to a piece of craft foam and adhered it to a card base.
  • Next I attached all the images to that panel and finished the whole thing off with a scattering of Crystal Nuvo Drops.

Here’s a closer look at the kitties with all their sass. The middle two remind me of my cats. I think next time I’ll color them to match.

For more inspiration, updates and news be sure to check these places:

I appreciate you sharing your time with me. Have a fabulous day!

The Rabbit Hole Designs Pretty in Peonies Thank You Card

Hello again! It’s a flowery kind of day, don’t you think. I’m not typically into flowers but this Pretty in Peony set is just beautiful and I love playing with them. The Rabbit Hole Designs has such a great variety of sets. Be sure to stop by and see what else they have while you’re picking up this beauty!

Here’s how I made it:

  • Stamped and heat embossed flowers and leaves with gold embossing powder.
  • Watercolored with Zig Clean Color Real Brush markers.
  • Stamped my sentiment, scattered some gold jewels about and added washi tape to the edge of the watercolor panel.
  • Mounted the watercolor panel on black cardstock and glued that to a kraft card base.
  • I also stamped the largest peony on the back flap of my envelope in brown ink for a little extra pretty when the recipient opens the envelope.

I just love watercolor flowers! Don’t you? The color variation looks like real flower petals.

Here is the stamp set I used:

For more inspiration, updates and news be sure to check these places:

I appreciate you sharing your time with me. Have a fabulous day!

Lawn Fawn Puffy Stars Wands

Happy 4th of July to all of my American followers! I hope you have a happy and safe holiday!

I love making my own decorations for the 4th. I don’t know why but I’m drawn to them every year. This year I made some wands to display in a jar at the table with our snack food and thought they would be fun to share with you.

Here’s how I made them:

  • Die cut 2 of the largest puffy stars and one of the smallest from all 3 Doodlebug papers that I had.
  • Scored each large star from the point to the indent directly across on all 5 points. Then fold the score lines alternating hill and valley around all of the stars.
  • Hot glued the tips of the coordinating stars together and then hot glued a paper straw inside the bottom of each.
  • Next, I hot glued a contrasting small star to the front of each large star and topped that with a clear sequin and a red gem stone.
  • Last I found some random red, white and blue ribbons in my stash and tied them to the straw for a little extra interest.

Here’s a closer look at the stars where you can really see the layered embellishments.

As a family, we love the 4th and are super excited to bbq, play games outside and celebrate all day long. What are you doing this year? I’d love for you to share in the comments below.

I appreciate you sharing your time with me. Have a fabulous day!

Mama Elephant Panda Thank You Card

We’re chugging along through the week. Thanks for taking a moment to stop in an see what I’m up to. Today it’s a fun distress ink Mama Elephant card featuring the new hilly thanks die and panda stamps. It’s bright and fun and I love how much is going on all over it.

Here’s how I did it:

  • Blended distress inks on a cardstock panel – picked raspberries and salty ocean – and spritz with water.
  • Die cut hilly thanks from the distress ink panel and also from black craft foam. Then glued the thanks hill cardstock and foam together so the bottom part of the card pops up.
  • Glued top and bottom panels to the card front fitting the letters and their negative spaces together.
  • Stamped and die cut pandas and lanterns. Color lanterns yellow – I used Zig Clean Color Real Brush Markers but anything works for this teeny amount of coloring.
  • Adhered these images to the card front with liquid glue.
  • For finishing touches I drew a line connecting the lanterns together, added glossy accents to them for that great shiny look and glued a scattering of confetti bits on the bottom part of the card.

I love the dimension and shadow the black foam gives the hill and letters. Sometimes it’s the smallest things that make such a big impact on the card’s design.

I appreciate you sharing your time with me. Have a fabulous day!