Blog

Avery Elle Cards Featuring Rainbows

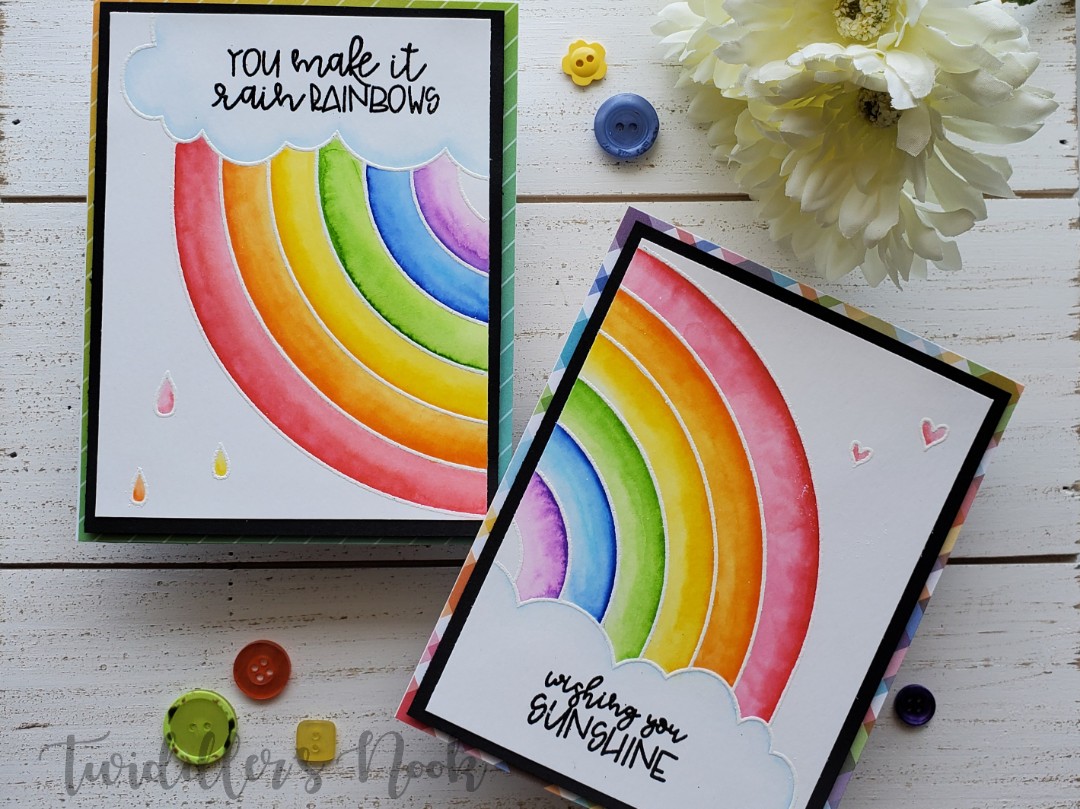
Today I’ve got two simple but vibrant cards featuring the new Avery Elle Rainbows stamp set from the recent release. I absolutely love this set and was fortunate to win their release week giveaway and got to choose it as my prize. It was the one thing I didn’t order ahead of time that I really wanted.

These cards are basically created the same way so I’ll go through it just once. Here’s how I did them:

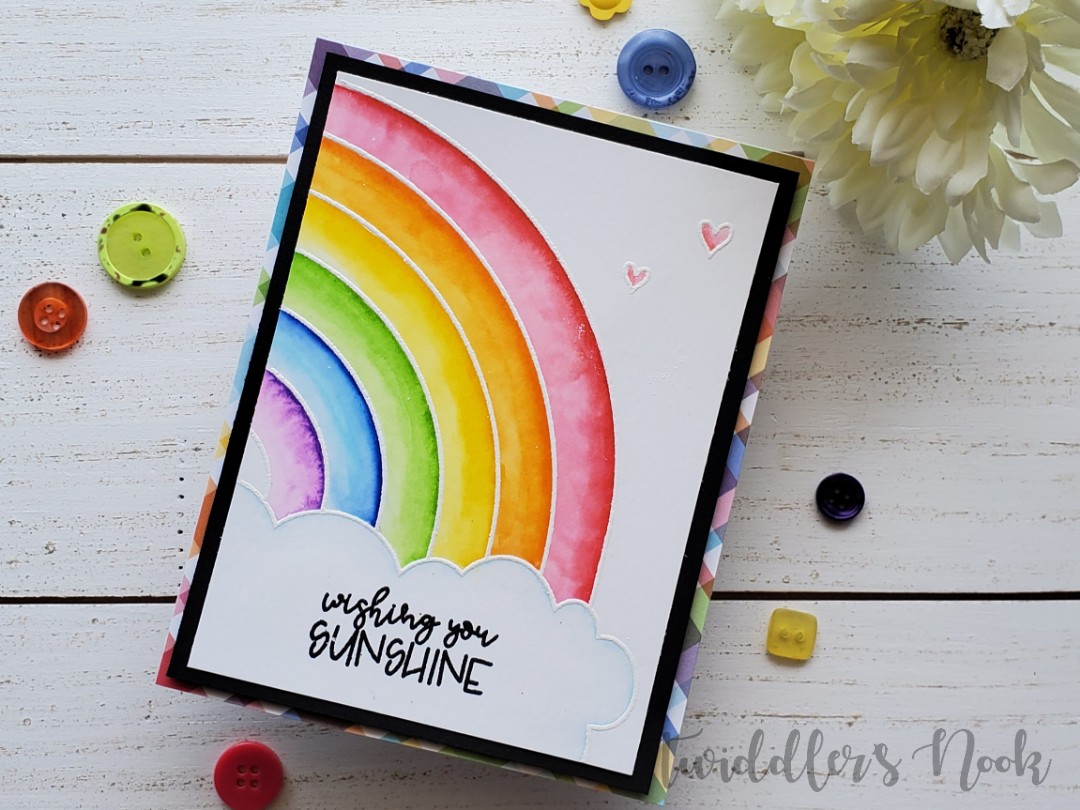
  • Stamped and heat embossed rainbow and hearts or rain drops (depending on which card) with white embossing powder.
  • Stamped and heat embossed sentiment with black embossing powder.
  • Both rainbows are colored with Zig Clean Color Real Brush markers and a water brush pen for the watercolor look. I want to mention that I always use Bristol Smooth Cardstock for these markers. It works perfect for blending and can withstand the water.
  • The rainbow panels were trimmed down to 3.75×5 and adhered to a black cardstock panel measuring 4×5.25.
  • Next I glued a piece of black craft foam that was just smaller than the black cardstock and this whole thing was glued to Lawn Fawn Really Rainbow or Perfectly Plaid paper measuring 4.25×5.5.
  • Last the whole thing was adhered to a card base and set side to dry because I used liquid glue with the craft foam layer.

I love the look of these cards. They are sure to make the recipient smile with the bright watercolor vibe. This Avery Elle set is perfect and I can’t wait to get the coordinating dies to make shaped cards too!

I appreciate you sharing your time with me. Have a fabulous day!

Rabbit Hole Designs Beach Day Cards

Welcome! I’m so excited to be back sharing this set of cards featuring The Rabbit Hole Designs new stamp set Beach Day. The kiddos in this set are adorable and the other images are perfect for setting up scene cards like I’ve done today. I hope you enjoy them as much as I do! Without further ado, let’s look at each card individually.

This first card featuring the little girl and whales from the set is a great thank you card. Here’s how I did it:

  • Stamped, cut and colored images with copic markers.
  • Die cut two wave borders and a stitched hillside border. I inked the top edges of each with distress inks and splattered a darker brown ink on the hillside for a textured sand look. The top of the white panel is inked to give the sky a little dimension as well.
  • Next, I layered all the background pieces together with tape runner and then added my whales, island and bird the same way.
  • I attached the little girl with foam tape so she stands out a bit.
  • The sentiment is stamped with a blue ink so it’s legible but doesn’t take away from the scene.
  • For finishing touches I added glossy accents to the clouds and then sprinkled iridescent glitter on top of it.
  • All done and cute as can be!

I love this boy card. As soon as I saw the birthday sentiment in the set I knew I wanted to make a card featuring just him and that sentiment. Here’s how I did it:

  • Stamped, cut and colored images with copic markers.
  • Die cut wave border, cloud border and two different hillside borders.
  • Inked the hillside and wave borders with distress inks and splattered the sand with dark brown ink again. I spritzed it all with water for a distressed look which does show up nicely on the blue waves. Kind of like bubbles.
  • I layered the clouds, waves and hillsides directly to a teal panel and then added the lighthouse and bird next.
  • I added foam squares to the back of the boy and added him as well.
  • The sentiment is stamped in a blue ink on the clouds.
  • For finishing touches on this card I scattered iridescent glitter in the background for interest and added glossy accents to the boy’s hat and boat.
  • And this sweet card is finished and ready for someone’s special birthday.

I hope you enjoyed these two adorable cards from The Rabbit Hole Designs.

I appreciate you sharing your time with me. Have a fabulous day!

Rabbit Hole Designs By the Shore Window Card

I just can’t get enough of these beachy stamps. I’m so ready for summer and it’s really showing in my craft choices. Today I’m back again with the new By the Shore set from Rabbit Hole Designs.

Card recipe:

  • Stamp and color image with copic markers.
  • Die cut scalloped window from a darker yellow cardstock.
  • Die cut circle window from striped cardstock just slightly bigger than the scallop.
  • To help with alignment I glued the striped and yellow panels together first. Then added foam tape to the back and layered it over the stamped panel so it could be centered. Everything was wonky at this point so I just trimmed off excess yellow and white cardstock from the edges and then layered it onto a card base.
  • The sentiment was stamped in a dark yellow ink on the same yellow cardstock and glued to the front.
  • For finishing touches on this card I scattered Nuvo Crystal Drops in caribbean ocean and dandelion yellow and added glossy accents to the clouds, seashell and sail on the boat.

This is such a sweet card and would be great to encourage someone going through a rough time.

I’ll be back tomorrow with more fun from the most recent Rabbit Hole Designs release!

I appreciate you sharing your time with me. Have a fabulous day!

Rabbit Hole Designs Mermaid Hair Card

I’m back again today with that fabulous Rabbit Hole Designs May release. Today we’re playing with Mermaid Hair. Anyone who knows me, knows how ME this set is! I couldn’t wait to play with it and after this one card, I’m completely hooked!

Card recipe:

  • Stamp mermaid and fish throughout copic friendly cardstock and color them in.
  • Stamp and cut masks for all of your images. I use full-stick post-it notes. They have sticky on the entire back of the sheet and work great.
  • Blend distress inks all over your background. I focused the lightest color in the center, getting darker closer to the edge. Colors used were salty ocean, mermaid lagoon and blueprint sketch. Then spritz with a water sprayer and blot off.
  • Next, the big reveal of taking off all that masking and seeing your beautiful creation!
  • Trim down the mermaid panel to measure 3.75×5. Add a teal mat underneath measuring 4×5.25. Glue together and adhered to a black card base.
  • Stamp the sentiment and heat emboss on vellum. Run the strip through a Xyron sticker maker to cover the entire back with adhesive and adhere to the panel.
  • To finish this card I added Nuvo Crystal Drops in morning dew to the mermaid’s bubbles, the jellyfish and gave all of the fish a bubble or two as well.
  • Inside the black card I added a piece of teal cardstock to have an area to write a message.
  • All finished, beautiful and vibrant!

I’m so in love with this mermaid set! All of the images are just adorable and so versatile. My mind is spinning with many more ideas so stay tuned!

I appreciate you sharing your time with me. Have a fabulous day!

Rabbit Hole Designs By the Shore Card

I don’t know about you but I’m over the moon for the newest Rabbit Hole Designs release. It’s all to die for and I had to have everything! Today I’m showcasing the By the Shore stamp set with a simple and adorable card!

Card recipe:

  • Stamp and color images with copic markers.
  • Die cut image with stitched rectangle and also a larger stitched rectangle from plaid paper.
  • Die cut scalloped frame from contrasting paper.
  • Glue plaid rectangle and frame to a card front.
  • Pop up smaller rectangle with stamped images with foam tape.
  • Embellish with Nuvo crystal drops and glossy accents.

This card is so sweet and simple. I left off a sentiment so it didn’t distract from the adorable image. I’ll add one to the inside when I’m ready to give it away.

I’ve already got another one of these beauties stamped and waiting for color because I loved this one so much!

Be sure to stop by tomorrow to see what other new Rabbit Hole Designs set I’ll be playing with!

I appreciate you sharing your time with me. Have a fabulous day!

Rabbit Hole Designs Caffeinated Flamingo Cards

I’m so excited to share this pair of cards made with The Rabbit Hole Designs Caffeinated Flamingo stamp set. I think it’s so perfect to start the week of with these caffeinated critters because…well, Monday. Ugh. Cheers to more coffee and making it through another week!

Originally, I only had this first card in mind but as I started die cutting, the second one came into my head and I knew I needed to make a pair. Here’s how I made them.

  • Die cut the polka dot cover from white cardstock and layered it over purple.
  • Die cut the whole scalloped frame set in rainbow colors and glued them onto the polka dot cover.
  • Stamped, colored and cut the Caffeinated Flamingo with my Cricut.
  • Stamped and heat embossed the sentiment from the same stamp set and trimmed it into a strip.
  • Die cut two palm trees.
  • The flamingo, sentiment strip and palm trees were all popped up with foam adhesive.

This first card is complete! I love how the bright rainbow colors are totally the opposite of the look on the flamingo.

Here is how I made the second card.

  • The rainbow rectangles are the centers from the die cut frames on the first card and are adhered to a white card base at alternating angles.
  • Die cut two palm trees again.
  • Stamped and heat embossed a sentiment from the Perfectly Blended stamp set and trimmed it into a strip.
  • Stamped #flockstar from the Caffeinated Flamingo stamp set in a pinkish-red ink directly to the card base.
  • The sentiment strip, palm trees and flamingo are adhered with foam adhesive just like in the first card.

Now this one is all finished too!

I love this pair of cards! They are so bright and fun. That flamingo makes me laugh every single time!

I appreciate you sharing your time with me. Have a fabulous day!

Mama Elephant Party Animal Wiper Surprise Card

I’ve been itching to try one of these cards since Mother’s Day when my family surprised me with a huge Mama Elephant haul! I was totally overwhelmed. It was fantastic and I’ve been having so much fun with all of it.

If you’re interested in the basics of the wiper surprise click here to go to the Mama Elephant You Tube page for a tutorial. Otherwise here are the basics on how I created this adorable birthday card.

  • I stamped, colored and die cut all the critters and bigger accessories from the Party Animals stamp set.
  • Cut two panels from the main die in the wiper surprise set. Using a Simon Says Stamp cloud stencil I blended cracked pistachio distress ink on the back panel for a sky effect. Then covered the other panel with mowed lawn distress ink and die cut with a Lawn Fawn grassy border die cut.
  • Following the video, I assembled the basics of the card and wiper mechanism first and then embellished with the critters.
  • Since I used a combination of liquid glue and tape runner, I let it sit for a minute so the glue could dry. To finish it off I added white gel pen accents throughout the images and glossy accents to all the noses, candle flames, stars on the hats and both balloons.
  • The next morning when the glossy accents were dry, I stamped a stacked sentiment on the right side to complete this fun birthday card.

Look at that little chickie popping up when you pull the sides. It’s just to die for! I love this so much, I keep playing with it over and over again.

I appreciate you sharing your time with me. Have a fabulous day!

Avery Elle Peek-a-Boo Scary Pals Card

I’m back and so excited that I had a chance to start playing with the new Avery Elle release!!! For this card I used the Peek-a-Boo Scary Pals stamps and coordinating dies and also the new Peek-a-Boo car stamps and coordinating dies.

To make this card I…

  • Stamped the images, colored them with copic markers and die cut them all out.
  • Blended distress inks on a white panel and small kraft strip and spritzed with water.
  • Trimmed the blue and kraft panels down so I had room to stamp the sentiment underneath and glued them to the card base.
  • Glued down my car, scary pal and accessories and then drew in the balloon strings.
  • Stamped my sentiment on the bottom portion of the card and it’s finished.

I love these monsters so much! It was hard to pick one for this card. I can’t wait to use them all! I hope you enjoyed this card and feel inspired to try something creative.

I appreciate you sharing your time with me. Have a fabulous day!

Avery Elle Peek-a-Boo Pals Card

As I was impatiently waiting for the mail to bring my order from the most recent Avery Elle release I decided it would be so fun to get some Avery Elle stamps and dies out that I already have!

Today I’m using the original Peek-a-Boo Pals stamps and coordinating dies and the circle frames dies as well.

I started by blending peacock feathers and cracked pistachio distress inks on a piece of cardstock, spritzed with water and set aside to dry. Then stamped the critters I wanted to use, colored them with copics and die cut them out. Next, I trimmed down a piece of white cardstock to 4×5.25 and die cut the circle frames from that. I added foam tape to the back of that panel and centered it on the distress inked background. Last I added my peek-a-boo critters with foam tape and stamped a little sentiment from the set on the front. I adhered the whole thing to a side fold card base and it’s ready to go!

I love having cards like these on hand that are versatile and can have a sentiment added to the inside later to match the occasion I’m giving it for.

I love these critters and can’t wait to try this idea with the new scary pals. Stay tuned and I’ll share something fun with those really soon.

I appreciate you sharing your time with me. Have a fabulous day!

CAS Graduation Card

Thanks for stopping by. Today I’m here with a CAS graduation card using Honey Bee Stamps Awesome Sauce sentiment set, Hooray die cut set and Lawn Fawn Hats Off to You stamps and coordinating dies.

I started with a card base and chose my color palette. I took cardstock of the colors I chose and cut thin strips. I didn’t measure them, trying to make them vary in thickness. Somewhere between 1/8 inch and a 1/4 inch.

Then, I put tape runner on the section of the card that I wanted to add my stripes to and laid the strips down, pressing firmly. I trimmed the excess off the edges of the card sides.

Then I die cut the hooray sentiment from blue, gray and white cardstocks to match the stripes and glued the layers together.

I stamped, color and die cut the graduation hat from the Lawn Fawn Hats Off to You set and laid everything out. At this point I decided to add the “You Are Awesome Sauce” sentiment below the stripes.

After stamping the sentiment I glued the hooray down and popped the hat up with foam squares.

This awesome graduation card is finished and so simple to customize for any senior’s school colors.

I appreciate you sharing your time with me. Have a fabulous day!